
Convert Auto R12 system to R134a
Two ways to convert auto R12 system to R134a
How to convert your auto R12 system to R134a
There are two ways to convert your car’s old R12 system to R134a: The factory method and the easy method. The factory method is the best choice because you’ll replace parts that are probably leaking due to age. Plus, you’ll get the best AC performance using the factory method. Unfortunately it’s more costly and time consuming.
First step to convert your auto R12 system to R134a
R134a raises discharge pressure, so it increases compressor work load. Some older compressors can’t handle the increased load. If your vehicle has a Harrison DA6 replace with an HD-6, HR-6, or HR-6HE. If your vehicle has a Ford FX-15 compressor, replace with an FS-10 compressor.
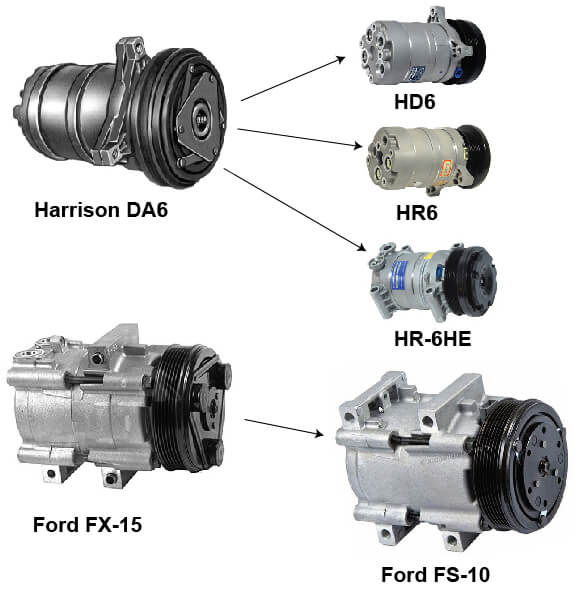
Compressor retrofit
What you need to convert R12 to R134a using the factory method
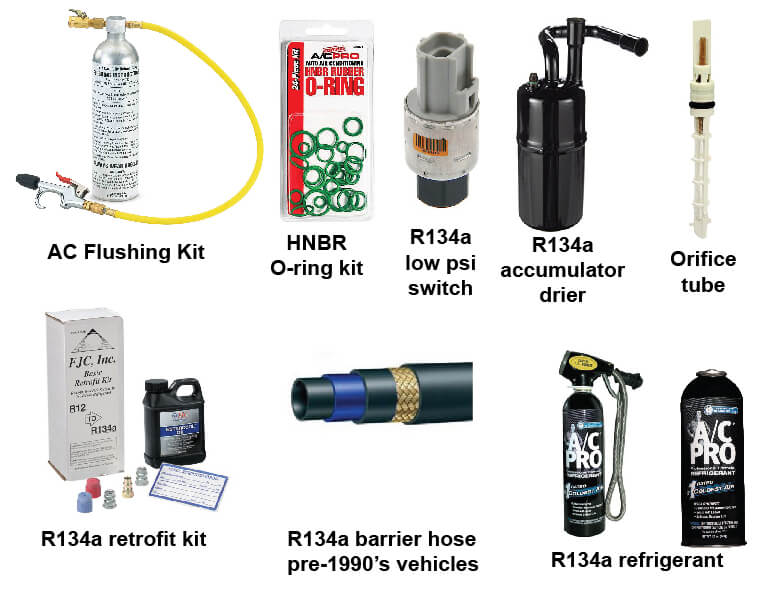
Retrofit parts and supplies
1) AC flush kit
2) Complete HNBR O-ring kit for your vehicle
3) R134a retrofit kit with R-134a port adapters, oi, port caps and retrofit label
4) R134a pressure switches
5) R134a orifice tube
6) New barrier style hoses for pre-1990’s vehicle
7) New R134a accumulator/dryer
Here’s how to convert R12 to R134a with the factory method
1) Discharge the R12 and recover the R12 for recycling.
2) Flush evaporator and condenser with AC flush kit to remove mineral oil
3) Flush AC high pressure and suction lines to remove mineral oil
4) Empty oil from compressor
5) Add specified Ester or PAG oil in the proper viscosity to the compressor, condenser and evaporator.
6) Swap out the high and low pressure switches
7) Swap out the accumulator/drier
8) Swap out the orifice tube.
9) Swap out the hoses if vehicle is pre-1990’s
10) Remove all O-rings and replace with barrier style HNBR O-rings
11) Attach vacuum pump and manifold gauge set and pull a vacuum for 45-minutes minimum.
12) Check for leaks
13) Attach high and low port adapters.
14) Fill with R134a using the retrofit formula/chart below
15) Install the port caps
16) Attach the retrofit label to warn future servicing technicians that the system has been converted to R134a.
Calculate how much R134a to use
Since R134a is LIGHTER than R12, you must convert the charge weight to get the proper charge during your retrofit. Fill the system with 75 to 85% of the factory specified capacity to achieve the best cooling. Use this formula or the chart below. Find the refrigerant capacity for your current system and multiply the R12 charge specification by 0.9 (90%). Then subtract 1/4 (0.25) pound.
R134a doesn’t cool as efficiently as R12, so even when properly charged your system won’t cool as well. Plus, R134a has a lower tolerance for over/under charging. In fact, you’ll DECREASE AC performance by adding too much R134a refrigerant. That’s just the opposite of R12.
R134a retrofit capacity chart
To find the refrigerant capacity for YOUR vehicle, click here.
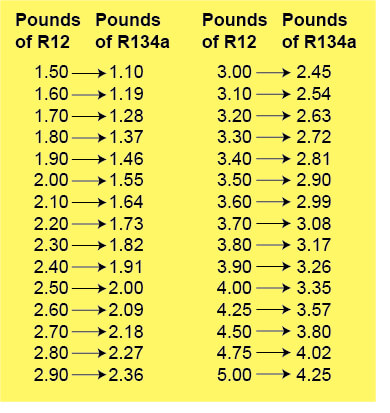
R12 to R134a Retrofit Charge Conversion Chart
What you need to convert R12 to R134a using the Quick/Easy
1) R134a retrofit kit with R-134a port adapters, oi, port caps and retrofit label
2) R134a pressure switches
Here’s how to convert R12 to R134a with the factory method
1) Discharge the R12 and recover the R12 for recycling.
2) Add recommended amount of PAG or Ester oil
3) Swap out the high and low pressure switches
4) Attach high and low port adapters.
5) Attach vacuum pump and manifold gauge set and pull a vacuum for 45-minutes minimum.
6) Fill with R134a using the retrofit formula/chart above
7) Install the port caps
8) Attach the retrofit label to warn future servicing technicians that the system has been converted to R134a.
©, 2018 Rick Muscoplat
Posted on by Rick Muscoplat