
Fix Your Car’s AC with This Step-by-Step Guide
Fix Your Car’s AC System Yourself using This Step-by-Step Approach
I’ll assume you’re here because you added refrigerant, but your car’s AC still isn’t working. You want to diagnose and fix your car’s AC system yourself but don’t know what to do next. That’s what this article is about; helping you with a step-by-step approach. To find the root cause of the problem, you’ll need some special tools. You can’t diagnose an AC system without them! I encourage you to buy the tools based on experience; I’ve seen too many DIYers replace good parts simply because they didn’t do a proper diagnosis.
Tools you need to diagnose and fix your car’s AC system
• An AC manifold gauge set
• A dial or digital probe thermometer
• A digital multi-meter
• Thermocouple thermometers to fit your multi-meter
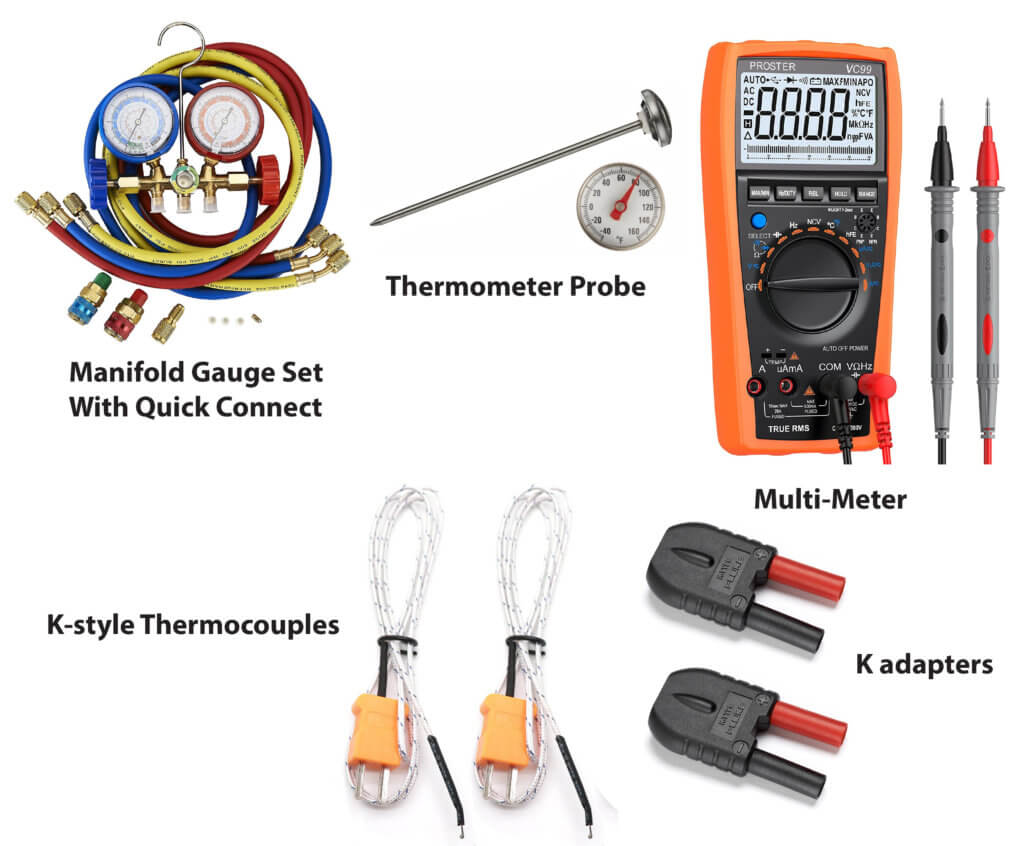
AC diagnostic tools
WARNING: Working on AC can be dangerous. Refrigerant can cause frostbite and blindness if it gets into your eyes. Always wear leather gloves when connecting and disconnecting gauges and charging equipment, and wear eye protection at all times when working with refrigerant.
Disclaimer: My advice is given here. Use at your own risk. If any of these steps conflict with your shop manual or the carmaker’s warnings, follow those instructions/warnings, not mine.
Step 1 to diagnosing and fixing your car’s AC system
Always start with these preliminary AC checks
1) Check the AC condenser for clogged or bent fins
You can’t get cold air if the condenser isn’t cooling the refrigerant. Condensers get clogged with bugs and debris and the fins get bent. That reduces airflow, causing high refrigerant pressure and compressor shutdown. Too many DIYers and even professional techs skip this step. Eliminate a clogged condenser as a possible cause before you check pressures or temperatures.
2) Check the AC condenser fan operation
The condenser fan should be running the entire time the AC is on. Some fans are located in front of the condenser, while others are located on the engine side of the radiator. Some vehicles use a single multi-speed fan that runs at maximum speed when the AC is on or when additional engine cooling is needed. In those applications, make sure the fan is running at high speed when the AC is on. If the fan isn’t working, find out why before you continue.
3) Check the cabin air filter
A dirty cabin air filter restricts airflow, which can cause the evaporator to ice over. When that happens, you just get warm, humid air. Other issues can cause evaporator freeze-up, and I’ll cover those later. But check the cabin air filter first to eliminate a clogged filter as the cause.
4) Check the blend door and actuator operation (heater valve in some applications)
The blend or “air mix” door controls the cabin’s air temperature. If the door is stuck or the actuator isn’t working properly, the AC will cool the air, and the heater core will heat it. This can cause you to mistake a blend door problem for an AC performance issue.
To check the blend door operation or heater valve operation, move the temperature dial to full hot and then to full cold (engine running and AC off). You should notice a rapid change in air temperature. If you don’t, address the blend door or heater valve issue first before suspecting an AC problem.
5) Check compressor clutch operation (for clutch-actuated compressors)
Turn the AC to MAX and start the engine. The center clutch portion of a clutch-type AC compressor should be spinning. If not, see this article to diagnose a compressor clutch issue.
NOTE: Many late-model vehicles use a variable displacement AC compressor. Those units don’t have a clutch; they spin the entire time the engine is running. A valve in the compressor varies how much the compressor outputs. To learn more about variable displacement compressors and to identify a clutch-less style compressor, see this article.
Step 2 Test the AC system’s static pressure
Static pressure tells you whether your car’s AC system has any refrigerant and whether the pressure is high enough to activate the compressor clutch. Perform this test on a cold engine that hasn’t run for at least one hour. NOTE: The test is done using ambient air temperature. If your engine is hot, that heat will skew your results. If you’re testing after running the engine, factor in how much the engine has heated the refrigerant.
1. Record the ambient air temperature near the condenser coil in front of the radiator. (Do not use the weather service temperature—it must be the temperature in front of the condenser!)
2. Connect the manifold gauge hoses to the high and low-pressure ports.
3. Read the pressures for the high and low sides. They should be the same pressure. If not, you’ve got a more serious problem which we’ll cover later.
4. Compare the pressure readings to the static pressure charts below based on the type of refrigerant used in your vehicle (R-134a or R-1234yf).
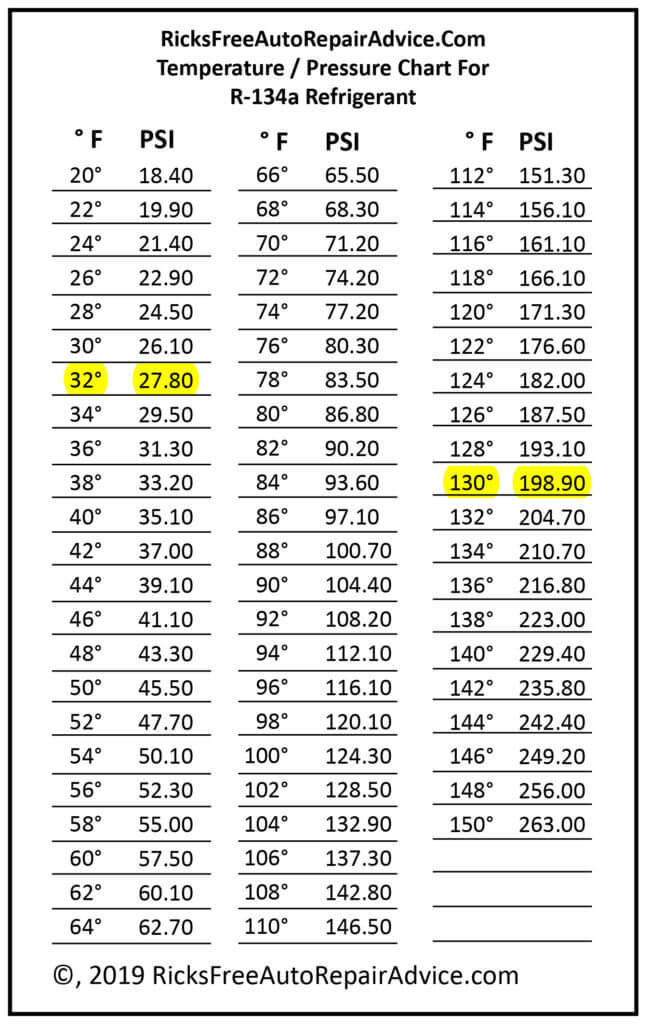
Static Pressure Chart
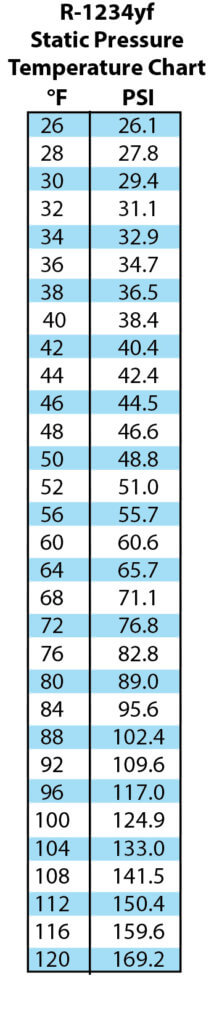
If the static pressure in your vehicle is below the value shown in the chart, the system is seriously low on refrigerant due to a major leak. The compressor will not engage if the pressure is too low. You must fix the leak before proceeding with any further diagnostic.
If the pressure is too high, the system is overcharged, there is air in the system, or the refrigerant is contaminated.
If the gauges aren’t the same during a static pressure test
1) You haven’t waited long enough for the pressures to equalize, or
2) The orifice tube, expansion valve, or compressor reed valves are stuck. Or, there’s a severe restriction somewhere in the system that’s preventing the pressure from equalizing. In that case, you must fix that problem first.
If the system is overcharged, has air in the system, or is contaminated, take it to a shop for a complete evacuation. DO NOT VENT THE EXCESS REFRIGERANT TO THE ATMOSPHERE.
Learn the minimum static pressures needed to activate the low-pressure switch
Each carmaker has its own specs for the low-pressure switch. Here are some typical pressures for the low pressure switch.
• At 34-psi., the switch allows compressor clutch operation but prevents compressor clutch operation at less than 10–psi
• At 47-psi., the switch allows compressor clutch operation but prevents compressor clutch operation at less than 25–psi
If your static pressure is correct, but the compressor clutch doesn’t engage, check the low-pressure switch, compressor clutch fuse and relay, clutch air gap, and clutch coil.
If they’re good.
Adjust compressor clutch air gap
Step 3 Start the AC diagnosis by testing running pressures.
NOTE: If your static pressure is too low to operate the low-pressure switch, you must add refrigerant to operate the compressor. Add just enough refrigerant to get static pressure to where it should be based on the ambient temperature and static pressure charts.
If static pressure is too high, STOP and take it to a shop. It is illegal to vent excess refrigerant into the atmosphere.
1) Set the AC set to MAX and blower on high.
2) Set the mode to recirculate and vents to dash.
3) Close all the windows.
4) Place the probe thermometer in the center air duct.
5)Start the engine and let the AC run for 5 minutes.
6) Record the high and low-pressure readings
7) Record the temperature from the center duct
8) Record the ambient air temperature
Compare your readings to these normal AC gauge pressures
As a very general rule, expect around 27-psi.-3 on the low side and 200 on the high side. The center duct dash thermometer temp should be below 40°F
In a properly operating R-134a AC system, a 27-psi. low side pressure should result in about 32°F at the evaporator (as long as the orifice tube/expansion valve is operating properly and there’s no air in the system that’s artificially inflating the pressure to 27-psi).
High-side pressures usually run 2.2 to 2.5 times the ambient temperature entering the condenser. So, if the ambient temperature is 80°F, you’ll see high side pressures running between 176-psi and 200-psi. on an R-134a system. At 200-psi. the refrigerant entering the condenser will be around 130°F.
| Ambient Temperature | R-134aa Refrigerant Normal Low Side Pressure | R-134a Normal High Side Pressure | R-1234ryf Refrigerant Normal Low Side Pressure | R-1234ryf Normal High Side Pressure |
|---|---|---|---|---|
| 65°F | 25-35-psi | 135-155-psi | 28-38-psi | 135-154-psi |
| 70°F | 35-40-psi | 145-160-psi | 33-43-psi | 145-159-psi |
| 75°F | 35-45-psi | 150-170-psi | 38-48-psi | 149-168-psi |
| 80F | 40-50-psi | 175-210-psi | 43-48-psi | 173-205-psi |
| 85°F | 45-55-psi | 225-250-psi | 49-58-psi | 220-243-psi |
| 90°F | 45-55-psi | 250-270-psi | 49-58-psi | 243-261-psi |
| 95°F | 60-55-psi | 275-325-psi | 53-58-psi | 266-289-psi |
However, humidity also affects pressure and temperature readings
Humidity decreases heat transfer, so “normal” pressures will be higher when the humidity is high. See the chart below.
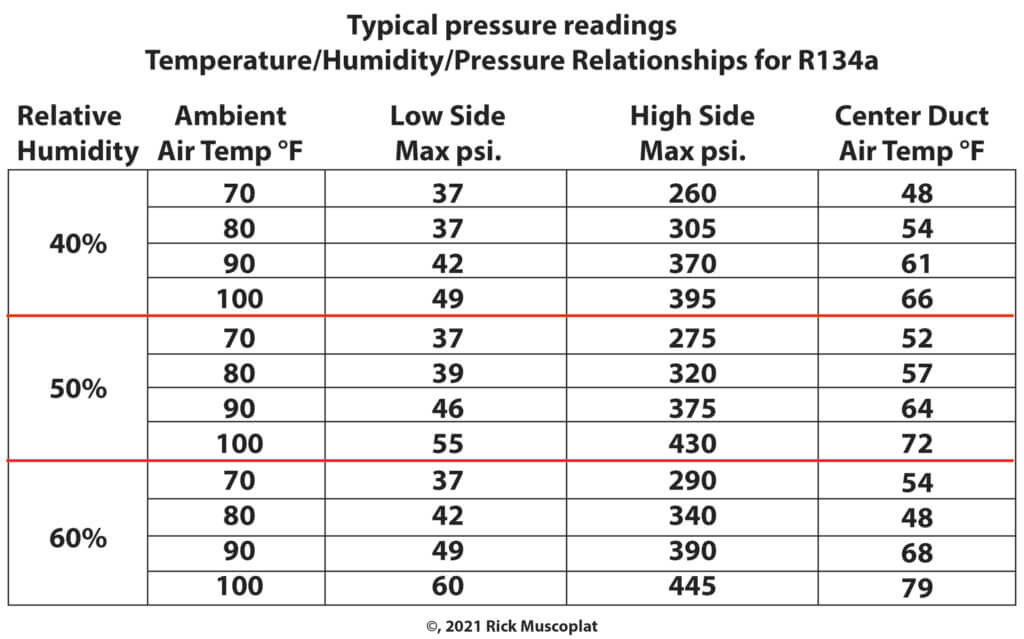
If your AC pressure readings are off
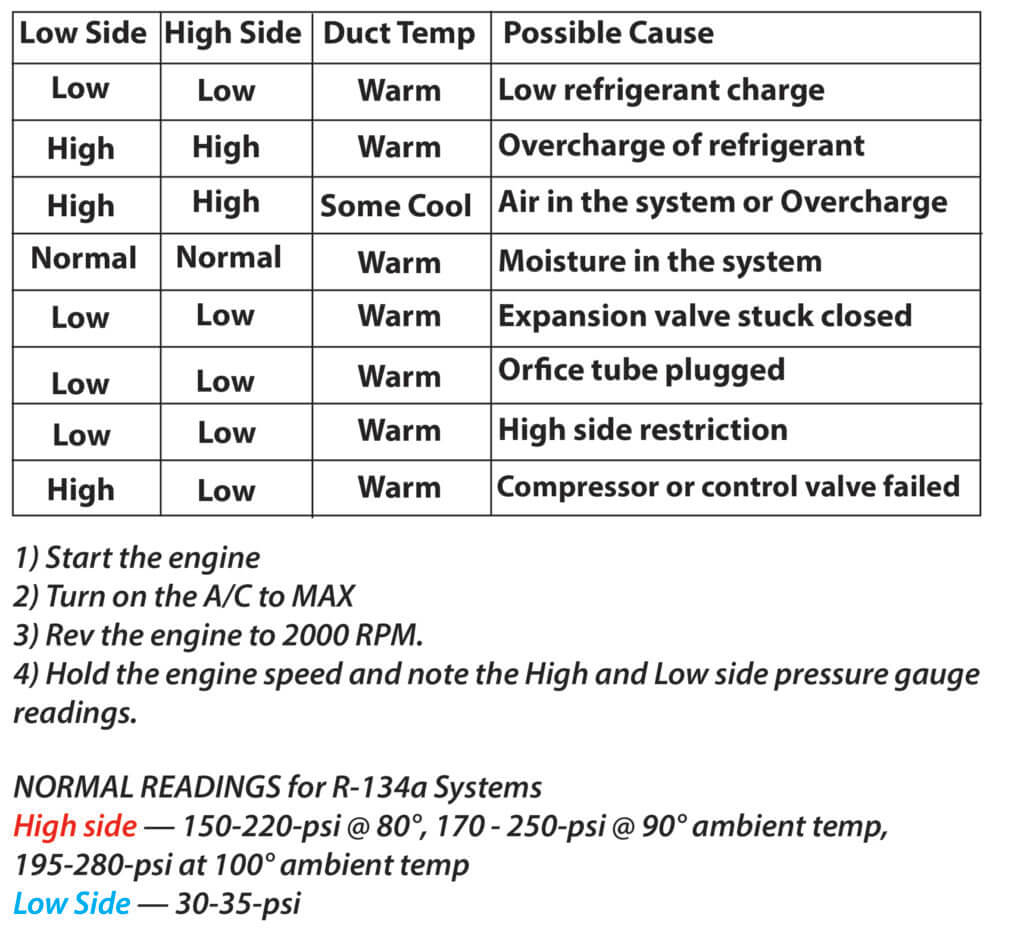
Use your gauge readings and this chart to get a rough idea of what’s wrong so you can fix your car’s AC yourself
Step 4 — If the pressures are off, conduct a heat load test on your car’s AC
For an expansion valve system, conduct a superheat heat load test
For orifice tube systems, conduct a maximum heat load test
Step 5 — Evacuate the system and make the repair based on the test results
Rent or buy a vacuum pump and pull a vacuum on the system. Replace the expansion valve, orifice tube or condenser as indicated by the results of the tests. Add the proper refrigerant oil based on the carmakers recommendations.
Step 6 — Recharge the AC system using a refrigerant scale
The refrigerant charge is based on weight, not pressure. Rent a refrigerant scale and refill the system. Over or under-charging an R-134a by as little/much as 2-oz can dramatically decrease performance.
If you follow these diagnostic steps, you can pinpoint the cause and fix your car’s AC yourself and get cold air again.
For all AC related articles, go to this page
For refrigerant capacities and oil specs, go to this page.
©, 2022 Rick Muscoplat
Posted on by Rick Muscoplat