
Hyundai clicking noise when turning
Diagnose and fix Hyundai clicking noise when turning
The Hyundai vehicles listed below may make a clicking noise when
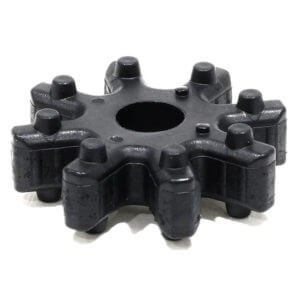
Steering coupler that makes clicking noise when turning
turning the steering wheel. The noise has also been described as a thud. The problem is caused by a flexible rubber coupling. Hyundai has issued a service bulletin 14-ST-002-1 to address the problem on the vehicles listed below. The noise does not affect steering. The new flexible coupling is part # 56315-2K000-FFF
Vehicles affected by Hyundai service bulletin 14-ST-002-1
2011-2014 Sonata (YFa)
2011-2014 Sonata Hybrid (YF HEV)
2007-2014 Elantra (HD, MD/UD)
2009-2012 Elantra Touring (FD)
2013-2014 Elantra GT (GD)
2013-2014 Elantra Coupe (JK)
2013-2014 Santa Fe (NC)
2012-2014 Azera (HG)
2012-2014 Veloster (FS)
Procedure to replace flexible coupling that makes clicking noise when turning
Refer to a shop manual for torque specifications before starting this repair.
1. Remove the motor drive power steering unit (MDPS) assembly from the vehicle
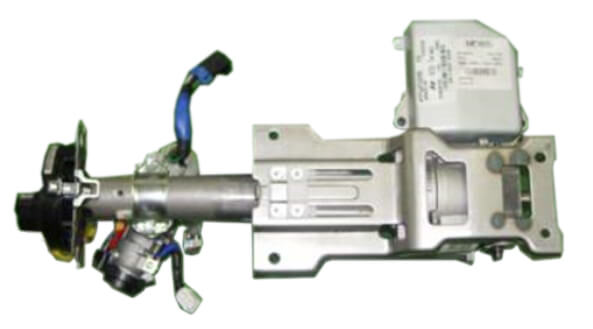
MDPS
CAUTION: Turn the steering wheel to the center position so the front wheels are pointing straight ahead before removing the MDPS assembly. When you reinstall the MDPS unit make sure the steering wheel is aligned to the center position, and that the front wheels are still pointing straight ahead.
2. Remove the 4 steering column mounting bracket upper bolts
3. Raise the steering column mounting bracket and remove the spacer
4. Remove the steering column bracket from the MDPS assembly by loosening the bracket mounting bolt.
5. Set the MDPS assembly upright. Remove the four bolts (I), then separate the upper section from the lower.
6. Remove the wave washer and disconnect the sensor wiring connector.
7. Remove the 3 MDPS ECU mounting bolts.
8. Loosen the 4 MDPS motor cover bolts and then carefully lift off the motor cover.
9. Remove the old flexible coupling and clean out any debris.
10. Install a new flexible coupling. Clean out the coupling seating areas using a compressed air gun. Then remove any residual debris with a brush or clean rags.
Before installing the new part, verify that it has the “4P” marking. – Visually check that the coupler is seated properly before reassembling the motor.
11. Reassemble the MDPS assembly in reverse order of disassembly.
12. Install the MDPS assembly back into the vehicle in reverse order of removal.
13. Conduct the ASP (Absolute Steering Position) calibration procedure according to the applicable service manual.
14. Check and clear any DTCs (Diagnostic Trouble Codes) using the GDS and confirm proper operation of the vehicle.