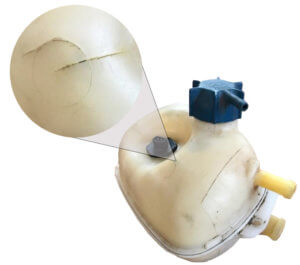
Cracked Coolant Reservoir: Plastic weld it or replace it
Learn how to fix a cracked coolant reservoir
You’ll see lots of online articles on fixing a cracked coolant reservoir using epoxy. Don’t waste your time; that method doesn’t last. Coolant reservoir tanks are made from either low-density polyethylene (LDPE) or high-density polyethylene (HDPE). Polyethylene is considered  a very low surface energy plastic. As such it’s really a non-stick surface and most adhesives can’t wet the surface to make a strong bond. Superglue, epoxy, RTV, silicone seal will not bond well and they definitely won’t last. If you use any of those products, you’ll be dealing with a leaking coolant reservoir tank again. They won’t last! You must use glue designed specifically for LDPE or HDPE or use a plastic welding method.
Which adhesives might work
3M Scotch-Weld DP 8005 Structural Plastic Adhesive is a two-part structural formulation that bonds low surface energy plastics such as polyethylene and polypropylene with other materials, without pre-treating the surface.
The big downside to 3M Scotch-Weld DP 8005 Structural Plastic Adhesive? It’s expensive; around $60 per tube, which is usually more than the cost of a replacement coolant reservoir tank.
First, determine whether your coolant reservoir tank is pressurized
In older vehicles, the coolant reservoir served only as a reservoir to receive and hold expanding coolant from the radiator. As the coolant heated and expanded, a valve in the radiator cap would open and the pressure would force the expanding coolant into the reservoir. As the engine cooled and the coolant in the radiator contracted, it created a vacuum in the radiator. The vacuum would open the valve in the radiator cap, allowing the radiator to suck coolant back in. Those tanks weren’t pressurized and are easier to repair.
Pressurized tanks are used in late-model cars where the radiator cap is actually the reservoir cap. The coolant reservoir tank runs at the same pressure as the cooling system. These tanks can’t be repaired. No adhesive will bond and seal, while also expanding and contracting. You must replace a cracked coolant reservoir that’s pressurized.
Repairing an un-pressurized coolant reservoir tank
• Locate the crack and mark it
• Clamp off the radiator overflow hose and disconnect from the tank.
• Remove the tank from the vehicle and pour out the coolant.
• Wash the tank with a degreaser followed by dishwashing detergent
• Using a soldering gun or iron, melt a “V” down the center of the crack. Then melt plastic • from the sides of the crack and move it across the crack to fill in the “V”. Then apply the 3M Scotch-Weld DP 8005 Structural Plastic Adhesive to the repair.
Coolant reservoir tank replacement cost
Coolant reservoir tank replacement is fairly inexpensive, especially if you can find an aftermarket reservoir. Most coolant reservoir tanks are located in easy to access locations, so replacement is just a matter of clamping off one or to hoses and then removing two or three bolts.
Example: 2010 Mazda CX-7
Mazda OEM coolant reservoir $95
Aftermarket coolant reservoir $25.
Labor approximately 1 hour.
©, 2021 Rick Muscoplat
Posted on by Rick Muscoplat