
Avoid These Brake Job Mistakes for Quieter and Smoother Braking
Avoid these common brake job mistakes when doing your own repairs
The basic disc brake design hasn’t changed much since they were introduced in U.S. in 1949. They still include a rotor and pads. Yet, the original disc brakes didn’t have the noise and pulsation problems we see today. Some of those problems are due to changes in rotor design, while others are due to common brake job mistakes. I’ll cover the top professional and DIYer mistakes that contribute to brake noise and pulsation
Changes in rotor design contribute to the pulsation problem
The original rotor design was a combination hub and rotor, with the wheel bearings housed in the rotor. But modern vehicles no longer use that design. Instead, the rotor sits on the wheel hub and is clamped in place by the wheel and lug nuts.
Anything that prevents the rotor from sitting perfectly parallel with the wheel hub will cause a lack of parallelism, resulting in rotor wobble (lateral runout), which causes disc thickness variation and pedal pulsation.
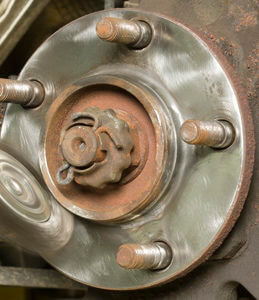
Not cleaning rust off the hub #1 mistake made by DIYers and is the single most common cause of pedal pulsation mistakenly blamed on rotor warp.
As little as .002″ of rust on the wheel hub can cause enough lateral runout to result in pedal pulsation. If there’s rust on the hub 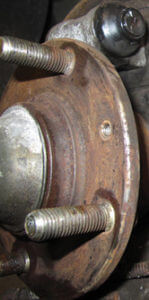 or inside the hat of the old rotor, you simply can’t get a perfect fit. Use a wire wheel or polishing pads to remove all rust from the hub and rust from the inside hat of an old rotor.
Not replacing anti-rattle clips and shims
Even though the clips and shims may look like they’re in good condition, DON’T REUSE them. Over time and with heat, the clips can lose their spring tension and the multiple layers of the noise reduction shims can degrade. Clips and shims are cheap. If you bought a real set of premium brake pads, they usually come with new clips and shims. USE THEM!
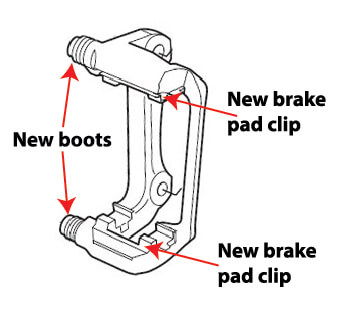
Apply brake grease to cleaned pad clip areas to reduce rust jacking. Then install brake pad clips and new boots
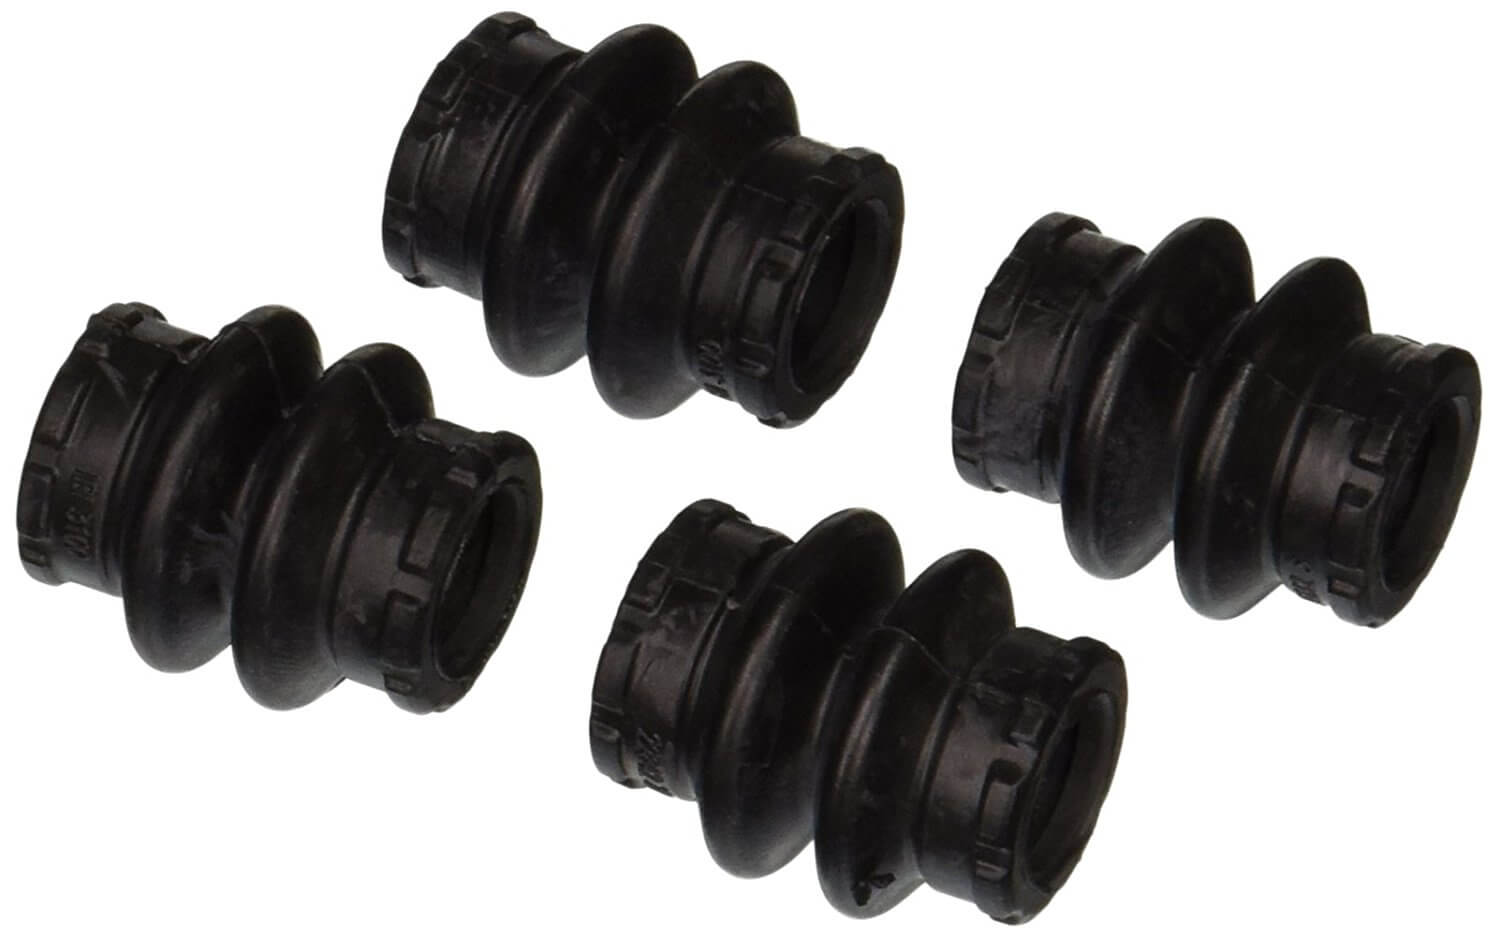
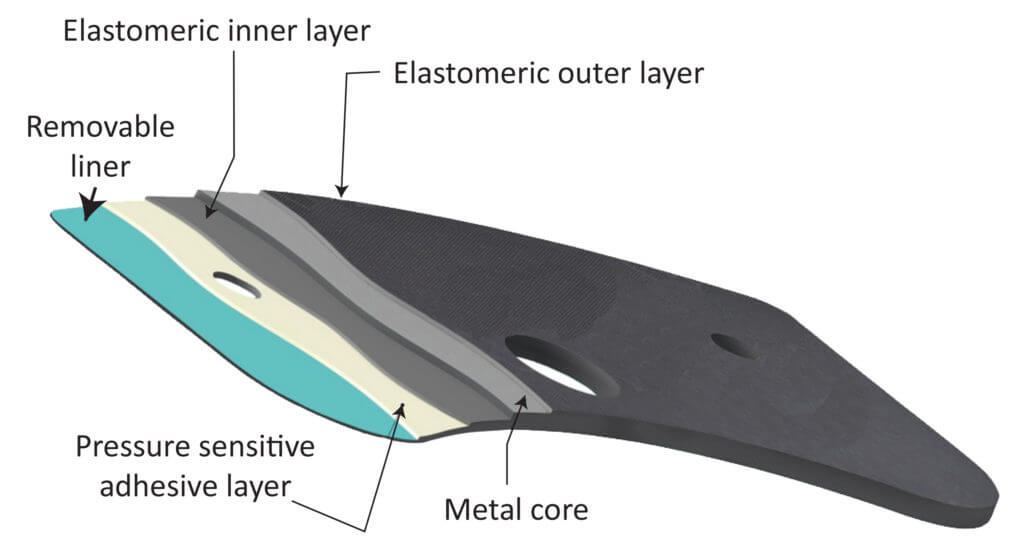
Reusing old cracked and torn caliper slide pin boots
Caliper slide pin boots keep water out of the slide pin bores
Caliper pin protective rubber boots
and prevent rust that can seize the caliper and cause brake pull and premature and uneven brake pad wear. Caliper slide-pin boots are cheap, usually less than $9/set. If you really want to keep your calipers moving smoothly, replace the boots with every brake job.
Not lubricating the caliper slide pins is a common brake job mistake
That old grease has be subjected to high heat. It needs to go. Wash out the old grease using brake cleaner. Wipe out the bores. Then add new high temperature brake grease to the slide pins.
Reusing old corroded slide pins is another common brake job mistake
How many times do I have to say this? Don’t reuse
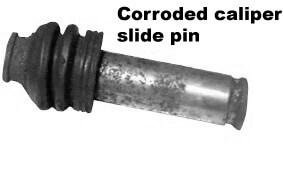
Corroded caliper slide pin
old rusted or degraded hardware. That includes rusted caliper pins. You can buy new ones at any auto parts store. They’ll keep your calipers moving smoothly.
Over 55% of all brake pads sold in North America are made by offshore companies and resold by importers and auto parts store under various private label names. None of those importers or retail sellers are actual manufacturers, nor do they possess the quality testing laboratories to ensure the products they sell are top quality. They can order the products in custom printed boxes labeled “PREMIUM BRAKE PAD,” but with NO Federal Safety standards in place, you could be getting garbage brake products and pay the same price or more than a well-known national brand.
Multi-layer brake pad shim
Letting the brake caliper dangle which you replace the pads
Grab some wire, even a coat hanger and suspend the brake caliper from the strut or spring to remove stress from the flexible brake hose. If you really want to ruin the brake hose, let the caliper dangle under its own weight.
Not cleaning the rotor with soap and water
This is a fairly new recommendation and you may think it’s stupid.
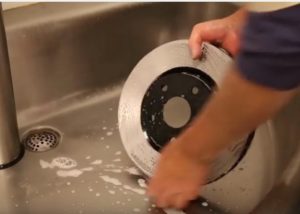
Prepare new brakes rotors by washing with hot soapy water and a brush
But cleaning a new brake rotor with brake cleaner alone leaves metallic residue on the rotor that embeds into the new brake pads and contaminates the new brake job. I’m serious about this. Read this post to see images of how much extra metallic residue comes off the rotor when it’s washed with hot soapy water versus just brake cleaner.
Retracting the caliper piston without flushing the fluid
When you push the caliper piston back into the bore without cracking the bleeder screw, you’re forcing sediment at the bottom of the caliper bore backwards into the ABS valves. The proper way to retract the piston is to connect a rubber or vinyl hose to the bleeder screw and route the open end into a catch bottle. Crack the bleeder screw open and then retract the piston. Close the bleeder as soon as the caliper piston bottoms out.
Not greasing the pads
Brake grease is a critical component to reduce noise, vibration and harshness. Most car makers recommend applying molybdenum grease to the back of the backing plates/shims where they contact the caliper fingers and piston. They also recommend applying brake grease in the anti-rattle clips to allow pad ear movement. Skip the grease and you’ll wind up with squeals and rattles.
Not installing wear sensors
Many time the wear sensors are packaged separately and must be clipped onto the brake pad. They’re an important warning device and must be installed with new pads. Note the location of the wear sensor on the old pads and install the new clip and pad in the same location (HINT: It’s usually on the inboard pad).
Not following the torque specs
Many new car makers are using torque-to-yield caliper to bracket bolts. These are ONE-TIME use bolts. You MUST replace them; they can’t be reused. Always use a torque wrench when reinstalling caliper and caliper bracket bolts. Overtightening these bolts, especially on newer cars with magnesium/aluminum steering knuckles can cause stripping and other damage.
Not using thread locker or not using it properly
Most car makers apply thread locker to the large bolts that hold the caliper bracket in place. Since you usually have to remove the bracket to replace the rotor, those bolts have to come out. Do not simply reinstall them without first cleaning off the old thread locker with a wire brush and then reapplying the correct thread locker (usually removable blue).
Not using a torque wrench to tighten lug nut
As I said above, the rotor must sit perfectly parallel with the wheel hub. If you don’t use a torque wrench to tighten the lug nuts, you’ll have uneven clamping pressure on the rotor hat. That will cause induce lateral runout.
Not checking for wheel bearing play
A worn wheel bearing will cause the rotor to run out of parallel with the steering knuckle and it’s the steering knuckle that’s holding the caliper bracket and caliper. A worn wheel bearing will also cause lateral runout, which causes disc thickness variation and brake pedal pulsation.
Many brake pad backing plates fail well before the friction material wears out. See this post to learn why that happens and how to avoid it.
You simply don’t know which manufacturer made the brake pads that are packaged under the store’s brand name, nor do you know if they’re actually made from premium materials. See this post on how to buy the best brake pads
The same applies to rotors. There are LOTS of substandard rotors on the market today and the low quality directly affects braking ability and brake job life. See this post on how to choose a brake rotor.
Don’t know whether you should reuse your old rotors? See this post on how to tell
©, 2019 Rick Muscoplat
Posted on by Rick Muscoplat