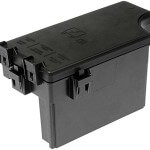
P1128 Chrysler Dodge
Fix code P1128 Chrysler or Dodge
Getting a P1128 trouble code on a Chrysler or Dodge product may lead you to believe you’ve go a bad thermostat or engine coolant temperature sensor because P1128 is:
P1128 Closed loop fueling not achieved Bank 1
The symptoms appear as hesitation, stalling, misfire. The stalling may be intermittent and can sometimes happen when the transmission is shifting gears, or when switching from drive to reverse. If you have a scan tool attached when this happens, you can sometimes notice a bad signal coming from the cam/crank sensors.
The PCM looks to the oxygen sensors to determine when they’re up to operating temperature before the PCM can shift from open loop (factory programming) to closed loop (running off of sensor data). Because a cold engine blows cooler exhaust, manufacturers add heaters to the oxygen sensors to heat them up quickly so the PCM can get into closed loop faster. The heaters also help keep the oxygen sensors at the proper temp during idle.
MOST COMMON CAUSE IS A BAD O2 SENSOR OR CORROSION ISSUE. SEE THIS POST
The PCM is also reading the results from the engine coolant temperature sensor. If the thermostat isn’t operating properly and is stuck open, the engine won’t get up to operating temperature. This scenario is slightly different than a P1128 code, because a low temperature would affect both banks. And, there’s only one temperature sensor on these engines. So a P1128 code would lead you to believe that the oxygen sensor on Bank 1 (the bank with #1 cylinder) isn’t warming to operating temp properly. Well, that could be the case, BUT, it also might be something else.
Shops are reporting problems with the alternator disrupting sensor signals in Chrysler and Dodge products. Plus, these vehicle use a Totally Integrated Power Module

Totally Integrated Power Module
to do all the power switching. This is a smart fuse box and relay center that operates relays via digital commands. The problem comes in when these TIPMs corrode due to road salt intrusion. It’s a huge problem for vehicles with TIPMs. So you’ve got a whole host of possibilities here. Here’s where to start your diagnosis.
1) Measure battery voltage at the terminals and at the PCM. If you’re not getting full battery voltage, that can cause all kinds of trouble codes. Test the battery with a battery load tester.
2) Check for alternator ripple. Set an automotive digital multimeter on AC and connect to battery terminals. Maximum acceptable reading is 0.2 volts AC.
3) Charge the battery with a battery charger. Then disconnect the large power out cable from the alternator and insulate it. Then disconnect the electrical connector. Drive the vehicle and see if the problem goes away. If so, suspect either AC ripple noise or bad voltage regulation, which would require a new PCM.
4) Check the TIPM for corrosion and the wiring harness for breaks.
5) Check the accelerator pedal position sensor for breaks or corrosion.
6) Check the wiring harness that runs from the TIPM to vehicle interior. Check the harness inside the driver’s wheel well area.
7) Remove and check the connectors at the cam/crank sensors. Replace with new pigtails if you see corrosion.
8) Are you using factory spark plug wires? If not, check resistance on spark plug wires. Wires should test at 5,200-19,000 ohms, depending on length. Low resistance wires can cause interference. Install factory wires and see if the problem goes away
©, 2015 Rick Muscoplat
Posted on by Rick Muscoplat
