
Step-by-Step Car AC Diagnosis and Repair Guide
How to Fix Your Car’s AC Using a Step-by-Step Diagnosis Method<h2
Quick Summary
If you’re trying to fix your car’s AC, don’t assume it’s simply low on refrigerant. In my experience, most air conditioning problems fall into one of four categories:
• Refrigerant leaks
• Airflow problems
• Electrical or compressor failures
• Restrictions inside the AC system
The fastest and least expensive repair comes from diagnosing the system in the proper order rather than blindly replacing parts or adding refrigerant. In this guide, I’ll show you the same systematic process I use to diagnose your car’s AC, identify why your AC isn’t blowing cold air, and determine the correct repair before spending money on unnecessary parts.
The Tools You’ll Need to Diagnose Your Car’s AC Problems
• Manifold gauge set (mandatory)
• Digital thermometer or duct thermometer — You can use a digital kitchen thermometer or even an analog unit as long as it goes down to 30°F
• Digital Meter and thermocouple, or if you already own a meter that can accept a “K” style probe, all you need is the probe add-on
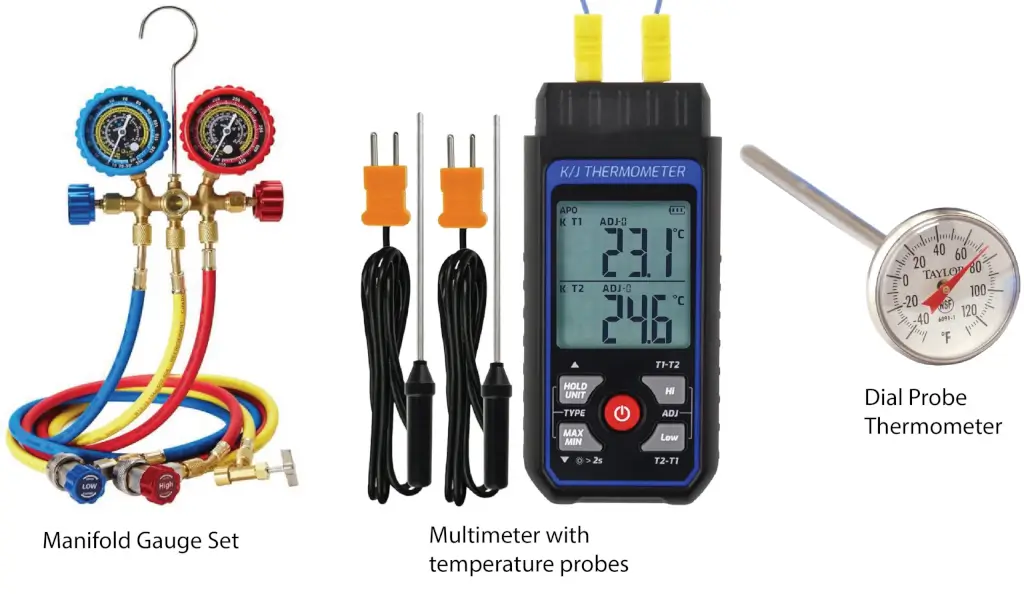
This image shows the tools you need to diagnose your car’s AC system
Step 1: Check the AC condenser and condenser fan first
Before I hook up any tools, I always check the condenser condition and condenser airflow. This step alone eliminates a huge number of misdiagnoses.
If the condenser is clogged with debris or the cooling fan isn’t working, the system can’t reject heat. That causes high pressure and poor cooling, and many people mistake that for a bad compressor.
Condensers get clogged with bugs and debris, and the fins get bent. That reduces airflow, causing high refrigerant pressure and compressor shutdown. Too many DIYers and even professional techs skip this step.
Stop Guessing—Start Testing
One of the biggest mistakes I see is someone buying a recharge kit the minute their AC quits blowing cold. Sometimes that works—but it’s only temporarily. The warm air comes back, and the fact that you never fixed it right the first time will come back to haunt you.
Why recharge kits don’t work
Refrigerant doesn’t wear out or get used up. If your system is low, it’s because your car’s AC system has developed a leak. Not only did some refrigerant leak out, but some lubricating oil as well. Worse yet, air and moisture got into the system, and those are system killers. Moisture combines with refrigerant oil to create acids that attack the compressor, condenser, expansion valve, and evaporator from the inside.
A recharge kit doesn’t fix the leak, doesn’t replace the lost oil, and can’t negate the effects of air and moisture. The kits just give you a false sense of security, lulling you into running the compressor when it’s low on oil and as moisture turns the remaining oil into sludge and acid.
That’s why I never start by adding refrigerant.
Step 1 — Eliminate Airflow Problems First
This is the step that countless DIYers—and even some professional technicians—skip. Yet it’s responsible for many unnecessary compressor replacements.
1) Inspect the Condenser — If the condenser can’t release heat, refrigerant pressure climbs until cooling performance drops or the compressor shuts off. In other words, if air can’t pass through it, you won’t get cold air. Even partial blockage can dramatically reduce cooling. Look for blockage from:
• Leaves
• Plastic bags
• Dirt
• Cottonwood fuzz
• Bent fins
• Impact damage
2) Verify the Cooling Fans Work — If the radiator fans don’t work, you’ll get some cooling at highway speeds, due to “ram air,” but little-to-no cooling at idle.
• Turn the AC to MAX.
• Watch the radiator fans.
• They should begin operating almost immediately.
Many vehicles have:
Dual electric fans
Multi-speed fans
Variable-speed fans
If one fan isn’t operating—or both are running at low speed—the condenser won’t receive enough airflow. Fan failure is common! Don’t assume yours work without checking.
3) Check the Cabin Air Filter — A clogged cabin air filter is responsible for countless AC complaints because it restricts airflow across the evaporator.
Symptoms include:
• Weak airflow across the evaporator and through the dash vents
• Poor cooling
• Foggy windows
• Evaporator icing
Replacing the filter often restores airflow immediately.
4) Test the Blend Door— The blend door controls the temperature of the air coming out of your vents. Your car’s AC may be producing ice-cold air, but if the blend door is stuck on hot, you’ll get warm air from the vents. s
To test the blend door:
Move the temperature control from full hot to full cold. Watch the blend door actuator and listen for:
• Actuator movement
• Clicking noises
• Delayed operation
If the outlet temperature barely changes, diagnose the blend door before continuing with AC testing.
Step 2 — Check Static Refrigerant Pressure Before Starting the Engine
This is one of the most important early steps when you’re trying to diagnose your car’s AC, yet it’s often skipped by DIYers eager to hook up a recharge can.
Static pressure tells you two important things:
1) Whether the system contains enough refrigerant to override the low-pressure cutoff switch and allow the system to activate the compressor clutch or variable-displacement compressor flow valve
2) Whether the system is empty
How to Check Static Pressure
• Park the vehicle in the shade if possible.
• Measure the ambient temperature away from the vehicle
• The test is done with the engine off. If you’ve run the AC recently, let the AC system sit for at least 15 minutes so pressures can equalize.
• Connect your manifold gauge set to the high- and low-pressure service ports.
• Compare both gauge readings to the ambient temperature using the static pressure/temperature chart.
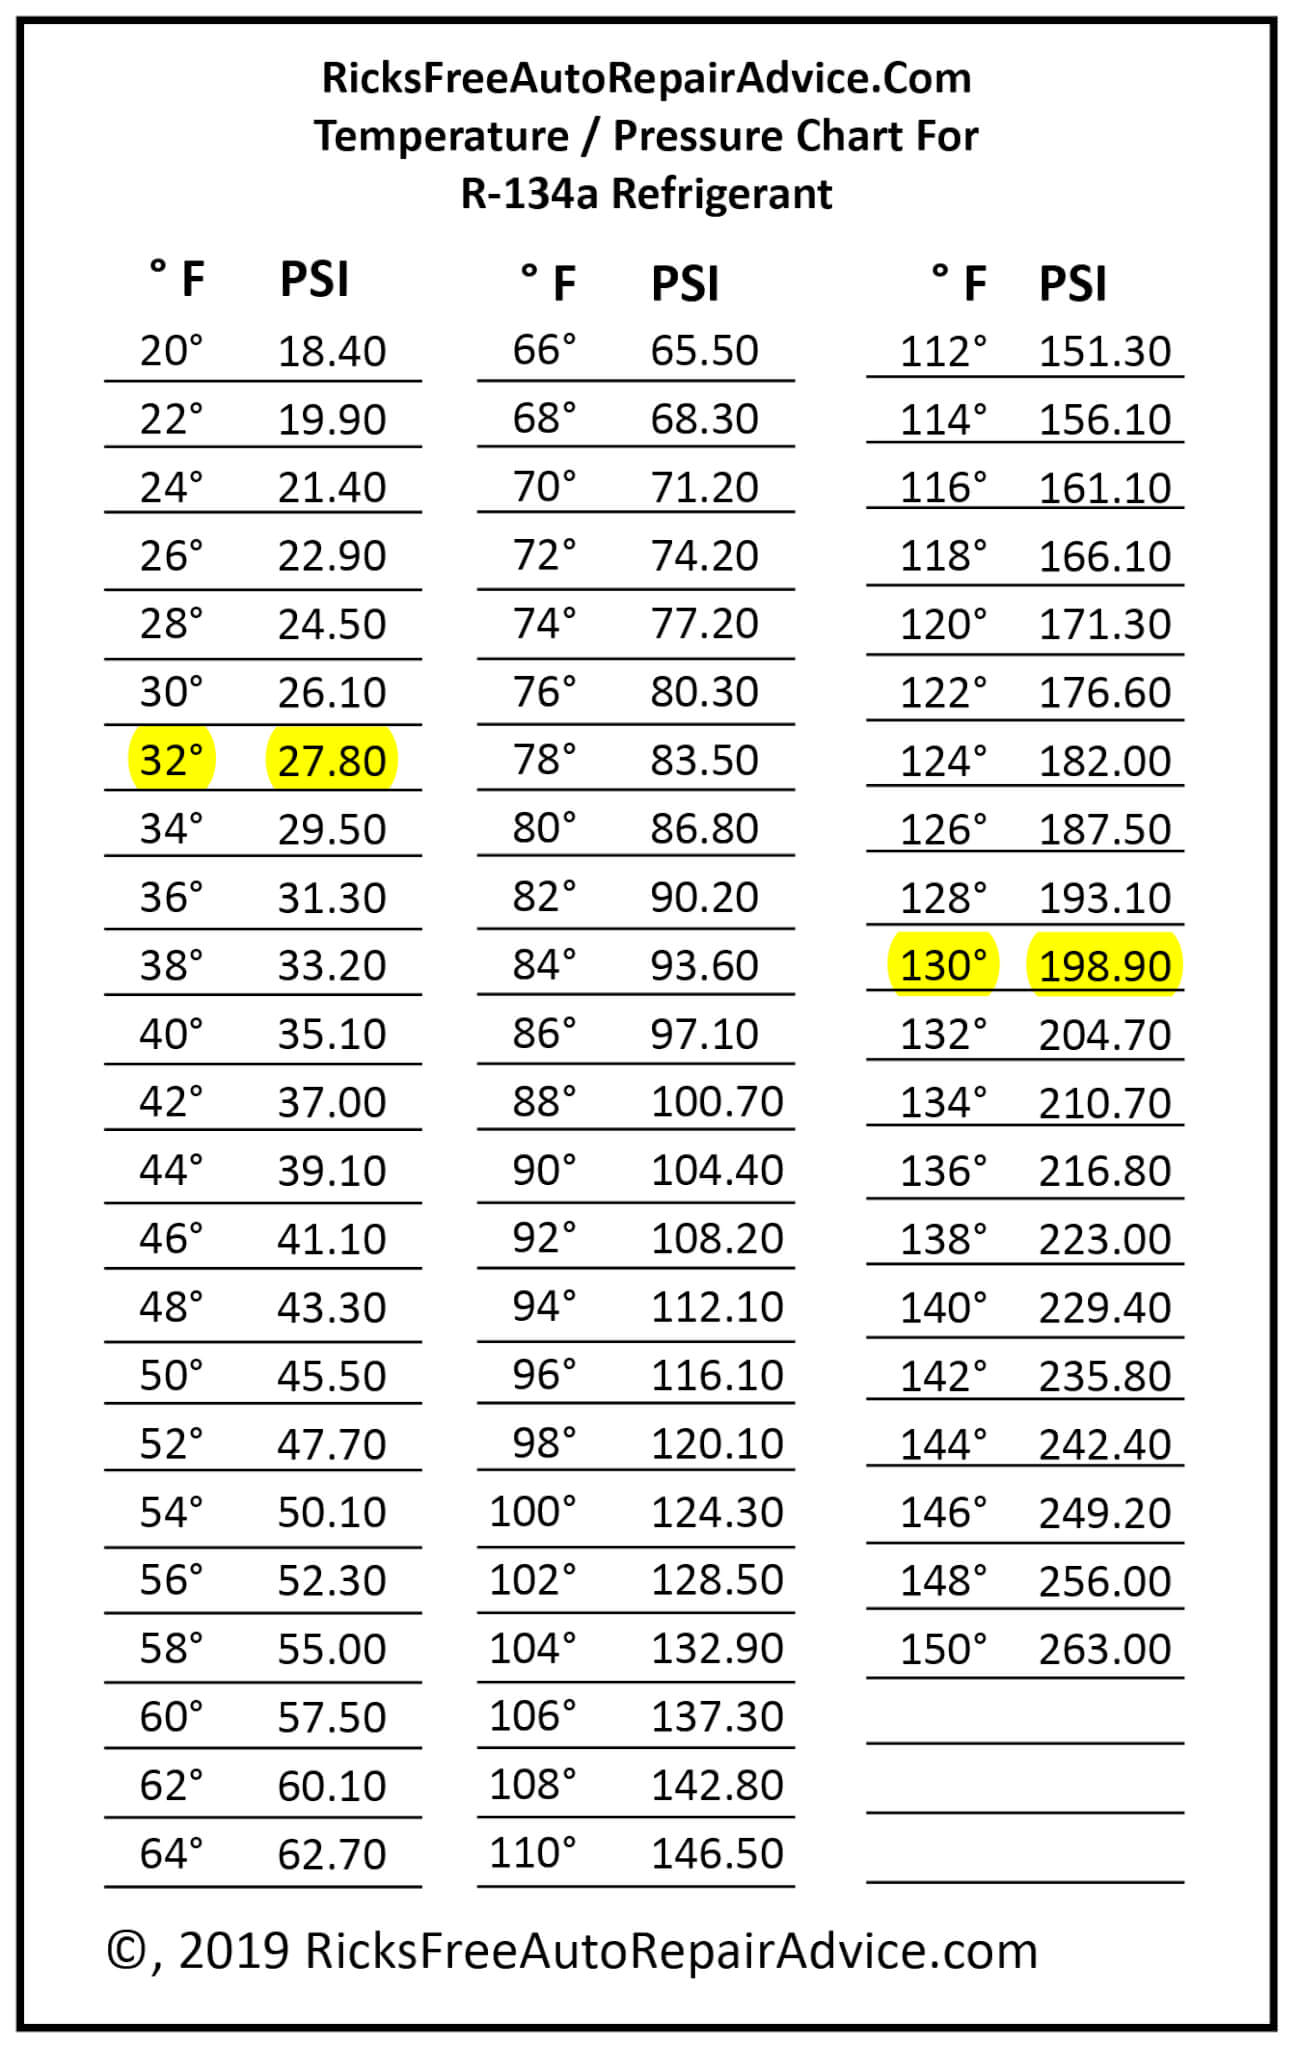
Because the engine isn’t running and the system is equalized, both gauges should read nearly the same pressure.
What the Readings Mean
• Both gauges are very low — The system has lost a significant amount of refrigerant. Don’t waste time trying to recharge it. Instead, find and repair the leak first.
• Both gauges match the pressure chart — That’s good news. The system contains enough refrigerant to continue testing.
• Static pressure is unusually high — This can happen on an overcharged system or one contaminated with air. You’ll confirm that possibility later by checking running pressures.
For more information on static pressure and to see a temperature-pressure chart for R-1234yf refrigerant, see this article: AC Static Pressure Chart Guide for Beginners
Step 4 — Verify Compressor Operation
Once you know the system has enough refrigerant pressure to override the low-pressure cutoff switch, start the engine and check the pressure to verify the compressor is working.
Modern vehicles use two different compressor designs, so it’s important to know which one you’re looking at.
Clutch-Type Compressors — On older and many current vehicles, the compressor pulley spins continuously while the clutch engages only when the AC is turned on.
With the engine running:
• Set the AC to MAX.
• Turn the blower to the highest speed.
• Watch the compressor.
You should hear the clutch click and see it begin spinning with the pulley, and you should see an increase in the high and low side pressures in the range of:
Low side around 25–30 psi
High side 180–220 psi
Those pressures tell you the compressor is pumping properly. If the pressures are low and close to one another, in the range of
Low side: 75 psi
High side: 90 psi
That’s a sign of a worn-out compressor.
If the clutch doesn’t engage, don’t assume the compressor has failed. Conduct other testing. For more information, read: AC compressor clutch not engaging: How to troubleshoot
Possible causes include:
• Blown fuse
• Bad relay
• Faulty pressure switch
• Failed clutch coil
• Excessive clutch air gap
• Broken wiring
• Faulty control module
• Defective evaporator temperature sensor
Variable-Displacement Compressors — Many late-model vehicles no longer use an external clutch. Instead, the compressor turns on anytime the engine is running, while an internal control valve adjusts the compressor output.
Because the pulley always spins, you can’t determine compressor operation just by looking at it. These systems require pressure readings and temperature measurements for accurate diagnosis.
You should see a large increase in the high-side pressure if the variable-displacement compressor is working, as well as an increase in the low-side pressure in the range of:
Low side around 25–30 psi
High side 180–220 psi
Those pressures tell you the compressor is pumping properly. If the pressures are low and close to one another, in the range of
Low side: 75 psi
High side: 90 psi
That’s a sign of a worn-out compressor.
Step 5 — Diagnose Your Car’s AC Performance Based on Pressures
Now that you know the compressor is working, it’s time to gather the information that explains exactly why your car’s AC isn’t cold. I don’t rely on pressure readings alone, but they’re one of the most valuable diagnostic tools available.
1) Prepare the Vehicle — Before taking readings:
• Set the AC to MAX
• Select Recirculate
• Set airflow to the dash vents
• Close all doors and windows
• Place a thermometer in the center dash vent
• Allow the system to run for about five minutes
• Raise engine speed to approximately 1,500 RPM if specified by the vehicle • manufacturer
Then record:
• Low-side pressure
• High-side pressure
• Center vent temperature
• Outside air temperature
These four numbers tell an experienced technician an enormous amount about the system.
Here’s a Quick Guide To What Normal Pressures Look Like
Although every vehicle is different, an R-134a system operating in 80°F weather generally produces:
• Low side pressure of approximately 25–35 psi
• High side pressure of approximately 2.2 to 2.5 times ambient temperature (about 175–200 psi)
• Vent temperature below 40°F after stabilization
Remember that humidity also affects operating pressures. High humidity reduces heat transfer, so pressure readings may be somewhat higher even when the system is functioning normally.
Interpreting your Readings
Pressure readings don’t identify a failed component by themselves, but they point you in the right direction. Here are some common patterns:
1) Low pressure on the low side and low pressure on the high side — usually indicates low refrigerant due to a leak.
2) High pressure on the high side with normal or low pressure on the low side — Often points to a restriction or inadequate condenser airflow.
3) Both pressures are unusually high — May indicate:
• Refrigerant overcharge
• Air contamination
• Poor condenser cooling
4) High and low pressures nearly equal while the compressor is running — The compressor may be spinning, but it isn’t compressing refrigerant internally. This is one of the easiest ways to identify an internally failed compressor without removing a single part.
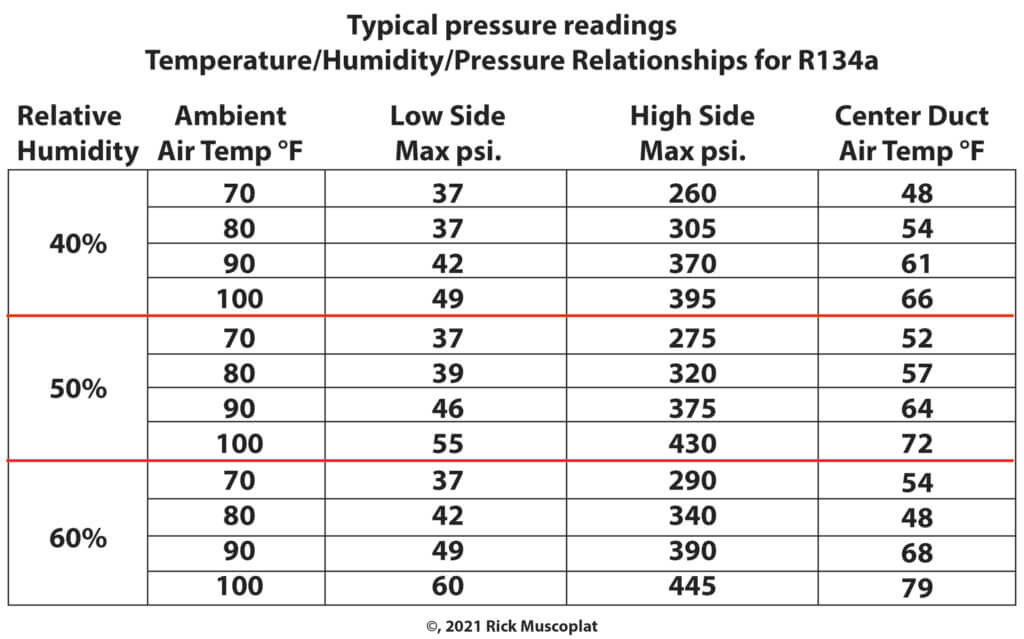
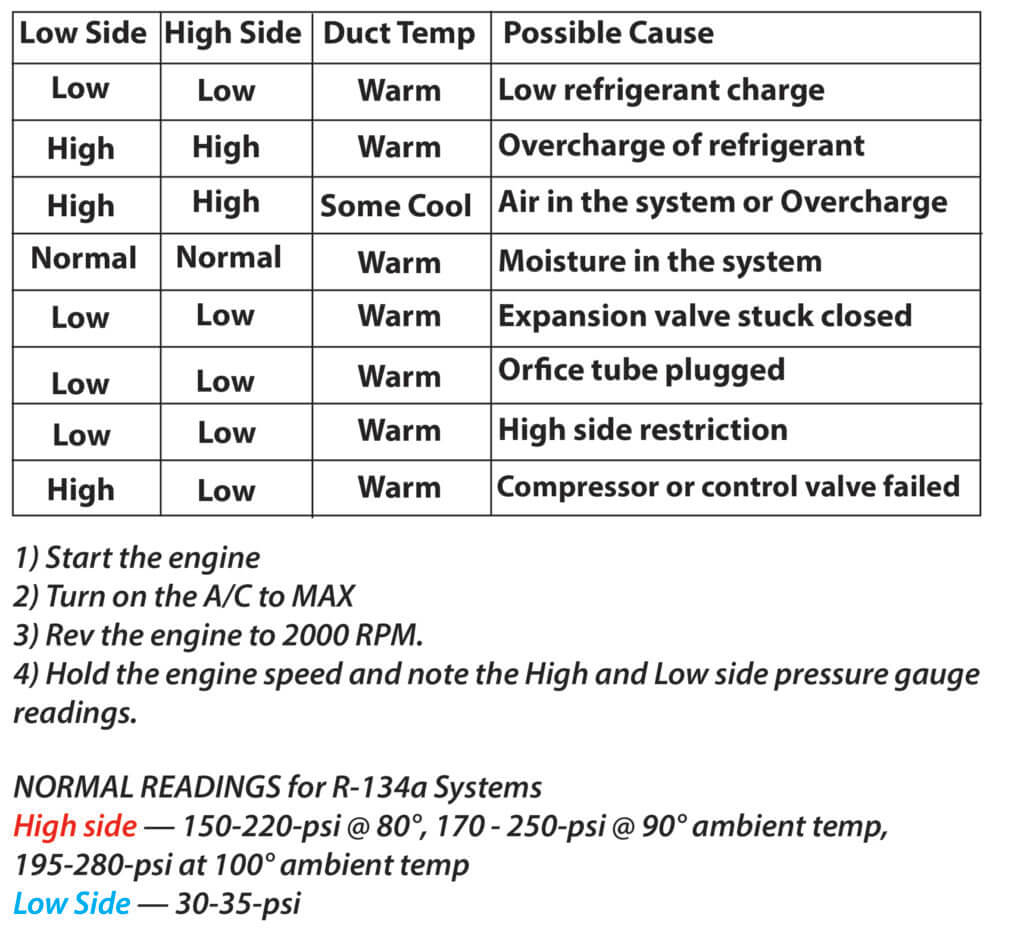
Use your gauge readings and this chart to get a rough idea of what’s wrong so you can fix your car’s AC yourself.
Why I Never Diagnose From Gauge Readings Alone
Many online charts promise they’ll identify every AC problem from pressure readings alone. They can’t because gauge readings are only one piece of the puzzle.
A good technician always combines pressure with temperatures and heat load tests before coming to any conclusion.
• Static pressure
• Condenser temperature drop
• Vent temperature
• Compressor operation
• Ambient temperature
• Airflow inspection
• Heat load testing
Looking at all of those together yields an accurate diagnosis rather than an expensive guess.
Step 6 — Test Condenser Performance (The Professional Test Most DIYers Skip)
If your readings are outside the normal range, it’s time to conduct specific tests. One of the most valuable tests I perform is measuring how effectively the condenser removes heat from the refrigerant. A condenser can look perfectly clean yet still perform poorly due to internal contamination or airflow issues. This simple temperature test often tells me more than gauge readings alone.
Why the Condenser Is So Important — Think of the condenser as your home’s outdoor air conditioner coil. Its job is to release the heat the evaporator absorbed inside your car.
If the condenser can’t get rid of that heat, the refrigerant stays too hot, system pressures climb, and cooling performance drops dramatically.
Many people assume a compressor is failing when the real problem is a condenser that can’t reject heat.
How to Perform a Condenser Temperature Drop Test
Using two temperature probes or a K-type thermocouple.
With the engine running:
• Set the AC to MAX.
• Turn the blower to the highest speed.
• Raise engine speed to approximately 1,500–1,700 RPM.
• Allow the system to stabilize for about five minutes.
• Measure the temperature of the liquid line entering the condenser.
• Measure the temperature leaving the condenser.
• Calculate the temperature difference.
What You’re Looking For
20°F to 50°F drop in temperature — That’s the sign of a healthy condenser. Those numbers tell you the condenser is transferring heat efficiently.
Less than a 20°F drop or little-to-no change in temperature— the condenser isn’t doing its job.
Possible causes include:
• Dirt or bugs blocking the fins
• Bent cooling fins
• Cooling fan failure
• Missing fan shrouds
• Refrigerant overcharge
• Excess refrigerant oil
• Air trapped inside the system
• Internal condenser contamination
More Than a 50°F Drop in Temperature — An excessive temperature drop usually means refrigerant flow has been reduced.
Possible causes include:
• Low refrigerant charge
• Internal restriction
• Partially plugged condenser
• Contaminated refrigerant
Whenever I see an unusually large temperature drop, I start looking for restrictions before replacing expensive components.
Don’t Forget Fan Shrouds —One detail almost nobody mentions is the radiator fan shroud. Without it, air takes the path of least resistance around the radiator and condenser instead of through them. I’ve seen missing shrouds increase vent temperatures by more than 10°F on hot summer days. If someone recently replaced a radiator or cooling fan, verify every seal and shroud is back in place.
Step 7 — Check the Evaporator and Metering Device Operation
Once the condenser passes inspection, I move inside the refrigeration circuit. This is where I determine whether the evaporator and metering device are allowing refrigerant to absorb heat correctly.
Depending on the vehicle, the metering device will be either:
• An orifice tube
• A thermostatic expansion valve (TXV)
Although both perform the same basic job, they diagnose differently.
How To Test Orifice Tube Systems — Measure the refrigerant line temperatures at the evaporator inlet and outlet.
Normal Operation — The inlet and outlet temperatures should be almost identical. A variation of only a few degrees is acceptable.
Outlet Temperature Much Colder Than the Inlet — This usually indicates:
• Refrigerant overcharge
• Incorrect orifice tube
• Refrigerant bypassing damaged O-rings
Outlet Temperature Much Warmer Than the Inlet — This usually points toward:
• Low refrigerant
• Restricted orifice tube
• Excess refrigerant oil
• Debris inside the system
This is often one of the first clues that an internal restriction is developing.
Next, conduct a maximum heat load test
How To Test An Expansion TXV System — Expansion valve systems automatically regulate refrigerant flow. That makes them extremely efficient—but also changes the way they’re diagnosed. Many DIY mechanics try measuring evaporator superheat on TXV systems. Unfortunately, that doesn’t accurately determine refrigerant charge. A properly operating TXV adjusts refrigerant flow to maintain nearly constant superheat, even as the refrigerant charge begins to drop.
That’s why I rely much more heavily on:
• Static pressure
• Running pressure
• Vent temperature
• Condenser performance
• Leak detection
Step 8 — Put All the Test Results Together
Now comes the easy part. Instead of guessing, you’re interpreting facts. Here’s how I combine everything I’ve learned.
Low Static Pressure — The system leaked. Find the leak before adding refrigerant.
Normal Static Pressure but Low Cooling — Continue evaluating:
• Compressor efficiency
• Running pressures
• Condenser performance
• Evaporator operation
High High-Side Pressure — Think airflow or restriction.
Inspect:
• Condenser
• Cooling fans
• Expansion valve
• Orifice tube
Both Pressures High — Possible causes include:
• Refrigerant overcharge
• Air contamination
• Excess oil
Both Pressures Nearly Equal While Running — The compressor isn’t compressing refrigerant effectively. Internal compressor failure becomes the leading suspect.
Excellent Pressures but Warm Air — Now I begin looking outside the refrigeration system.
Common culprits include:
• Blend door actuator failure
• Heater control valve problems
• Cabin air filter restriction
• HVAC control module issues
These problems are frequently mistaken for refrigerant-related failures.
The Biggest Mistake DIYers Make When Diagnosing Their Car’s AC
The internet has convinced many people that every AC problem is caused by low refrigerant. It isn’t.
If you want to find out why your car’s AC isn’t cold, you need to think like a technician instead of a parts changer.
Every test should answer one question before moving to the next.
That’s how you avoid replacing perfectly good compressors, condensers, or expansion valves.
And that’s how you permanently fix your car’s AC, rather than temporarily masking the symptoms.
The Most Common Reasons Your Car’s AC Isn’t Cold
After diagnosing hundreds of automotive AC systems, I have encountered these failures most often.
1) Low Refrigerant From a Leak — This is the most common failure. If refrigerant leaked out, the leak must be repaired before recharging the system.
The refrigerant escaped through:
• A leaking compressor shaft seal
• Damaged hose
• Condenser leak
• Evaporator leak
• Schrader valve
• O-ring seal
2) The System is Overcharged — Many DIYers actually create this problem by thinking that more refrigerant is better. It’s not. Excess refrigerant reduces cooling. On many vehicles, only two ounces separates a perfect charge from an overcharge.
Too much refrigerant actually raises operating pressures, increases compressor load, and reduces cooling performance.
2) Poor Airflow — An AC system removes heat through airflow. If airflow is restricted anywhere, cooling suffers. These issues are surprisingly common and often mimic expensive compressor failures.
Common causes include:
• Dirty condenser fins
• Bent condenser fins
• Cooling fan failure
• Dirty cabin air filter
• Blocked evaporator
• Blend door problems
3) Compressor Problems — Sometimes the compressor simply isn’t pumping because the clutch isn’t engaged. On variable displacement compressors that don’t use a clutch, the flow sensor may be failing. Or, the compressor may be worn out.
Possible causes include:
• Bad compressor clutch
• Failed clutch relay
• Open wiring
• Blown fuse
• Excessive clutch air gap
• Faulty pressure sensor
• Failed evaporator temperature sensor
• Climate control module issues
4) Restrictions Inside the System — Restrictions create abnormal pressure readings that can look confusing unless you know what you’re seeing. Many restrictions develop after an internal compressor failure contaminates the system with metal debris.
Restrictions usually occur in:
• Expansion valve
• Orifice tube
• Condenser
• Receiver-drier
Safety Comes First
Automotive air conditioning systems require more caution than routine maintenance, such as an oil change. Refrigerant is stored under high pressure, and if liquid refrigerant escapes, it flashes into a gas almost instantly. Contact with your skin can cause severe frostbite, while exposure to your eyes can lead to permanent vision damage. Always wear safety glasses and gloves, and never loosen AC fittings unless you’re certain the system has been properly evacuated.
Whenever I work on an AC system, I wear:
• Safety glasses
• Leather gloves
• Long sleeves whenever possible
• Never loosen fittings on a charged AC system.
• Always recover refrigerant using approved equipment before opening any part of the system.
WARNING: Working on AC can be dangerous. Refrigerant can cause frostbite and blindness if it gets into your eyes. Always wear leather gloves when connecting and disconnecting gauges and charging equipment, and wear eye protection at all times when working with refrigerant.
Disclaimer: Use the advice provided here at your own risk. If any of these steps conflict with your shop manual or the carmaker’s warnings, follow those instructions/warnings, not mine.
For more information on Static Pressure and the relationship between Static Pressure and temperature, see the static pressure charts in this article.
What goes wrong with expansion valves?
An expansion valve can fail in many ways. See this post for a full explanation of how an expansion valve works and what can go wrong.
How to Fix AC Condenser Issues
If the AC condenser is leaking or is clogged internally, it must be replaced. The condensers on most late-model cars and trucks cannot be flushed! The passages are too small, and once the debris is caught, it stays caught. So bite the bullet and replace both the condenser and the receiver/drier.
To replace the car’s AC condenser. Pay a shop to evacuate and recycle the refrigerant. Have them measure how much AC oil comes out during the evacuation.
Disconnect the condenser hose fittings and replace the condenser and receiver/drier. Replace the O-rings in the fittings and coat them with refrigerant oil. Pay a shop to evacuate the system and refill it with refrigerant and oil.
Fix AC orifice tube issues
Locate the orifice tube in your system. It can be installed at the evaporator inlet or in a high-pressure line. Some systems require you to replace the entire high-pressure line, while others allow you to replace only the orifice tube.
Pay a shop to evacuate and recycle the refrigerant. Have them measure how much AC oil comes out during the evacuation.
Disconnect the high-pressure line and replace the orifice tube with the proper size. Lubricate the orifice tube O-rings and the high-pressure line fittings with refrigerant oil. Pay a shop to evacuate the system and refill it with refrigerant and oil.
Fix the expansion valve issues
Locate the expansion valve in your system. It’s installed at the inlet of the evaporator coil. It can be installed at the evaporator inlet or in a high-pressure line. Some systems require you to replace the entire high-pressure line, while others allow you to replace only the orifice tube.
Pay a shop to evacuate and recycle the refrigerant. Have them measure how much AC oil comes out during the evacuation.
Disconnect the high-pressure line and remove the expansion valve and sensing tube (if equipped). Install the new expansion valve. Lubricate the orifice tube O-rings and the high-pressure line fittings with refrigerant oil. Pay a shop to evacuate the system and refill it with refrigerant and oil.
©, 2019 Rick Muscoplat
Posted on by Rick Muscoplat