
Split CV boots — Easy to install but they don’t last long
The Pros and Cons of Using Split CV Boots
Over time, CV boots can crack or tear, exposing the CV joint to potential damage. One solution that has gained popularity is the use of split CV boots. These boots can be installed without removing the axle, offering a quick fix to a common problem. But are split CV boots a reliable solution, or do they come with significant drawbacks? This article explores the pros and cons of using split CV boots to help you make an informed decision.
There Are Two types of split CV boots—glue style and nut and bolt style
Split CV boots are designed as a two-piece solution that can be wrapped around the CV joint and then sealed together, usually with glue, clips, or screws. Unlike traditional one-piece CV boots, which require the removal of the drive shaft for installation, split CV boots can be installed without this labor-intensive step. This convenience has made them an attractive option for many vehicle owners and mechanics looking for a quick and easy fix.
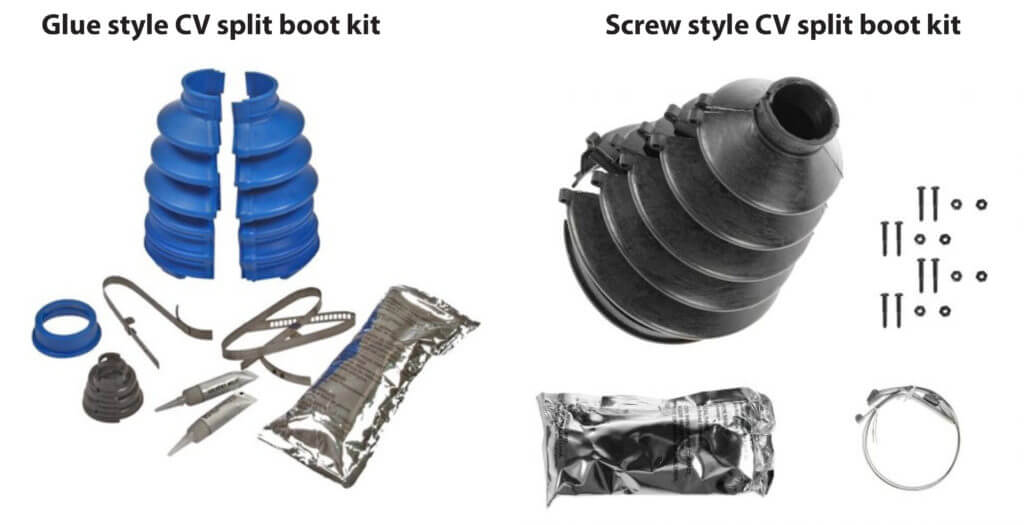
Two common split CV boot kits
Even if you follow the instructions to a “T,” you’ll still wind up with a boot that won’t last as long as a traditional boot. Why? Because the seams aren’t nearly as flexible as a normal boot, and that’s where they’ll fail.
The Pros and Cons of Using Split CV Boots
Pros:
• Ease of Installation— The most significant advantage of split CV boots is the ease of installation. Traditional CV boots require the drive shaft to be removed from the vehicle, a process that can be time-consuming and requires specialized tools. Split CV boots, on the other hand, can be installed in a fraction of the time without the need to disassemble the axle. This makes them an appealing option for DIY enthusiasts and professionals alike.
• Cost-Effective Solution— Because they eliminate the need for axle removal, split CV boots can significantly reduce labor costs. For a DIYer, the savings come from not having to purchase or rent specialized tools.
• Temporary Fix— Split CV boots offer a quick, temporary fix for torn or cracked CV boots. If you’re in a situation where you need to protect your CV joint from further damage but don’t have the time or resources for a full repair, a split CV boot can serve as a stopgap measure. This can be particularly useful if you’re on a road trip or far from a mechanic.
• Availability and Convenience— Split CV boots are widely available and can be purchased at most auto parts stores or online. Their design means they can be easily stored and installed whenever needed, making them a convenient option for emergency repairs.
Cons:
• Durability Concerns— One of the main drawbacks of these boots is their durability. Because they are a two-piece design that must be sealed together, they are inherently weaker than traditional one-piece boots. The seal is a common point of failure, especially under harsh driving conditions or when exposed to dirt, moisture, and extreme temperatures. Over time, the seal may weaken, leading to leaks and potentially compromising the protection of the CV joint.
• Inferior Seal— Even with careful installation, split CV boots often do not provide a seal that is as secure as traditional boots. The adhesive or mechanical fasteners used to hold the two halves together may not completely prevent contaminants from entering the CV joint. Any breach in the seal can allow dirt, water, and other debris to infiltrate the joint, accelerating wear and potentially leading to premature failure of the CV joint itself.
• Short-Term Solution— While split CV boots can be a quick fix, they are generally not recommended as a long-term solution. Their inferior durability means that they may need to be replaced more frequently than traditional boots, ultimately negating the initial cost savings. For this reason, many mechanics and vehicle owners view split CV boots as a temporary solution until a more permanent repair can be made.
• Potential for Improper Installation— Installing split CV boots requires precision, especially when it comes to sealing the two halves together. Any misalignment or improper sealing can lead to a compromised boot that doesn’t fully protect the CV joint. This can result in more frequent inspections and potentially more frequent repairs if the split boot fails prematurely.
• Not Suitable for All Vehicles— While split CV boots are a versatile solution, they may not be suitable for all vehicles, particularly those with high-performance or off-road applications. In these scenarios, the additional stress and exposure to harsh environments can make split boots an inadequate choice. Vehicle owners with these types of vehicles may find that traditional CV boots are a more reliable option.
How to replace a torn CV boot with a split CV boot
1) Using side cutters, remove the two band clamps on the old boot.
2) Using a utility knife, slice through the old boot lengthwise and remove the old boot from the axle.
3) Clean off all the old grease
4) Open the new grease packet and squeeze new grease into the CV joint
5) Clean your hands or wear clean nitrile gloves before mating the two halves. If you’re gluing, this process must be spotless. Apply the adhesive to one side of the seam and join the two sections. Allow the glue to dry for the recommended time.
5) If you’re using a screw-type boot, install the screws and nuts into one seam and tighten to the recommended torque.
6) Slide the open side over the axle and complete the operation to join the open seam. Again, allow time for the glue to dry.
7) Slide the boot up to the joint and deposit all the remaining grease from the packet into the boot.
8) Slide the boot onto the joint and make sure the lip snaps into the depression on the joint
9) Open the band clamps and install them on the axle
10) Using a band clamp tightening tool, tighten both band clamps to the recommended tightness.
If you’ve purchased a Dorman Products boot kit, find the video instructions here
©, 2020 Rick Muscoplat
Posted on by Rick Muscoplat