Heater core replacement
What’s involved in a heater core replacement?
If the shop says you need a heater core replacement, chances are you’re still recovering from the shock of the estimate, because heater core replacement cost can be upwards of $1,300. I’ll explain what’s involved in the job so you understand why the cost is so high, and in the process, you can determine whether you think you can replace a heater core yourself, especially since heater core cost is only around $150. But first, let’s talk about how your car’s heater core works, what causes it to fail, how a heater core flush might solve your problem without actually having to replace the entire unit and whether heater core sealants work.
What is a heater core
A heater core is just a small radiator that receives hot coolant from the top of your engine. You engine’s water pump circulates coolant from the main radiator into the engine and forces a portion of that hot coolant into the heater core. The hot coolant flows through the heater core and returns to the water pump through a second heater hose. With your blower fan operating, the heater core can add 85° to 100° above outside temperatures, giving you’re a maximum cabin temperature of up to 90°F.
Due to limited space behind your dash, the heater core fins and tubes are much smaller than your main radiator and those small tubes can be plugged and damaged by owner neglect. In fact, 90% of all heater core failures care directly related to owner neglect. Here’s how heater cores fail:
Heater core failure causes
1. Not changing coolant at the recommended intervals causes more heater core failures than any other cause. Engine coolant contains anti-corrosive and anti-electrolysis additives to prevent galvanic action—corrosion that’s caused when dissimilar metals come in contact with an electrolyte. In this case, the coolant is the electrolyte and the aluminum, magnesium, copper, steel, used in the engine, heater tubing, water pump, thermostat, etc, are the dissimilar metals. Once the protective additives are depleted, your entire cooling system corrodes from the inside out. The corrosion particles break away and get stuck in the heater core tubes, blocking coolant flow and forming a “cold spot” in the heater core.
Once that starts, your heater core is on its way out. The hot and cold spots cause the heater core to expand and contract at different rates and that tears the seams apart, causing the heater core to leak.
2. The second most common cause of heater failure is the use of an improper coolant or mixing different types of coolant. The coolant you find at the auto parts stores claim they’re “universal.” They’re not and not one car makers approves of those universal coolant. If you try to save a few bucks by buying a universal coolant instead of buying the recommended coolant, you can damage the entire cooling system. What’s really happening here is that coolant must be compatible with not just the different metals use in your car’s
cooling system, but also the rubber, nitrile, EPDM and silicone seals and gaskets used throughout the system. Use the wrong coolant and you can get a coolant/seal mismatch that degrades the seals and gaskets. That’s bad enough, in many cases causing major gaskets to fail. Worse than that however is the longer-term effect of that seal degradation. Here’s an example:
You install a non-recommended coolant and end up with a head gasket leak. You replace the head gasket, refill with coolant and go on your way. But the particles generated from the original head gasket and the degraded seals throughout your engine, flow into the heater core and clog it.
The price difference between universal coolant and dealer coolant is about $10/gallon. Most cars take less than 2 gallons. So you save $20 and cause far more damage down the road.
3. Removal of a low flow restrictor. Some carmakers intentionally reduce the flow of coolant through the heater core to increase heat output into the passenger cabin. If you replace or repair a heater hose and remove the flow restrictor, the increased flow can wear out the small heater core tubes.
Heater core symptoms
• little-to-no heat—a sign of a plugged heater core or an air pocket in heater core
• wet carpet due to heater core leak due to a leaking heater core. The coolant is leaking out of the heater box onto your carpet
• oily film on windshield. The leaking coolant is vaporizing and condensing on your windshield
• sweet fruity smell when using blower. Most coolants have a sweet smell
How to test a heater core
First, check your coolant level. A low coolant level will affect the heater core long before it affects engine temperatures. If the coolant level is fine, move on to the next step.
Next, check if your car is equipped with a heater control valve. Older cars used a heater control valve to regulate coolant flow through the heater core. Many heater control valves were operated by a cable, while others where operated by a small vacuum motor. Both types can fail in the closed position, eliminating coolant flow to the heater core.
Locate the two heater hoses going to the heater core—they’ve be going into the firewall. With the engine at full operating temperature and the heater control set to hot, touch each hose. If one hose is hot and the other hose is cold, then you’ve got a problem. The cause can be a bad water pump that’s not circulating coolant properly (although that would also show up as an overheating engine), an air pocket in the heater core, or a plugged heater core.
Perform a cooling system pressure test. If the heater core is leaking, the coolant may drip down the AC condensation drain tube and onto the ground and the system won’t hold pressure.
Remove heater core air pocket and flush heater core
Some cooling systems are poorly designed so that a single incidence of low coolant levels can form an air pocket in the heater core and the pocket won’t self purge, preventing proper coolant flow. In that case, you should try removing the air pocket by flushing or through the use of an air evacuation tool. Air evacuation tools apply a vacuum to the entire cooling system to draw out air pockets. It’s far more effective than flushing.

UView 550000 Airlift Cooling System Leak Checker and Airlock Purge Tool Kit removes air from cooling system
Flush the heater core by removing both heater hoses. This is a delicate operation. If you apply too much muscle to removing

Lisle 60900 Heater Core Backflushing Tool
the old heater hoses, you can stress the heater core tubes and literally break the solder joints and even break the inlet/outlet tubes off completely. Here’s the safest way to remove the heater core hoses:

Heater hose spring clamps
Remove the hose clamp and slide it several inches back from the heater core tubing. Use a spring clamp remove tool if space is limited. Then, use a heater hose removal tool to break the bond between the heater
hose and heater core tubing. Slide a pointed end of the heater hose removal tool between the hose and the tube and slide it around until you break the bond. Then you can pull the heater hose off the tube.
Next, attach a long piece of clear 5/8” vinyl tubing to the heater core outlet (the one that runs to the water pump).

Connect vinyl tubes to heater core
Route that hose to your air hose, garden hose or heater core flushing tool. Install a second piece of clear 5/8” vinyl tubing to the inlet side of the heater core and route it to a 5-gallon pail on the floor.
Start by using compressed air to backflush the heater core and remove any particulate debris. Keep air pressure low. The switch to a water backflush, paying attention to the water pressure.

Flush the heater core
Heater cores are designed for a 10-15-psi maximum, while home water pressure can be almost 40-psi. If you use too much pressure on a plugged heater core, you can break the soldered/brazed seams. Flush until the water is clear. Then fill the heater core with fresh coolant and reattach the heater hoses.
Should you use chemicals to flush a heater core?
Some online videos recommend using commercially available heater core cleaners. Some even recommend building a circulating setup where you pump tub and tile cleaner through the system overnight to break up calcium deposits. Those procedures do work—sometimes. Other times they remove so much debris that your heater core begins to leak. That’s because the debris was plugging the pinhole leaks in your heater core. Use the chemicals if an ordinary flush doesn’t open up your heater core AND you’re willing to accept the risk that you may be creating a leak.
Should you use heater core sealer?
Maybe. You’ll see all kinds of online advice on this, from “sure, it worked for me,” to “don’t even think about using a cooling system sealer.” So what’s the truth? Well, cooling system sealers work in two ways:
1. They can plug the leak with a pulp material. You add the sealer. It flows through the system and gets jammed into pinhole leaks. These products work for very small leaks. However, the leak will start again the next time your flush the system. These plugging products wash away, so you’ll have to retreat after every future flush.
2. The sealer reacts to temperatures differences. These products work as well.
BUT, the biggest issue with cooling system stop leak products is that consumers ignore the directions and add too much sealer, and THAT is what causes the horror stories. If you’re going to try a sealer, NEVER exceed the dosing recommendations on the package label. Trust me on this, more is NOT better. Add too much and you will clog up the radiator and the heater core.
Heater core replacement cost?
Replacing a heater core in most late model cars is a huge job that often involves evacuating car’s air conditioning refrigerant and removing the entire dash and console. Let’s take a look at the steps for a 2010 Ford Taurus
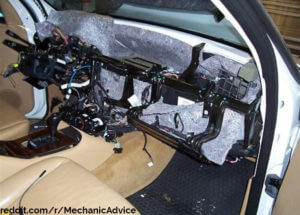
Start by remove the instrument panel. Removing the instrument panel takes almost 6 hours and involves 36 steps. That step alone makes up the bulk of the heater core replacement cost for labor.
1. Rotate the steering wheel until the front wheels are in the straight-ahead position.
2. Drain the coolant.
3. Recover the refrigerant.
4. Remove the wiper mounting arm and pivot shaft assembly.
5. Remove the 2 LH instrument panel upper cowl bolts.
6. Remove the PCM.
7. Remove the wire harness retainer from the PCM bracket stud.
8. Remove the 3 nuts and the PCM bracket.
9. Remove the RH instrument panel upper cowl bolt.
10. Remove the upper engine cover.
11. Remove the vacuum hose clips from the strut tower cross brace.
12. Remove the strut tower cross brace.
13. Remove the heater hoses from the heater core.
14. Remove the Thermostatic Expansion Valve (TXV) manifold nut and the TXV manifold.
15. Remove the steering wheel.
16. Remove the front seats.
17. Remove the floor console.
18. Remove the LH and RH A-pillar trim panels.
19. Remove the LH and RH scuff plate trim panels.
20. Position aside the LH and RH door opening weather-strips.
21. Remove the LH and RH instrument panel side finish panels.
22. Remove and discard the steering column shaft-to-steering column bolt.
23. Separate the steering column shaft from the steering column.
24. Disconnect the instrument panel upper LH bulkhead electrical connector.
25. Disconnect the 2 Smart Junction Box (SJB) lower electrical connectors and instrument panel lower LH
bulkhead electrical connector.
26. Remove the hood release handle bolt and position the hood release handle aside.
27. Remove the driver footrest pad.
28. Remove the LH and RH front carpet sections.
29. Remove the 2 pin-type retainers and the rear footwell duct.
30. Disconnect the instrument panel RH bulkhead electrical connector.
31. Disconnect the antenna cable and the satellite radio antenna connector, if equipped
32. Remove the 2 bolts and the ground wires from the floor pan tunnel.
33. Disconnect the Restraints Control Module (RCM) small electrical connector and detach the 2 wire
harness pin-type retainers.
34. Remove the 4 instrument panel center support bracket bolts.
35.Remove the 6 instrument panel side bolts.
36.Remove the instrument panel from the vehicle.
37. Remove the 3 RH lower instrument panel insulator screws and position the insulator aside.
38. Remove the 2 Remote Function Actuator (RFA) module nuts and position the module aside (if equipped).
39. Detach and position the in-vehicle temperature sensor aspirator hose aside.
40. Remove the 2 floor duct screws and the floor duct.
41. Detach the console duct Y-adapter pin-type retainer and remove the Y-adapter.
42. Remove the 2 floor duct adapter bolts and detach the floor duct adapter from the heater core and evaporator core housing.
43. Disconnect the 3 electrical connectors and detach the wire harness pin-type retainer.
44. Detach the 4 wire harness pin-type retainers and disconnect the electrical connector.
45. Disconnect the 3 electrical connectors, detach the wire harness pin-type retainer and detach the instrument panel harness from the heater core and evaporator core housing,
46. Remove the 4 heater core and evaporator core housing bolts.
47. Remove the heater core and evaporator core housing.
48. To install, reverse the removal procedure.
Once the dash is removed, the next portion of heater core replacement cost is removing and replace the heater core from the heater box, which takes about 2 more hours. If the vehicle has AC, evacuating and recharging takes an additional 1.4 hours.
So the heater core replacement cost for a 2010 Ford Taurus breaks down as follows:
Labor for AC evacuation and recharge, dash removal, heater core replacement 9.6 hours $125= $1,122.50
Replacement heater core $150
Replacement refrigerant $90
Total heater core replacement cost $1,452.50
©, 2017 Rick Muscoplat
Posted on by Rick Muscoplat