
How to Test an Airbag Safely After a Trouble Code
Quick Summary
When the SRS (Supplemental Restraint System) warning light comes on, you’re dealing with one of the most safety-critical systems in the vehicle. If you need to test an airbag, you must follow a controlled, professional process.
• Never probe an airbag directly with a multimeter or test light
• Always disable the battery and allow the SRS capacitor to discharge fully
• Use a scan tool with SRS capability to read and interpret codes
• Use a ballistic resistor (airbag simulator) to safely test the circuit
• Most faults are caused by wiring, connectors, or clock spring issues—not the airbag itself
Follow the correct procedure, and you can diagnose the problem safely without risking accidental deployment.
Why Testing an Airbag Is Different from Any Other System
I’ve worked on just about every system in a vehicle, and I can tell you this: nothing demands more respect than an airbag system.
When you test an airbag, you’re not just diagnosing an electrical issue—you’re working around a pyrotechnic device. An airbag can deploy at roughly 200 mph in less than 30 milliseconds, and it doesn’t take much current to trigger it.
Even something as simple as:
• A multimeter
• A small battery
• Static electricity
can supply enough energy to deploy an airbag under the wrong conditions.
That’s why this process is not optional—it’s mandatory.
Start with the Trouble Code Before You Test an Airbag
Before I touch anything, I always connect a scan tool and pull the codes. A basic code reader won’t cut it—you need a scanner that can access the SRS system.
Once connected, I document:
• All stored codes
• Any history or pending codes
• Live data, including resistance readings
You never clear codes before writing them down. That’s one of the fastest ways to lose valuable diagnostic information. The code tells you where to focus—whether it’s a driver airbag circuit, seatbelt pretensioner, clock spring, or a wiring fault.
Understand Airbag Resistance Before You Go Further
Every time I test an airbag system, I’m thinking about resistance. Most airbag squib circuits operate around:
• 2 to 3 ohms
If I see:
• High resistance: Open circuit, corrosion, or broken wire
• Low resistance: Short circuit
Those readings tell me exactly what direction to go.
Disable the System Before You Do Anything Else
This is the step that separates professionals from amateurs. Before you test an airbag:
• Turn the ignition OFF
• Disconnect the negative battery cable
• Disconnect the positive cable
• Wait at least 15–30 minutes
The SRS module has a backup capacitor that can still deploy the airbags even after the battery is disconnected. That’s why you have to wait and never rush the discharge step.
Inspect the Wiring Before You Grab Any Tools
Once the system is safe, I start with a visual inspection. Airbag wiring connectors are almost always yellow—that’s the industry standard.
I trace the wiring harness and connectors from the:
• Steering wheel harness
• Under-seat connectors
• Seatbelt pretensioner wiring
• Dashboard and side curtain connections
What I’m looking for:
• Loose connectors
• Corrosion
• Pinched or damaged wires
You’d be surprised how many airbag codes come down to something simple like a loose connector under a seat .
Use a Ballistic Resistor to Safely Test the Circuit
This is where most DIYers either get it right—or get
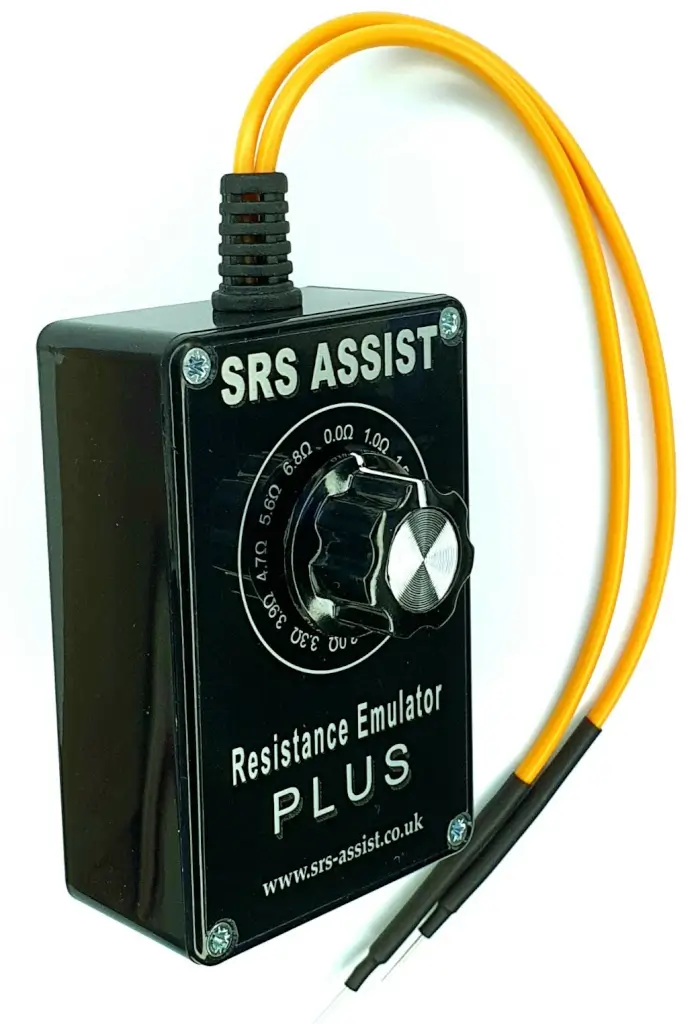
Airbag simulator
into trouble. You never test the airbag itself. Instead, you simulate the airbag using an airbag simulator, also known as a ballistic resistor.
• Disconnect the airbag connector
• Set the ballistic resistor to the specified setting (typically ~2 ohms). • Connect to the airbag connector.
• Reconnect the battery
• Use the scan tool and multimeter to test the circuit
That resistor mimics a functioning airbag without risking deployment.
The simulator allows you to
• Measure circuit resistance
• Check for opens or shorts
• Verify wiring integrity
This is the only safe way to electrically test an airbag circuit.
Don’t Forget the Clock Spring (A Common Failure Point)
If I’m dealing with a driver airbag code, I always

Notice the multi-circuit ribbon cable inside the clockspring
check the clock spring. The clock spring is a ribbon cable inside the steering column that maintains a connection while the wheel turns
Over time, it wears out, causing SRS codes.
To test it:
• Disconnect both ends
• Check continuity through the circuit
If there’s an open circuit, the clock spring is bad. And no—it’s not repairable. It gets replaced.
Interpreting Results Like a Professional
As you measure resistance on the wiring harness with the simulator installed or check the clockspring continuity, the results usually point clearly to the problem.
If the wiring harness with the simulator installed reads correctly, then the airbag itself is likely faulty
If the wiring harness readings are off, you’re dealing with a wiring or a module issue. Inspect the entire harness and the connections at the SRS module. Repair the harness or connectors
After repairs:
• Reconnect everything properly
• Clear the codes
• Run a system check
If the codes don’t return, the repair is complete.
When to Stop and Call a Professional
I’m all for DIY diagnostics—but there’s a line maybe you shouldn’t cross.
If you’re dealing with:
• A deployed airbag
• Seatbelt pretensioners
• SRS module replacement
• Post-collision repairs
That’s really professional territory.
Airbags are not the place to take risks.
Final Thoughts on How to Test an Airbag
When you learn to properly test an airbag, you’re not just fixing a warning light—you’re ensuring the system will work when it matters most.
Done correctly, this process keeps you safe and prevents accidental deployment. It also saves you from replacing expensive parts unnecessarily
And that’s the difference between guessing and diagnosing like a pro.
©, 2026 Rick Muscoplat
Posted on by Rick Muscoplat