
Brake lights come on by themselves or go off when brake is applied — TSB fix
Diagnose and fix brake lights come on or go off when brake is applied
GM service bulletin 16188-01 brake lights come on by themselves
GM has issued a service bulletin 16188-01 to address a problem with the GM vehicles listed below where brake lights come on by themselves. The problem appears as a brake lights come on by themselves without brake pedal application OR, the brake lights go off when the brake pedal is applied.
Vehicles affected
2004 2012 Chevrolet Malibu Malibu
2004-07 Chevrolet Malibu Maxx
2005-10 Pontiac G6
2007-09 Saturn AURA
What causes the brake lights come on problem
In older vehicles, the brake light switch actually switched power to the brake lights. In late model cars with body control modules (BCM), the brake light switch is only an input to the BCM. The BCM actually switches power OR sends a digital signal to a smart junction box that switches the power to the brake lights.
So, the BCM is always looking at the brake pedal switch for a change in voltage, usually a power to ground condition as the brakes are applied. In this service bulletin, GM reveals that increased resistance between the BCM and brake pedal switch results in voltage fluctuations that can cause the BCM to misinterpret the brake pedal switch signal. So the BCM can command the brake lights come on by themselves or go off when you apply the brake.
GM service bulletin 16188-01 Special coverage for brake lights come on by themselves
GM has issued a special coverage adjustment for the vehicles listed below. According to the terms of service bulletin 16188-01, GM will fix the problem for free for 15-yrs from date of service or 150,000 miles, whichever comes first.
What fixes the brake lights come on by themselves problem?
GM has issued repair parts to fix the problem if your particular vehicle is out of the special adjustment period.
Obtain these parts:
1 Retainer-Brk Ped (Short Tie Strap – Pkg of 10) #15188763
2 Strap-EGR Tube (Long Tie Strap – Pkg of 10) #11509086
1 14 Inch Tie Strap Obtain Locally
1 Clip-Wrg Harn (Tie-Down Mount) #13596990
1 (If Required) Retainer-Accessory Wiring Harness (Rubber Spacer) #13596991
Promoter, Plastic Adhesion (4 OZ) #12378462 (US) #10953554 (Canada)
Lubricant, Dielectric (2 OZ) #12377900 (US) #10953529 (Canada)
Woven Polyester Electrical Tape (PET) – Part Number #1089482
Repair procedure to fix brake light comes on by itself
This fix is designed to test connector terminals, coat the terminals with dielectric
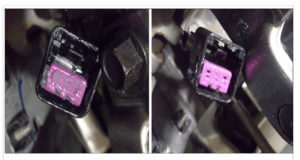
Brake light switch with dielectric grease applied
grease to prevent corrosion or intermittent contact and relieve stress in the wiring harness.
1) Disconnect the brake pedal switch connector and perform a terminal drag test on the brake pedal position sensor (BPPS) cavity terminals using terminal adapter J-35616-2A (GY). Replace any terminal that do not make good contact.
2) Apply dielectric lubricant to BPPS cavity terminals.
3) Apply dielectric lubricant to BPPS connector. Reconnect to brake pedal switch.
4) Cut off existing gray tie strap to obtain more wiring harness slack for BCM connection.
5) Remove right side console trim panel to obtain access to BCM. Remove tie strap from BCM connector X2 (C2) harness and disconnect harness connector. Perform a terminal drag test. Replace terminal that do not make good contact.
6) Remove the tie strap push pin (1) from the instrument panel and cut it off of the BCM harness using side cutters. This will allow more wiring harness slack.
7) Install Kent Automotive non-abrasion Woven Polyester Electrical Tape (PET) (1) and a new (short) tie strap (2) to the wiring within the BCM connector bundle. Do NOT use electrical tape!
8) Install NEW tie straps to BCM connector X2 (C2) harness.
9) Perform a terminal drag test on BCM connector X2 (C2) terminals 18, 31, and 59.
10) Apply dielectric lubricant to BCM terminals in cavity X2 (C2).
11) Apply dielectric lubricant to connector face of BCM connector X2 (C2).
12) Apply adhesion promoter, install tie-down mount, tie strap and rubber spacer to upper corner of BCM. Clean the surface of the IP Mag Beam using an alcohol wipe, apply adhesion promoter, install tiedown mount and tie straps to IP Mag Beam (rubber spacer is not needed for the following models)
Posted on by Rick Muscoplat