
Fix Your Car’s AC Problems Yourself
Learn how to diagnose and fix car’s AC problems yourself
Before you can fix car AC problems, you have to understand the components and what they do. I’ll go through those in a second. But first, I’ll list the most common causes of car AC failures:
• The system is low on refrigerant due to a leak or is overcharged with refrigerant, which actually reduces cooling. There’s a 2-oz. window between the correct charge and overcharged. More is NOT better. Overcharging is the single most common DIY mistake.
• Air is in the system due to a leak. Symptom: Air coming out of vents is never very cold, even though gauges show pressures in the acceptable range. Once air is in the system, it must be fully evacuated, the leak repaired, then dried and recharged.
• There’s moisture in the system due to a leak, and the moisture causes icing at the orifice tube or expansion valve. Symptom: The system cools air and then stops cooling. After a while, it starts cooling again. Once moisture is in the system, it reacts with the refrigerant oil to form sludge and acids that eat away at metal components and eventually destroy the compressor due to lack of lubrication.
• You have a faulty compressor clutch that prevents the compressor from turning or a faulty compressor that isn’t actually compressing the refrigerant. Symptom: AC compressor clutch fuse blows instantly when you turn on AC (short in clutch coil windings). The clutch receives power and ground but won’t engage (open in clutch coil windings or air gap issues (see below).
• The compressor clutch won’t engage due to wear, which enlarges the air gap between the compressor pulley and the clutch plate. Symptoms: Clutch won’t engage or does engage but makes a screeching noise. Replace the entire clutch assembly.
• Clogged orifice tube or inoperative expansion valve. Symptoms: The refrigerant charge is correct and the compressor engages but produces a very high high-side pressure. Low side pressure is low
• Faulty pressure switches. Symptoms: Static pressure is within limits but no power flows to the clutch relay.
Diagnosing an AC not cooling problem should be an orderly step-by-step process, not one where you automatically add refrigerant or start replacing parts. You can cause damage if you just assume that all your car AC needs is more refrigerant.
To properly diagnose and fix your car’s AC system, you’ll need some tools. Even after buying the tools, you’ll still come out ahead over paying a shop, so stop whining! If you want to fix your own car you’ve got to have the right tools.
Tools to fix car AC problems
• Duct thermometer. You can use a digital kitchen thermometer or even an analog unit as long as it goes down to 30°F

AC duct thermometer
• Digital Meter and thermocouple or, if you already own a meter that can accept a “K” style probe all you need is the probe add-on

Meter and themocouple
Temp probe alone
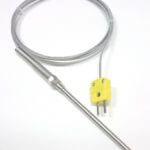
“K” style temp probe
• Manifold gauge set with hoses and quick-connect adapters
Reading system pressure is mandatory to diagnosing your car’s AC system. You can find inexpensive manifold gauge sets at Harbor Freight, eBay, and Amazon.

Manifold gauge set with hoses
Step 1: Check static pressure
The first thing you want to know is whether there is any refrigerant in the system. To do that, you attach your manifold gauge set to the high and low-pressure ports and read the pressures with the engine OFF and AC not running for at least 15-mins.
Use the thermometer to check outside temperature right in front of the vehicle. For a more complete description of static pressure, see this post.
The low side pressure must be above the threshold for the low-pressure switch for the AC compressor clutch to engage. If the system pressure is too low, you’ll have to add enough refrigerant to bring low side pressure high enough to activate the low-pressure switch to allow compressor clutch operation. But never try jumpering across the low-pressure switch to activate the compressor. See this post to learn more about the low-pressure switch and why jumpering can destroy your car’s compressor.
 Step 2: Check compressor clutch operation
Start the engine and turn the AC to the MAX position. Pop the hood and examine the compressor clutch to see if the clutch disc is spinning. If so, you can proceed. If not, see this post to determine why the compressor clutch isn’t spinning.
If the compressor clutch is spinning and you have an orifice tube system, continue with the following tests. To determine whether your vehicle uses an orifice tube or expansion valve setup, see this post
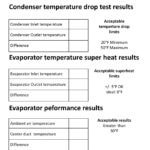
Step 3: Conduct a condenser subcooling temperature drop test — Diagnose AC not cooling
1) Start the engine and run at 1,500 – 1,700 rpm
2) Turn AC to MAX and highest blower speed
3) Open all doors and run the system for about 5 minutes to stabilize the system before taking the readings.
4) Then close the doors and windows and set the blower to low speed. With the engine running and AC on, set the blower motor to low speed.
5) Use the temperature probe to measure the LINE-IN temperature as close to the condenser as possible. Then, measure the LINE-OUT temperature to be as close to the condenser as possible. Record the findings and calculate the difference.
6) A properly operating condenser should drop the temperature of the refrigerant by at least 20°F but no more than 50°F between the inlet and outlet.
If AC Condenser isn’t cooling by at least 20°F
1) Check for bent fins or debris in fins that are preventing proper airflow across the condenser. If you find bent fins or debris, clean/repair and retest.
2) Check for proper electric radiator fan operation. In a two-fan system, both fans should be running at high speed when the AC is on. Many systems have multiple-speed radiator fans. Make sure the fans are running at high speed.
3) Check the condition of the radiator fan shrouds and seals. These are far more important than you think. They direct the airflow through the condenser and radiator. A missing seal can greatly affect AC cooling.
4) If the fins are clean and in good shape, the fans are working properly and the seals and shrouds are good, but the condenser isn’t dropping inlet temperature by at least 20°F, the cause may be:
• Internal contamination
• Too much refrigerant oil
• Refrigerant overcharge
Do not try any fixes until you finish the other tests
AC Condenser is dropping inlet temperature by at least 20°F and no more than 50°F but AC still isn’t cooling.
That confirms the condenser is operating properly and isn’t the cause of your AC problems. So move on to the System performance check
If the AC Condenser is dropping inlet temperature by more than 50°F
Check for low refrigerant charge
Check for contamination
The condenser may have internal restrictions, So an infrared thermometer is used to check temperatures across the condenser tubes. If you find spots with large temperature differences, chances are it’s caused by a blockage from a prior AC failure.
Step 4: Conduct a system performance test
This test checks the performance of the compressor, evaporator, and orifice tube/expansion valve.
1) Measure ambient air temperature one foot in front of the car’s front grille. Record the temperature on the worksheet.
2) Start the engine and run at 1,500 – 1,700 rpm
3) Turn the AC to MAX and the highest blower speed
4) Set the system to recirculate
5) Open all doors and run the system for about 5 minutes to stabilize the system before taking the readings.
6) Then close the doors and windows. With the engine running and AC on, set AC to MAX and blower motor to on high speed.
7) Insert the AC thermometer into the center duct and wait until the dial reads the lowest temperature. Record the results on the worksheet
If the AC system is operating properly, you should see the temperature drop at least 30°F from the ambient temperature measured in front of the grille.
AC system is cooling the air by less than 30°F
Check the blend door for full closing (not passing heated air across the evaporator coil)
Check the heater valve is fully closed (in vehicles with a heater valve located in the heater hose, make sure it’s not circulating hot coolant into the heater core)
Check the recirculation door to make sure it’s not pulling in outside air
Check for debris blocking the evaporator
Check evaporator fins for scale or bacterial buildup
Check refrigerant charge
Move on to the evaporator superheat test
Step 5 Conduct an evaporator superheat test on an orifice tube system
1) Start the engine and run at 1,500 – 1,700 rpm
2) Turn AC to MAX and the highest blower speed
3) Set the system to recirculate
4) Open all doors and run the system for about 5 minutes to stabilize the system before taking the readings.
5) Then close the doors and windows. With the engine running and AC on, set AC to MAX and blower motor to on high speed.
6) Measure the temperature at the evaporator inlet as close as possible to the evaporator.
7) Measure the temperature at the evaporator outlet as close as possible to the evaporator.
For more information on performing a heat load test on an orifice tube AC system, see this post.
For orifice tube systems, there should be NO difference in temperature between the inlet and outlet temperatures, but the maximum acceptable variation is +5°F to -5° colder or warmer than the inlet temperature. Read this note on expansion valve systems.* For more information on superheat, see this post
What goes wrong with expansion valves?
An expansion valve can fail in many ways. See this post for a full explanation of how an expansion valve works and what can go wrong.
AC evaporator outlet tube temperature is more than 5° colder than the inlet.
The system is overcharged
The orifice tube O-rings are leaking liquid refrigerant past the orifice
The orifice tube is the wrong size for the system. Replace with correct orifice tube
AC evaporator outlet tube temperature is more than 5° warmer than the inlet.
The AC system is allowing superheat
Check for low refrigerant charge
Check for orifice tube restrictions—dirty filter screen, wrong orifice tube size.
Check for excessive oil in the system
“The refrigerant charge level on a thermostatic expansion valve (TXV) system cannot be accurately determined by measuring evaporator superheat as it can on an orifice tube system. By design, the TXV tries to maintain the appropriate level of superheating in the evaporator and increases or decreases refrigerant flow to match the heat load on the system. As the refrigerant charge level drops in a system due to a leak or from normal refrigerant loss as the system ages, the TXV will increase refrigerant flow to maintain evaporator superheat within specification. A TXV system will maintain a normal superheat value even when the system charge level has dropped significantly. For this reason, evaporator superheat cannot be used as a reliable method of confirming the refrigerant charge level on a TXV system.” 4 Seasons
Step 6: Use running pressures to diagnose car AC
See this post to diagnose remaining problems using high and low-pressure readings.
Fix car AC condenser issues
If the AC condenser is leaking or is clogged it must be replaced. The condensers on most late model cars and trucks cannot be flushed! The passages are too small and once the debris is caught, it stays caught. So bite the bullet and replace both the condenser and the receiver/drier.
To replace car AC condenser. Pay a shop to evacuate and recycle the refrigerant. Have them measure how much AC oil comes out during the evacuation.
Disconnect the condenser hose fittings and replace the condenser and receiver/drier. Replace the O-rings in the fittings and coat them with refrigerant oil. Pay a shop to evacuate the system and refill with refrigerant and oil.
Fix car AC orifice tube issues
Locate the orifice tube in your system. It can be installed at the inlet of the evaporator or in a high-pressure line. Some systems require you to replace the entire high-pressure line, while others allow you to remove and replace just the orifice tube.
Pay a shop to evacuate and recycle the refrigerant. Have them measure how much AC oil comes out during the evacuation.
Disconnect the high-pressure line and replace the orifice tube with the proper size. Lubricate the orifice tube O-rings and the high-pressure line fittings with refrigerant oil. Pay a shop to evacuate the system and refill it with refrigerant and oil.
Fix car AC expansion valve issues
Locate the expansion valve in your system. It’s installed at the inlet of the evaporator coil. can be installed at the inlet of the evaporator or in a high-pressure line. Some systems require you to replace the entire high-pressure line, while others allow you to remove and replace just the orifice tube.
Pay a shop to evacuate and recycle the refrigerant. Have them measure how much AC oil comes out during the evacuation.
Disconnect the high-pressure line and remove the expansion valve and sensing tube (if equipped). Install the new expansion valve. Lubricate the orifice tube O-rings and the high-pressure line fittings with refrigerant oil. Pay a shop to evacuate the system and refill with refrigerant and oil.
©, 2019 Rick Muscoplat
Posted on by Rick Muscoplat