
Sump Pump Buying Guide for Homeowners
How to Buy the Right Sump Pump for Your Home
Quick Summary
When buying a sump pump, always focus on:
• Gallons per hour, not horsepower
• Pump construction — cast iron versus plastic
• Float switch design — vertical or diaphragm versus tethered
Submersible pumps are the professional standard, versus the older pedestal style, and buying a quality brand with a backup system is what separates a dry basement from a flooded one.
How to Buy a Sump Pump (Expert Guide That Prevents Costly Mistakes)
I’ve installed and replaced many sump pumps, and I’ll tell you this straight: most homeowners buy the wrong one. They focus on horsepower, grab the cheapest unit, and ignore the details that actually determine performance and reliability. If you want to understand how to buy a sump pump the right way, you need to think like a pro—match the pump to the job, not the price tag.
Understanding the Different Types of Sump Pumps
Submersible Sump Pumps — This is what I recommend in almost every case. The motor is sealed in a watertight housing and sits directly in the sump pit. Because the surrounding water cools the motor, these pumps last longer and run quieter. They’re also better protected from debris. In fact, submersible pumps are considered the industry standard and the top choice among professionals.
However, they’re a bit more expensive than pedestal pumps and harder to service, since you have to reach into the sump basket to install or remove them.
Pedestal Sump Pumps — These use an air-cooled motor mounted above the pit, with a long shaft driving the impeller below. They’re cheaper and easier to service, but they’re louder and less durable. I only recommend pedestal units for shallow pits or tight budgets.
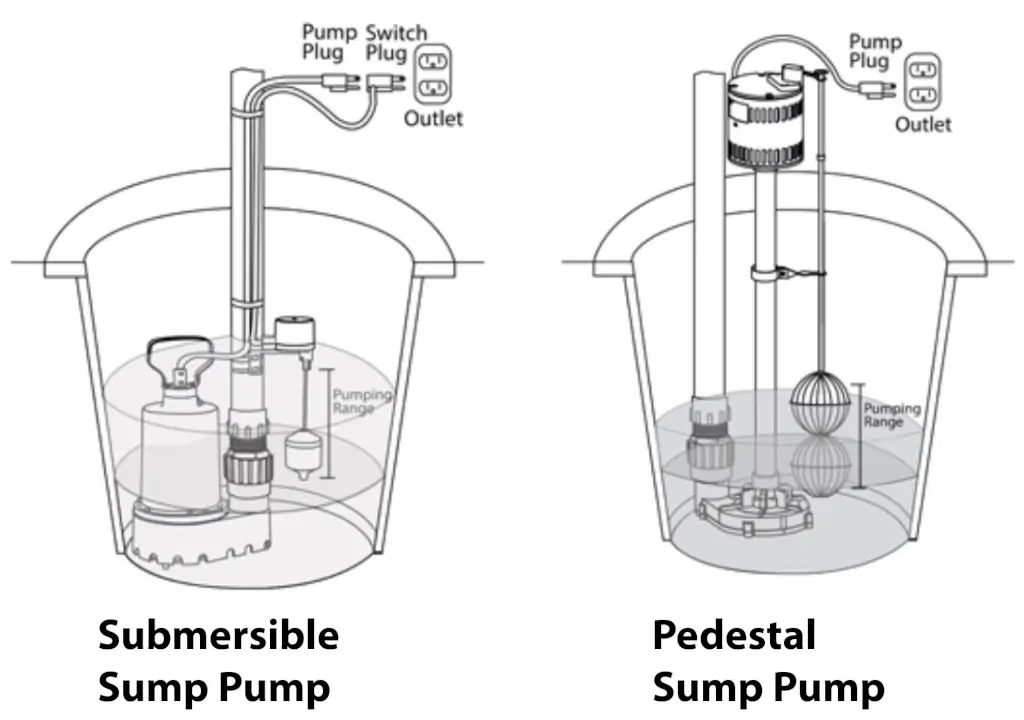
Submersible sump pump and a pedestal sump pump
Sump Pump Sizing: Why GPH Matters More Than Horsepower
Here’s where most people get it wrong. They obsess over horsepower when they should be looking at sump pump sizing in gallons per hour (GPH).
Horsepower simply tells you the motor’s potential. What actually matters is how much water the pump can move at your specific discharge height (called “head pressure”). A pump rated at 4,000 GPH at 5 feet might only move 2,500 GPH at 10 feet.
A pump that’s too large for your application will run up your electric bill and reduce the pump’s life
When it comes to buying a sump pump, bigger isn’t better. A pump with more GPH capacity than your home actually needs will short-cycle — meaning it kicks on, rapidly empties the pit, and shuts right off, only to repeat the process again and again. This constant stop-and-start is hard on all the pump and sump components:
• Reduces motor life — Motor startup creates more wear than longer running
• Reduces float switch life — Excessive starts wear the electrical contacts in the float switch, causing unnecessary switch replacement
• Reduces the life of sump components — The oversized pump causes aggressive pressure surges in your discharge line every time it fires. Over time, this stresses your pipes, fittings, and check valve in ways that steady, moderate operation simply wouldn’t. A properly sized pump that runs in longer, smoother cycles is easier on the sump’s plumbing
• Costs more to operate — Since pump start-up draws far more electricity than steady running, a pump that’s too large for your application will cost more to run than a properly sized pump.
How to Calculate the Right Size Pump For Your Application
If you already have a sump pump and it’s doing the job, not cycling too often, and moving the water quickly and dumping it where you want it, just note the GPH rating on the pump and buy that same GPH again in a new pump.
However, if you can’t find the GPH rating on your pump, are unhappy with your current pump, or are installing a new sump, here’s how to measure the flow to buy the right pump for your application.
Step 1: Determine how much water enters the pit during a cycle.
1) Wait for a normal rain event. When the pump turns on, unplug it.
2) Measure how many inches the water level rises before the float would normally activate again.
3) Measure the diameter of your sump basket and calculate the gallons per cycle using this formula:
Gallons = (π × radius² × height) ÷ 231
Example: You have a sump basket with a 24-inch diameter (12-inch radius), and the water rises 8 inches before the pump turns on.
Multiply 3.14 (π) × 12² (radius²) × 8 rise) ÷ 231 ≈ 15.67 gallons per cycle.
4) Time how often the pit refills during the storm. If the pit refills four times per minute, multiply the cycles per minute by the gallons per minute you calculated in the previous step. Example: 8.8 GPM × 4 cycles per minute = 62.68 GPM. 32.68GPM x 60 mins = 3,760 GPH.
STOP: This is where more homeowners make a big mistake. You might assume that you need a pump capable of 3,760 GPH based on the above calculation. You’d be wrong. We can’t calculate GPH yet because we haven’t accounted for head pressure (the loss due to lifting the water) and friction losses through the elbows and horizontal pipes.
A typical rule of thumb is that pumps lose roughly 1–1.5 GPM of flow for every foot of head, though the exact drop depends on the specific pump’s performance curve.
Let’s move on to Step 2: calculating the head and friction loss.
Step 2: Calculate Total Head
Total head is the vertical lift plus friction losses.
1) Measure the vertical lift from the bottom of the pit to the highest point of the discharge pipe to the outdoors.
2) Measure the total length of the horizontal pipe — Add 1 foot of head per 10 feet of horizontal pipe. Then, add 1 to 2 feet for each pair of 90° elbows
Example: 8 ft pit depth + 3 ft of pipe from the top of the pit to the joists before it takes a turn to the outside + 20 ft horizontal + two 90° elbows
Total head in this case is: 8 + 3 + 2 + 2 = 15 ft
Now we can finish our calculations
Using a moderate head/friction loss of 1.25 GPM per foot:
We have 15 feet of head/friction loss × 1.25 GPM = ~18.75 GPM of loss
62.68GPM (calculated in Step 4) – 18.75 loss = 43.93 total GPM
43.93GPM × 60 = 2,635 GPH at 15′ head. So we need a pump that can pump at 2,635 GPH PLUS a 25% buffer = 3,294 GPH
Now that we know how much pumping capacity we need, move on to Step 3
Step 3: Refer to the pump’s performance chart
Pump cartons list the pump’s flow capabilities at zero lift. Yet we know that the pump’s performance drops as the head increases. So, we need to dig deeper and consult the pump’s performance curve using our calculated head.
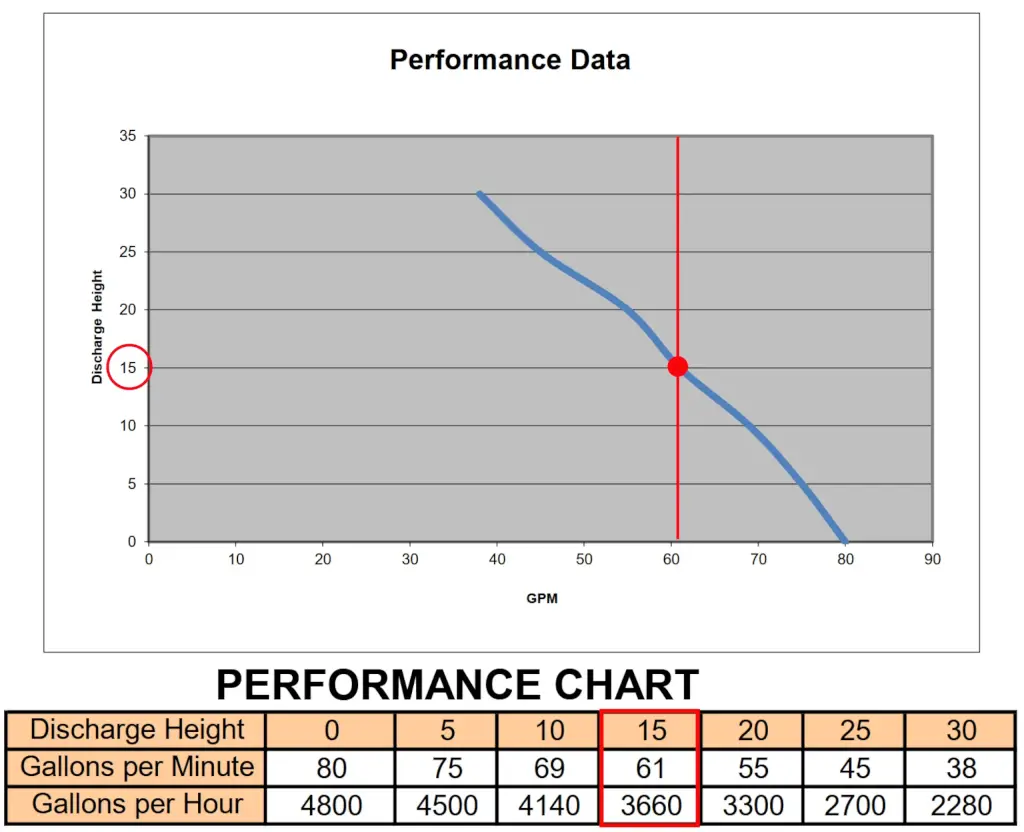
We calculated that we need a pump capable of moving 3,294 GPH. This pump is slightly oversized, but is still within allowable limits.
Sump Pump Construction: Plastic vs Cast Iron
When it comes to sump pump construction, this is where quality really shows.
Plastic Construction — Plastic pumps are corrosion-resistant and inexpensive. They work fine for light-duty applications, but they don’t dissipate heat well. Over time, heat is what kills pump motors. In addition, a plastic impeller and pump body tend to deteriorate due to scrubbing caused by particles in the sump water.
Cast Iron Construction — Cast iron absorbs and dissipates heat much better, keeping the motor cooler and extending its life. It’s also heavier, so it stays planted in the pit instead of shifting around. The cast iron pump body lasts longer than plastic.
Stainless Steel / Cast Iron Combination — This is the premium option. You get corrosion resistance, superior heat management, and durability. If you’re serious about reliability, this is the best choice.
Float Switch Types: The Most Important Reliability Factor
In my experience, most sump pump failures aren’t motor failures—they’re switch failures. So if you’re learning how to buy a sump pump, pay close attention here.
• Vertical Float Switch — This is my top choice. The float rides up and down a rod, which keeps it from getting hung up on debris. It’s ideal for smaller pits and offers very reliable operation.
• Tethered Float Switch — This uses a floating ball on a cord. It’s simple and adjustable, but it needs more room to operate and can get tangled or stuck.
• Diaphragm / Electronic Switches — These are common in higher-end pumps. They have fewer moving parts and are very reliable, especially in tight basins.
If you want my honest recommendation:
Go with a vertical float or diaphragm switch. Avoid cheap tethered designs unless you have plenty of pit space.
Best Sump Pump Brands (What Pros Actually Use)
When I’m choosing a pump, I don’t gamble on unknown brands or store-branded pumps. The cost of failure is too high.
My Top Picks For Professional Grade Sump Pumps
1) Zoeller (my go-to for reliability)
2) Liberty Pumps
3) Wayne (good mid-range option)
4) Superior Pump (budget-friendly but decent)
Zoeller, in particular, has a reputation for durability and performance
Backup Systems: The Feature You Should Never Skip
If you live anywhere with storms or power outages—and in places like Minnesota, that’s a given—you need a backup. You have two options:
• Battery backup systems (most common)
• Water-powered backup systems (no electricity required)
A battery backup can keep your basement dry for hours during an outage and is one of the smartest upgrades you can make. However, the battery might not last longer enough for extended power outages.
A water-powered backup pump uses city water to power a pump. An efficient unit uses 1 gallon of city water to remove 1 gallon of sump water. The less efficient models use 2 gallons of city water for every 1 gallon of sump water. At 3,294 GPH and a typical city water cost, a water-powered backup pump generally costs about $10/hr to operate.
My Professional Buying Strategy
When someone asks me how to buy a sump pump, I keep it simple:
I choose a submersible pump with cast iron construction, sized by GPH for the home’s conditions, equipped with a vertical or diaphragm switch, and backed up by a battery system. That combination almost eliminates failure.
Spend a little more upfront, and you won’t be dealing with water damage later.
©, 2026 Rick Muscoplat
Posted on by Rick Muscoplat