
How to Test Engine Coolant Using a Multimeter
3 Proven Ways to Test Coolant and Prevent Cooling System Damage
Quick Summary
There are three reliable ways to test coolant: checking freeze protection with a coolant tester, using chemical test strips to measure pH and corrosion inhibitors, and performing an electrolysis test with a digital multimeter. The multimeter test is especially valuable because it reveals electrical conductivity in the coolant that can destroy radiators, heater cores, and water pumps. When I test engine coolant, I’m not just checking freeze protection—I’m verifying that the coolant still protects the engine from corrosion, electrolysis, and premature component failure.
Check its freeze protection
The simplest way to test engine coolant is by checking freeze protection. This test tells you whether the coolant mixture contains enough antifreeze to prevent freezing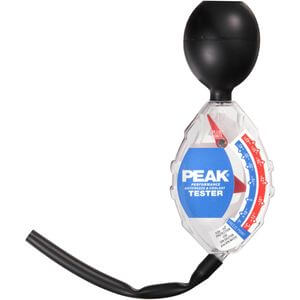 during winter.
To do this test, I use a simple coolant tester from an auto parts store. These testers typically cost less than $10 and measure the coolant’s freezing point.
The procedure is straightforward. I draw coolant into the tester and read the scale, which shows the approximate freeze protection.
While this method is useful, it only measures glycol concentration. It does not tell you anything about corrosion protection.
So even if the freeze protection looks fine, you should still test the coolant using additional methods.
Test coolant condition with test strips
The next step I use to test the engine coolant is to use chemical test strips. These strips measure several important properties of the coolant, including pH level and corrosion inhibitor levels.
There are different types of coolant test strips available:
• Two-way strips measure glycol concentration and pH.
• Three-way strips measure glycol concentration, pH, and reserve alkalinity.
• Four-way strips measure nitrite, molybdate, glycol concentration, and pH.
These tests are extremely valuable because they reveal the actual chemical condition of the coolant—not just the freeze protection.
When I test coolant using strips, I simply dip the strip into the coolant reservoir and compare the color change to the chart on the bottle.
If the pH level or inhibitor levels fall outside the recommended range, it’s time to replace the coolant.
The downside to using test strips is that they usually come in a bottle of 100 strips and that can be pricey. However, some companies sell smaller packs for DIYers.
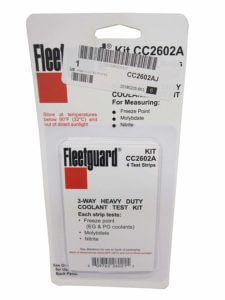
Fleetguard Test Kit CC2602A. Tests for Freeze Point, Molybdate, and Nitrite
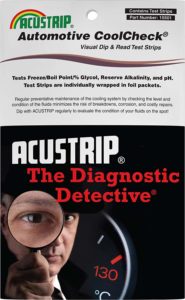
Accustrip 2050-3 (CTS-3) coolant test strips
Test Engine Coolant Using a Multimeter
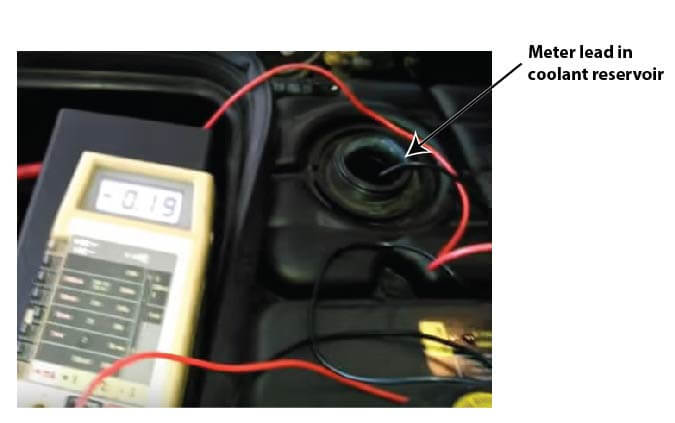
You can check the anti-corrosion properties of your current coolant using a digital multimeter.
Electrolysis occurs when an electrical current flows through the coolant. This current can rapidly corrode metal components throughout the cooling system.
I’ve seen electrolysis destroy radiators, heater cores, and aluminum cylinder heads. The good news is that it’s incredibly easy to test coolant for this problem.
Here’s how I do it.
• First, I set my digital multimeter to measure DC voltage on a 12-volt scale.
• Next, I connect the black meter lead to the negative battery terminal.
• Then I insert the red lead directly into the coolant reservoir, making sure it contacts the coolant but not metal components.
• With the engine running at around 2,000 RPM, I observe the voltage reading.
• If the voltage reading exceeds about 0.3 to 0.4 volts, the coolant is conducting too much electricity. That’s a strong sign the coolant has degraded, or the vehicle has a grounding problem.
When that happens, the first step is usually to replace the coolant. If the coolant is new and the reading is still high, I start checking ground connections between the engine, chassis, and battery.
• Whenever I test engine coolant with a multimeter and see excessive voltage, I know the cooling system is at risk of serious corrosion.
For more information on checking coolant condition, see this article at MotorWeekhttps://motorweek.org/goss_garage/coolant-check/
Why It’s Important to Test Engine Coolant
Before we talk about how to test engine coolant, it helps to understand why the test matters.
Coolant does several critical jobs inside the engine:
• Prevents freezing
• Prevents overheating
• Protects metals from corrosion
• Lubricates the water pump
• Prevents electrolysis damage
When coolant degrades, it becomes acidic. That acid slowly eats away at aluminum components and cooling system seals.
One of the most expensive failures caused by neglected coolant is heater core corrosion. In many modern vehicles, replacing a heater core requires removing the entire dashboard and evacuating the A/C system. I’ve seen those repairs easily exceed $1,000.
That’s why it’s smart to test it regularly.
When You Should Test Engine Coolant
In my experience, the best time to test coolant is during routine maintenance.
I recommend testing it:
• At every oil change
• Before winter
• Before long road trips
• Whenever overheating occurs
Making it a habit to test engine coolant can prevent expensive cooling system failures and extend the life of the radiator, heater core, and water pump.
Final Thoughts
Most people ignore their cooling system until something fails. As a technician, I’ve seen firsthand how expensive that mistake can be.
That’s why I always encourage drivers to test engine coolant regularly. By checking freeze protection, using chemical test strips, and performing a quick multimeter electrolysis test, you can identify coolant problems long before they damage your engine.
When you take the time to test itt, you’re not just maintaining your cooling system—you’re protecting some of the most expensive components in your vehicle.
© 2012 Rick Muscoplat
Posted on by Rick Muscoplat