
Understanding Normal AC Pressure Gauge Readings
AC Pressure Readings: What’s Normal and What’s Not
Quick Summary (Key Takeaways)
• Normal AC pressure gauge readings are directly related to the local ambient temperature and humidity conditions at the time you take the reading, as well as the amount of airflow across the condenser.
• A properly functioning R-134a system typically shows 25–55 psi on the low side and 150–300+ psi on the high side, depending on ambient temperature and humidity.
• Static pressure must be checked first—if it’s wrong, running readings won’t matter.
• Low and high pressures that are too similar often indicate a bad compressor.
• High pressures usually mean either an overcharged condition or poor airflow across the condenser, while low pressures typically point to low refrigerant or restrictions.
Why Normal AC Pressure Gauge Readings Matter More Than Most People Think
I’ll say this straight: if you don’t understand normal AC pressure gauge readings, you’re guessing

If you really want to diagnose your car’s AC system, you must use a manifold gauge set, not the gauge on a DIY recharge kit.
—not diagnosing.
I’ve seen plenty of people hook up a recharge kit, look at the single low-side gauge, and determine whether the system has enough refrigerant and is operating properly. They assume they know what’s wrong based on readings from the low-side gauge. That’s not how AC systems work. You need both sides of the system—low and high—to tell the full story.
To me, reading AC gauges is like reading a scan tool. Once you understand the patterns, you can pinpoint the problem fast—without throwing parts at it.
And it all starts with knowing what “normal” looks like.
What Are Normal AC Pressure Gauge Readings?
Let’s break it down in real-world terms.
Typical R-134a running pressures
• Low side: 25–55 psi
• High side: 150–300+ psi
But here’s the key: These “normal” numbers vary with ambient temperature.
Use this Rule to get a more accurate reading:
• The low side pressure reading should roughly track the evaporator temp (around 30–40°F). Stick a kitchen thermometer in the center duct of your dash. AC set to MAX and recirculate, and doors and windows closed.
• The High side reading should be 2.2 to 2.5 × ambient temperature
So at 80°F ambient temperature:
• Low side: ~40–50 psi
• High side: ~175–210 psi
That’s a healthy system.
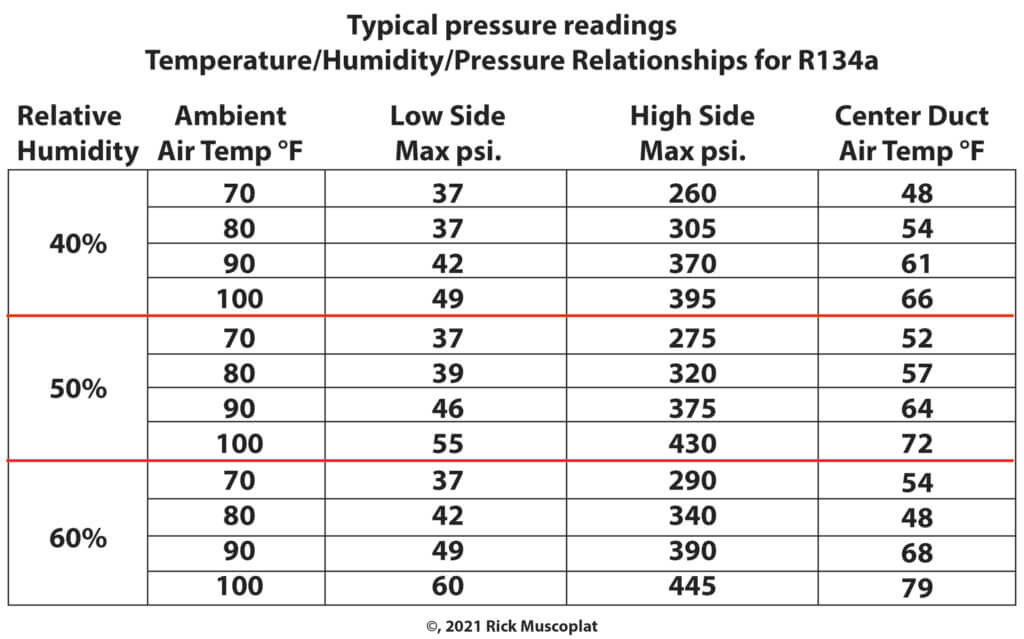
Normal AC Pressure Chart (Real-World Reference)
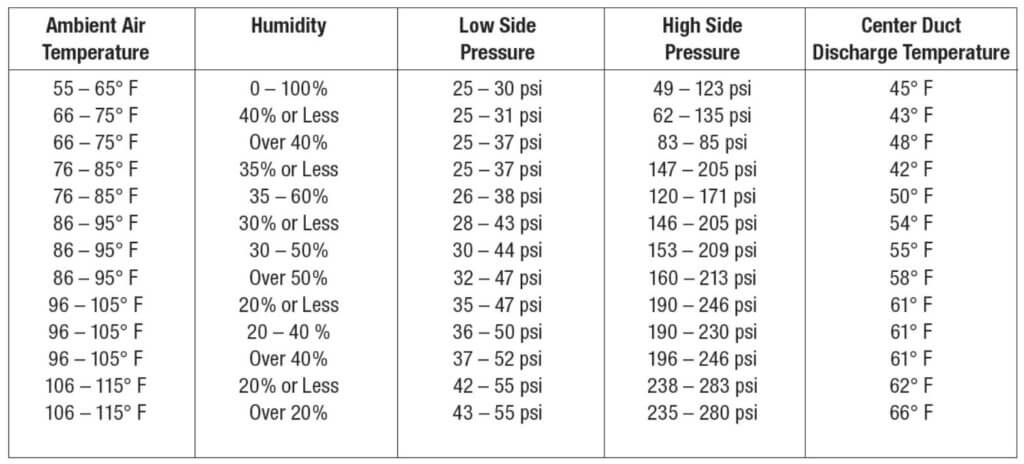
For more information on normal AC pressures, see the charts below.
Normal high and low AC ambient temperature and pressure listing
Ambient Temperature in °F, Low side Pressure Gauge reading, and High side Pressure Gauge reading
65°F Ambient temperature: Low side pressure 25-35 psi High side pressure 135-155 psi
70°F Ambient temperature: Low side pressure 35-40 psi High side pressure 145-160 psi
75°F Ambient temperature: Low side pressure 35-45 psi High side pressure 150-170 psi
80°F Ambient temperature: Low side pressure 40-50 psi High side pressure 175-210 psi
85°F Ambient temperature: Low side pressure 45-55 psi High side pressure 225-250 psi
90°F Ambient temperature: Low side pressure 45-55 psi High side pressure 250-270 psi
95°F Ambient temperature: Low side pressure 50.55 psi High side pressure 275.300 psi
100°F Low side pressure 50-55 psi High side pressure 315-325 psi
105°F Ambient temperature: Low side pressure 50-55 psi High side pressure 330-335 psi
110°F Ambient temperature: Low side pressure 50.55 psi High side pressure 340.345 psi
NOTE: High humidity and airflow velocity across the evaporator and condenser directly affect pressure readings.
How I Check AC Pressure the Right Way
If you want accurate normal AC pressure gauge readings, you have to test correctly.
My exact process
• Set AC to MAX / RECIRCULATE
• Blower on HIGH
• Doors closed (windows open is fine)
• Engine running at 1,200–1,500 RPM
• Attach a full manifold gauge set
If you skip any of these steps, your readings can be misleading.
If your readings are outside the typical pressure/temperature range, see below.
See this post to learn what type of AC system is in your vehicle.
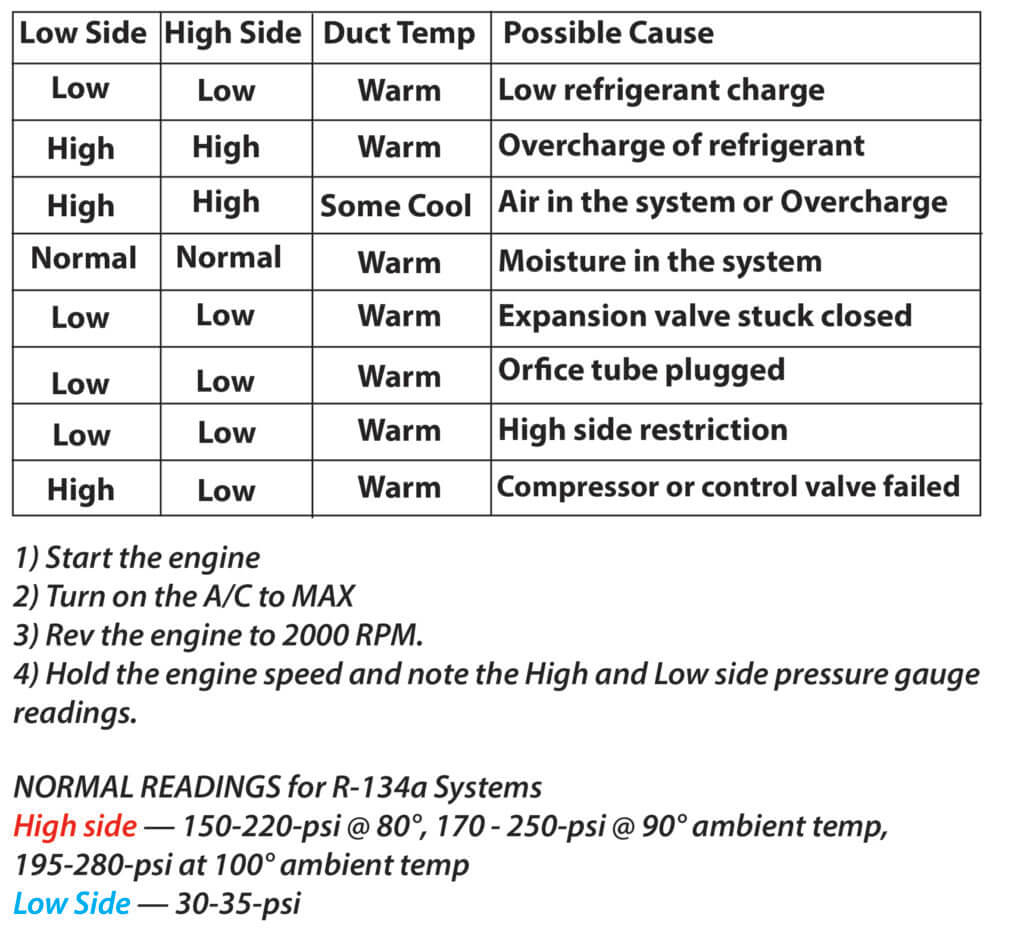
How to Interpret Normal vs Abnormal Pressure Readings
1. Low Side and High Side Are About the Same
Example: 70–90 psi on both sides
What it means
The compressor is running but not pumping
Diagnosis
• Bad compressor
This is one of the easiest calls I make.
2. Both Pressures Are Too High
High low-side AND high high-side with little fluctuation
Common causes
• Overcharged system
• Poor condenser airflow
• Cooling fan problems
• Air contamination
What I do
• Check for clogged condenser fins
• Verify condenser fan operation
3. Low Side Low, High Side Normal or Low
What I see
• Low suction pressure
• Weak cooling
What it means
• Low refrigerant
• Evaporator starving
What’s happening inside
• The evaporator isn’t full, so part of it stays warm while the rest freezes.
This leads to:
• Evaporator icing
• Reduced airflow
• Cycling compressor
4. Low Side Very Low, High Side Low
Both sides below normal
Likely cause
• Restriction in the system
Usually:
• Plugged orifice tube
• Debris contamination
• Moisture freezing at restriction
What Most People Miss About Normal AC Pressures
This is where I see the biggest mistakes.
1. Humidity changes everything — High humidity increases system load and raises pressures.
2. Airflow is critical — DIYers often skip checking the condenser fins and fan. Even a perfectly charged system will show abnormal readings if:
• The condenser is clogged
• The condenser fans aren’t working
3. Refrigerant charge must be exact — R-134a systems only have a 2oz window. Too much refrigerant:
• Raises pressures
• Reduces cooling
Too little:
• Starves evaporator
• Causes icing
4. System type matters — You must know whether you’re working on an orifice or expansion valve system.
• Orifice tube systems behave differently from expansion valve systems
• Variable compressors change pressure behavior
My Go-To Diagnostic Strategy Using Gauge Readings
Here’s exactly how I approach every AC system:
• Check static pressure
• Verify ambient temperature
• Run the system at a controlled RPM
• Compare to known normal ranges
• Look for pressure patterns—not just numbers
• Confirm with airflow and temperature tests
That’s how I avoid guessing—and fix the problem right the first time.
When Pressures Are Normal, But AC Still Doesn’t Cool
This one throws people off all the time.
If pressures look normal but cooling is weak, I check:
• Blend door operation
• Heater control valve
• Cabin air filter
• Evaporator cleanliness
Sometimes the AC system works perfectly, but heat is still being mixed in.
Check the heater control valve — Determine if the vehicle has a heater control valve. The valve is usually under the hood and opened and closed by a vacuum motor or cable. Look for heater hoses and either a cable or vacuum hoses running to a valve. Use a hand pump vacuum to operate the valve or move the cable by hand to close it off. Then, check the cooling.
Check air temperature or blend door and actuator — If the cabin air temperature is controlled by an air-temperature/blend-door system, check the actuator operation to see if it moves as you change the temperature setting. In some cases, the fix can be as simple as replacing an actuator. If the actuator moves but the air door doesn’t, try moving the door by hand. Many times, the door can get stuck or break off from its hinges.
Check the cabin air filter — Yeah, it’s just like a furnace filter. If it’s clogged, it can restrict airflow. That, in turn, causes the evaporator to freeze up, shutting off the AC. Don’t skip this part. Many DIYers replace AC parts only to discover a clogged cabin air filter after spending hundreds on parts.
Check for a dirty evaporator coil — Leaves and dust can clog the fins of an evaporator coil, reducing its ability to remove heat from your car. To access the evaporator coil, remove the blower motor resistor and take a peek inside. To clean the evaporator coil, use a foaming chemical cleaner.
For more troubleshooting tips using gauges, see this post
©, 2020 Rick Muscoplat
Posted on by Rick Muscoplat