
How to Fix a Radiator Leak: Step-by-Step Guide
How to use radiator stop leak products to fix pinhole radiator leaks
A leaking radiator can lead to serious engine problems, including overheating, which can cause extensive damage and costly repairs. Fixing a radiator leak promptly is crucial for maintaining your vehicle’s performance and longevity. This article provides an in-depth guide on how to use radiator stop leak products to fix pinhole leaks in your car’s radiator.
Three types of radiator leaks
• Seam leaks—Most modern radiators are built with an aluminum core and plastic tanks. The tanks are connected to the core with a sealant and crimped in place. Leaks often form the crimped areas due to the degradation of the sealant or a deformity or degradation in the plastic.
• Corrosion leaks— Leaks can also form in the thin horizontal or vertical tubes that carry the coolant across the radiator. These tube leaks are usually caused by electrolysis corrosion due to exposure to salt and water.
• Impact leaks— Because the radiator sits up front, it’s exposed to flying gravel and stones that can puncture the thin tubes and cause a leak.
Which leaks are candidates for repair with a radiator stop leak product?
Seam leaks— Pinhole seam leaks can usually be fixed with a radiator stop leak product. However, larger seam leaks require a complete radiator replacement.
Corrosion leaks— Corrosion leaks are usually pinhole-sized and can be fixed with these products. However, once started, the corrosion usually spreads beyond the original site, so don’t be surprised if you spring new leaks after plugging the first one.
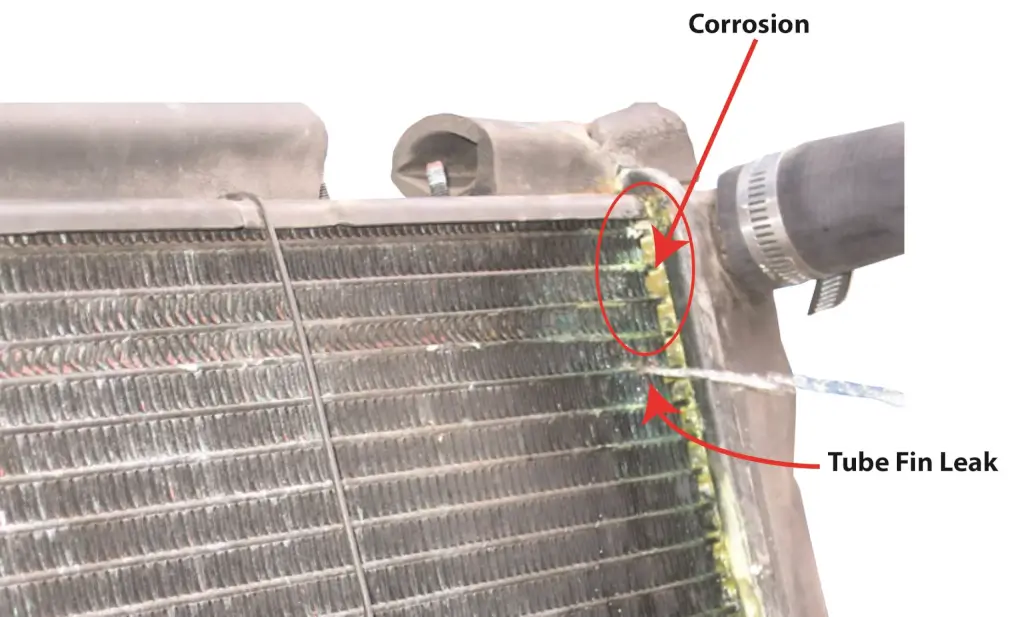
This image shows a pinhole-sized radiator leak caused by corrosion
Impact leaks are usually too large to be fixed by a radiator stop leak product, meaning the radiator has to be replaced.
Step-by-step guide to fixing a radiator leak.
1) Find and evaluate the leak
• If you can see the leak, proceed with the repair shown below.
• If you can’t locate the leak, rent a cooling system pressure tester from an auto parts store. Pressurize the system to 15 psi and use a flashlight to find the leak. If the leak produces a small mist or stream of coolant, it can be fixed with a stop-leak product. However, if the leak produces a strong stream of coolant, the hole is too large to be fixed with a stop-leak product
2) Purchase a radiator stop-leak product
Several companies make stop-leak products; the best-known companies are Bars and K&W.
Read the label: Some products require you to flush the system and fill with fresh coolant, while others allow you to simply add the product to your current coolant.
However, all the products warn against adding a stop-leak product to a system that’s contaminated with oil from a transmission oil cooler leak or a head gasket leak. In addition, if the system is badly rusted, you must flush it first.

3) Add the exact amount of stop leak product to the radiator
This is where most DIYers screw it up by thinking that more is better. Do not add more product than the manufacturer recommends. More is not better. Adding too much stop leak product can clog in your car’s heater core, costing you far more to fix than the cost of a replacement radiator.
4) Run the engine at idle to allow the product to circulate and plug leak
Some products require the coolant to be at operating temperature which means you’ll have to keep the system filled while it heats up. If the leak is too large to maintain adequate coolant level, then a stop leak product won’t work for you.
5) Top off the coolant
Once you’re confident that the leak has been resolved, it’s time to refill the radiator with fresh coolant. Refer to your vehicle’s manual to find the appropriate coolant mixture and fill the radiator to the recommended level. Remember also to check the coolant reservoir and top it up if necessary.
6) Monitor for Leaks
After refilling the radiator, monitor the vehicle closely for the next few days. Look for any signs of coolant leaks or changes in engine temperature. If you notice anything unusual, address it promptly to prevent further issues.
NOTE: If you flush the cooling system any time after this repair, you’ll most likely have to repeat the entire procedure. Flushing can remove the plugging material.
©, 2023 Rick Muscoplat
Posted on by Rick Muscoplat