Heat load test on an auto AC orifice tube system
How to perform a heat load test on an auto AC orifice tube system
Conduct a maximum heat load test on your car’s AC to find out why it’s not cooling. To get accurate results from your heat load test, you’ll have to test the condenser, evaporator and air duct temperatures.
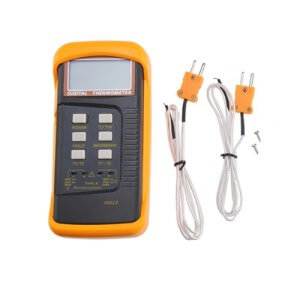
You’ll need a digital readout thermometer and a temperature probe to perform a maximum heat load test. One inexpensive option is the AGPtek Dual Two Channel Digital Thermometer 2 K-Type Thermocouple Sensor.

Digital temperature meter with two thermocouples
and a PYLE Meters PCTL01 Pipe Clamp Temperature Lead

Clamp temperature sensor
With these thermometers you can check the level of refrigeration charge, the operation of the evaporator and condenser, as well as and restrictions in hoses. Hey, if you want to save the cost of a shop conducting these tests, you simply have to own or have access to the right tools, so stop whining. There’s no cheap magic bullet to fix your car’s air conditioning system.
Set up the heat load test
1) Park the vehicle outside in direct sunlight
2) Open all doors and windows
3) Start and run the engine up to full operating temperature
4) Let engine run at idle
5) Set AC to MAX
6) Set the blower on High
Click on the PDF below to open it
Start with the condenser temperature test
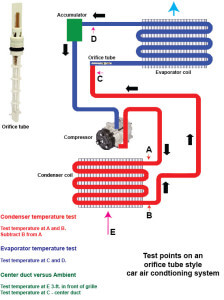
Clamp your temperature probe on the inlet A and outlet B tubes on the condenser coil. This test determines how much heat is being removed by the condenser. The condenser coil must remove at least 20° and no more than 50°F. Subract the outlet B reading from the inlet A reading.
If the temperature difference between the inlet and outlet is less than 20°F here are the possible causes:
• Poor airflow across condenser coil.
• Debris clogging the coil fins. Clean the condenser coil.
• Improper airflow across condenser. Check for proper condenser fan operation (if electric) or • fan clutch operation if mechanical radiator fan is used.
• Check for broken or missing fan shrouds or seals
• The system is overcharged
If the Heat load test on an auto AC orifice tube system is more than 50°F here are the possible causes:
• There’s air in the system. Evacuate and pull vacuum for at least 45-mins.
• System is low on charge.
• Restriction in condenser coil—sludge, too much oil, mechanical restriction due to pinched tube
Then conduct an evaporator temperature test
Clamp your temperature probe onto the high pressure line and suction line going into and out of the evaporator coil at C and D. Measure the temperature of the suction line and compare it to the high pressure line. The temperature should be the same on both lines. The refrigerant should not gain heat in the evaporator. The heat loss in the evaporator should be just enough to boil the liquid refrigerant and turn it into a gas, but no more. However, there’s a 5° tolerance.
If the suction line temperature is MORE than 5° warmer than the temperature of the high pressure line, it is gaining superheat. That’s the sign of a low system charge or a restricted orifice tube. In a system that’s low on charge, the refrigerant boils immediately as it’s released from the orifice tube and continues to pick up heat beyond the conversion (liquid to gas) point. The gas is not only hotter, but the gas doesn’t carry the refrigerant oil back to the compressor. The oil pools at the bottom of the evaporator, starving the compressor and causing it to fail.
If the suction line temperature is MORE than 5° colder than the temperature of the high pressure line, it indicates a system overcharge or an incorrect orifice tube. Or, it can also indicate a serious undercharge condition. In an overcharged system, the excessive refrigerant floods the evaporator and converts to a gas as it exits the evaporator coil. The refrigerant pulls heat out of the tubing under the hood, causing the suction line to accumulate frost.
In a low charge state, the inlet side of the evaporator coil gets very cold, very quickly due to the rapid vaporization of the refrigerant. A high moisture in the airflow can cause ice to accumulate near the bottom of the evaporator coil. As the ice forms, the heat removal process takes place higher and higher in the evaporator coil until the point where the refrigerant is still in a liquid state as it spills into the suction line. At that point it’s still removing heat, causing a much colder suction line temperature.
Finally, conduct a duct versus ambient temperature test
Measure the ambient temperature 3-ft. in front of the grille. Do NOT use radio or TV temp readings. Next, measure the air temperature at the center duct.
A properly operating system must be capable of removing at least 30°F of heat from the ambient air under this maximum stress test. If the system passes the maximum stress test, you’ll get better results when driving with the windows closed.
©, 2013 Rick Muscoplat
Posted on by Rick Muscoplat

