
How to check the condition of the struts in your car
There’s only one way to test the condition of the struts in your car or truck, and it’s not what you think
Ask any shade tree mechanic for the best way to test car struts, and they’ll tell you to bounce up and down the fender to see how many times it rebounds. WRONG. That is the test method for shocks, not struts. If you perform the bounce test for struts, you’ll ALWAYS get a false positive result unless the struts have suffered a CATASTROPHIC failure.
The only valid car strut tests
Forget about the bounce test for struts and take it for a short road test. You don’t have to take it offroad to check your car struts. In fact, a simple drive around the block should do it. Here’s how:
Perform a hard stop to test the car strut’s ability to dampen noise dive
When you stop, your body weight shifts forward, placing more stress on the front brakes. Good car struts resist nose dives. If you notice a significant nose dive during a hard stop, your car struts are worn out.
Another symptom of worn car struts is premature front brake wear due to excessive nose dive and excess weight transfer to the front brakes.
Perform a hard acceleration to test the car struts’ ability to prevent rear squat
During hard acceleration body weight shifts towards the rear wheels causing the rear end to squat. Car struts are designed to resist squat and keep the rear end fairly level. If your car struts allow squatting during acceleration, the rear struts are probably worn.
Perform a hard swerve to test the car struts’ ability to dampen roll
Swerve the car hard and notice how much body roll you see. If the roll is more than normal, chances are the struts are worn
Perform a visual inspection of the car’s struts and suspension components.
Are the car struts leaking?
Most car struts seep a small amount of fluid where the piston 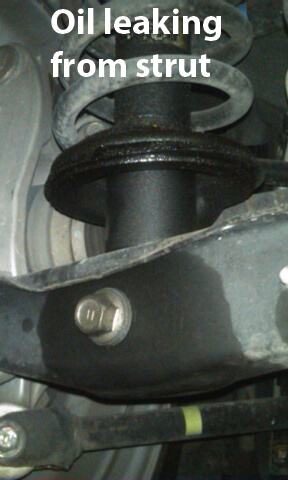 enters the strut body. Acceptable seepage appears as a light but dry oil stain. That, by itself, isn’t a reason to replace struts. However, if the seepage is wet and shiny, you have a worn piston seal and you’re losing more than an acceptable amount of fluid. The struts must be replaced.
Are the control arm bushings cracked or missing?
Rubber cushions affect the strut’s ability to properly dampen spring oscillations. Since you most likely have to disconnect 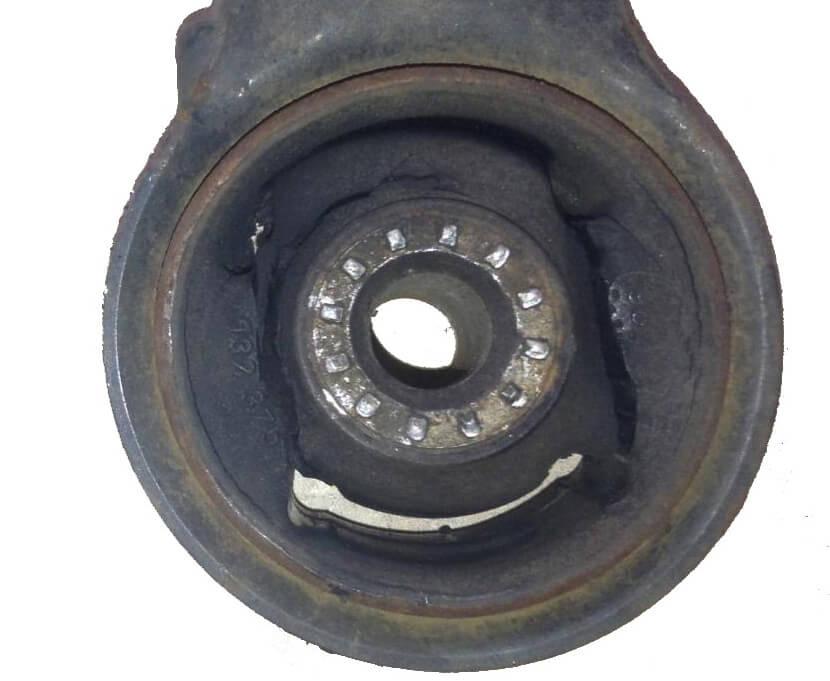 the strut to replace worn bushing, it’s a good idea to do a full suspension evaluation and replace all worn parts at the same time.
The bounce test isn’t listed as a valid test by any strut manufacturer. To the contrary, here’s what Monroe has to say about testing struts:
“Remember, a shock absorber provides resistance to bounce, roll or sway, brake dive, and acceleration squat. This means that the shock needs to be checked for each of these — and the best way to do this is while driving the vehicle.”
Why the strut bounce test for struts produces false results
A car strut is a structural component of your vehicle. It does far more than dampen spring oscillations and keep your tires on the road. A car strut is mounted diagonally between the steering knuckle and the strut tower, eliminating the need for an upper control arm and ball joint. A complete car strut assembly includes the strut, jounce bumper, bellows, coil spring, and strut plate (also called a strut mount) containing a bearing that allows the strut to turn as you steer.

Compare struts and shocks
The strut attaches to the strut plate via a thick, stiff rubber bushing. Unlike an upper control arm in a typical shock absorber application, the strut mount doesn’t allow much up-and-down movement, only a slight diagonal tilt.
The whole point of a strut is to cut cost AND add stiffness to the steering to imitate European cars. That stiffness is created by the strut being secured to the strut tower.
The bounce test for shock absorbers is designed to test the dampening capabilities of the shock. When you bounce on the fender of a vehicle fitted with struts, you’re not really compressing the strut rod enough to get a realistic read on the strut’s dampening abilities.
Here’s why: When you apply downward motion on the fender, here’s how the motion travels:
Strut tower—>strut mount, strut mount—>coil spring, coil spring—>strut body, Strut body—>control arm.
Once the motion transfers to the control arm, it produces positive camber until it reaches camber limit. Then, the equal and opposite reaction causes the rubber in the strut mount to flex toward the engine.

Strut mount
It’s only after all that movement that you get enough strut piston compression to start the dampening process.
In other words, the bulk of the energy is spent producing positive camber and strut mount flex.
©, 2016 Rick Muscoplat
Posted on by Rick Muscoplat