
Nail Your CV Axle Replacement With These Pro Tips
How to Avoid the Top CV Axle Replacement Mistakes
Quick Summary
CV axle replacement isn’t hard, but small details matter. If the circlip doesn’t seat, the axle can back out. If you reuse the axle nut or torque it incorrectly, you can destroy a wheel bearing. And if you nick the boot during installation, you’ve just guaranteed another failure. In this article, I’ll walk you through real-world CV axle replacement mistakes and the axle shaft replacement tips I rely on to make sure the job is done once and done right.
Article
How to Avoid the Top CV Axle Replacement Mistakes
I’ll be the first to say it: CV axle replacement looks easier than it really is. Pull the old axle, slide the new one in, torque the nut, and you’re done—at least that’s how it looks on a quick YouTube video. But in the real world, this job is full of small traps that can turn a simple repair into vibration problems, leaks, or even total loss of drive. Over the years, both in the shop and working on my own vehicles, I’ve learned that success with CV axle replacement comes down to understanding how the parts lock together and why each step matters
The Circlip: The Most Critical Step in CV Axle Replacement
The most common—and most damaging—mistake I see during CV axle replacement is improper circlip engagement. The inner stub shaft uses a spring-steel circlip to lock the axle into the differential or transaxle. That tiny piece of metal is all that prevents the axle from slowly walking out under load.
When I install a new axle, I don’t rely on hope or guesswork. I’m listening and feeling for that subtle “click” as the circlip compresses and then snaps into its groove inside the transmission. Sometimes the click is obvious; sometimes it’s barely noticeable. That’s why one of my core axle shaft replacement tips is this: always tug on the axle after installation. If it slides back out easily, it isn’t seated—period.
I also take the time to align the circlip opening at the 12 o’clock position and lightly grease the splines and circlip. That little bit of prep can make the difference between a clean install and a stubborn axle that refuses to seat.

When the Old Circlip Stays Behind—and Wrecks the Job
Here’s a mistake that even experienced DIYers can make. During CV axle replacement, the old circlip can pop off the stub shaft and stay lodged inside the transmission. If you don’t notice it and you install the new axle anyway, the new circlip has nowhere to seat. Best case, the axle won’t fully install. Worst case, you damage the new axle or the transmission.
Anytime I pull an axle, I immediately check the old stub shaft to confirm the circlip is still attached. If it’s missing, I stop right there. One of my most important axle shaft replacement tips is to inspect the transmission opening with a flashlight and remove the old circlip with a pick or magnet before moving forward. Skipping this step is a guaranteed headache.
Why Reusing the Axle Nut Is a Serious CV Axle Replacement Mistake
If your new axle comes with a replacement axle nut, that’s not a suggestion—it’s a requirement. Modern axle nuts are prevailing-torque, one-time-use fasteners. They’re designed to
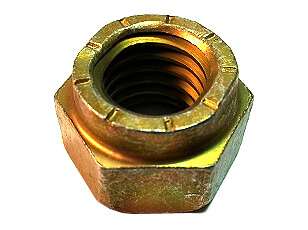
This is a one-time-use prevailing torque style axle nut. It can’t be reused.
deform slightly to maintain clamping force. Reusing the old nut during CV axle replacement is asking for trouble.
I’ve seen reused axle nuts cause hub spline wear, vibrations, loose axles, and premature wheel bearing failure. One of my non-negotiable axle shaft replacement tips is simple: always install the new nut that comes with the axle. If no nut is included, buy a new OEM-style replacement.

Always use the new nut that comes with the replacement CV axle
Torque Isn’t Optional—It’s Everything
Axle nuts are torqued far tighter than most fasteners on a vehicle, often between 150 and 250 ft-lbs. That torque sets the preload on the wheel bearing. Too loose, and the bearing pounds itself to death. Too tight, and you crush it internally.
During CV axle replacement, I always finish tightening with a torque wrench—not an impact gun. An impact is fine for removal or snugging, but final torque must be accurate. This is one of those axle shaft replacement tips that directly affects safety. I also make sure any cotter pins, staked nuts, or locking features are fully secured before the vehicle leaves the ground.
Protecting the Boot: The Mistake That Shows Up Later
One of the sneakiest CV axle replacement mistakes doesn’t show up right away. It shows up weeks later as grease splattered all over the suspension. That’s usually the result of a nicked or torn boot during installation.
I never push, pry, or hammer on the boot. I handle the axle by the shaft, guide it straight into the transmission, and keep the boot clear of sharp edges. Another one of my go-to axle shaft replacement tips is patience—forcing an axle at a bad angle is how boots get damaged.
A torn boot doesn’t just make a mess; it allows dirt and moisture into the joint, which guarantees premature CV failure.
Final Thoughts From the Shop Floor
Done correctly, CV axle replacement is a durable, long-lasting repair. Done carelessly, it becomes a repeat failure or a safety issue. The difference is attention to detail. Every time I perform CV axle replacement, I verify circlip engagement, confirm the old circlip is removed, use a new axle nut, torque it to spec, and protect the boot like it’s made of glass. Those same axle shaft replacement tips are what keep comebacks out of my bay—and they’ll do the same for you.
©, 2025 Rick Muscoplat
Posted on by Rick Muscoplat