
How to Find What’s Draining Your Car
Step-by-Step Guide to Locate What’s Draining Your Car Battery
Quick Summary
If your battery keeps dying overnight or after sitting for a few days, you’re probably dealing with a parasitic battery drain. The good news is that you can find what’s draining your car battery with either a current-draw test or a voltage-drop test. In this guide, I’ll explain both methods, show you the tools I use, and reveal the most common causes of battery drain, including stuck relays, malfunctioning modules, glove box lights, aftermarket electronics, and charging system issues. By following a systematic testing process, you can pinpoint the exact circuit that’s draining your battery and fix it before it leaves you stranded.
How to Find What’s Draining Your Car Battery
As a retired ASE Master Technician, I’ve diagnosed hundreds of vehicles with dead battery complaints. In many cases, the owner had already replaced the battery, only to discover the new one had died too. The reason is simple: the battery wasn’t the problem. A hidden electrical draw was slowly draining it while the vehicle sat parked.
Learning how to find what’s draining your car battery is one of the most valuable diagnostic skills a DIYer can develop. It can save hundreds of dollars on unnecessary battery replacements and prevent frustrating no-starts.
What Is a Parasitic Battery Drain?
Every modern vehicle draws a small amount of electricity after the engine is shut off. This is normal. Several systems need continuous power, including:
• Radio memory
• Clock
• Security system
• Keyless entry module
• The engine computer’s adaptive memory
In most vehicles, the normal draw is between 20 and 50 milliamps (0.02 and 0.05 amps). Anything significantly above that range can eventually kill the battery. This unwanted current draw is known as a parasitic battery drain.
Common Causes of Battery Drain
When customers ask me how to find what’s draining their car battery, I always start with the most common offenders.
Interior Lights That Stay On — A faulty switch can leave these lights on even when the compartment appears closed. These include:
• Glove box lights
• Vanity mirror lights
• Trunk lights
• Underhood service lights
Stuck Relays — Relays can weld themselves internally and continue powering a circuit long after the key is removed. Common examples include:
• Cooling fan relays
• Fuel pump relays
• Accessory relays
• Aftermarket Accessories
Many battery drain complaints begin shortly after installation of:
• Dash cameras
• Remote starters
• Stereo amplifiers
• GPS trackers
• Alarm systems
Poorly installed aftermarket electronics are among the leading causes of parasitic battery drain.
Control Modules That Never Go to Sleep — Modern vehicles contain dozens of computer modules. If even one module remains awake after shutdown, it can draw enough current to drain the battery overnight.
Before You Start Testing
I always perform these checks first:
Check Battery Condition — A weak battery can mimic a parasitic drain problem.
Before testing:
• Load test the battery
• Verify battery age
• Check the terminal condition
• Inspect for corrosion
• Verify Charging System Operation
Many drivers assume they have a battery drain when the real problem is inadequate charging.
With the engine running, the charging voltage should typically be 13.5 to 14.8 volts. If the charging voltage is low, repair the charging system first.
There Are Two Proven Methods to Find a Battery Drain
Both approaches identify which circuit is responsible for the battery drain, but they use different strategies and tools.
Method 1 – Current Draw Testing (Amp Clamp or Multimeter in Series)
Method 2 – Voltage Drop Testing (Fuse-by-Fuse Voltage Comparison)
I’ll walk you through both methods step by step and explain the pitfalls that can lead to false readings or blown fuses.
Method #1: Current Draw Testing
This is the traditional way to find what’s draining your car battery. I prefer using a low-amp clamp meter because it’s faster and safer than placing a multimeter in series.
Tools You’ll Need
• Low-amp current clamp (preferred)
• Digital multimeter
• Fuse puller
• Phone camera
• Vehicle wiring diagram

How I Perform a Current Draw Test
Step 1: Turn Everything Off — Remove the key and shut off all accessories.
Step 2: Allow Modules to Sleep — Modern vehicles can take: 15 to 45 minutes before entering sleep mode. Patience matters here.
Step 3: Measure Current Draw — Using a low-amp clamp:
• Clamp around the negative battery cable
• Monitor current flow
A healthy vehicle should draw less than 50 mA.
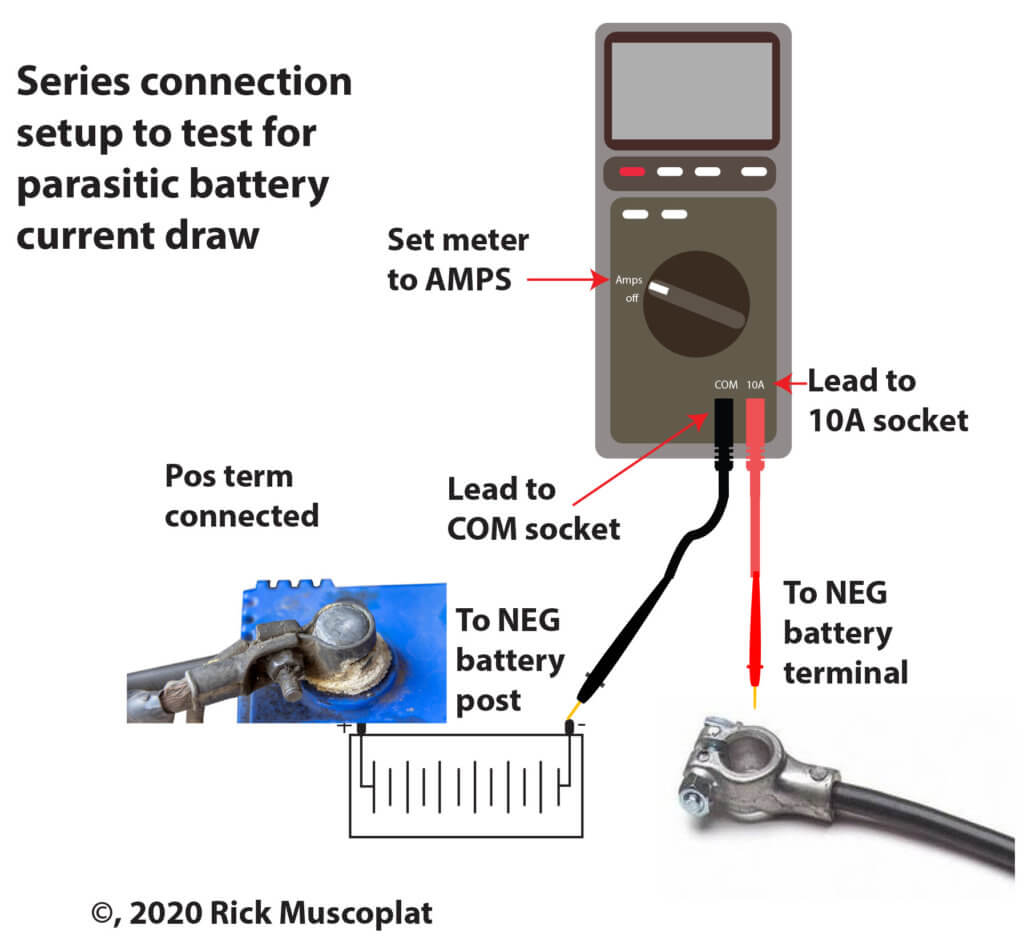
Or, connect a multi-meter in series with the negative battery cable
Step 4: Remove Fuses One at a Time — Document fuse locations with your phone. Then remove one fuse at a time while monitoring current. When the current drops significantly, you’ve identified the suspect circuit.
Why I Prefer Voltage Drop Testing
Over the years, I’ve shifted toward voltage drop testing because it’s easier and less disruptive. I don’t have to:
• Disconnect the battery
• Risk blowing meter fuses
• Wake sleeping modules
• Pull dozens of fuses
The results are just as accurate.
Method #2: Voltage Drop Testing
If you’re looking for the easiest way to find what’s draining your car battery, this is the method I recommend.
Why It Works
Current flowing through a fuse creates a tiny voltage drop. By measuring that voltage drop, I can determine which circuit is drawing power. The higher the voltage drop, the greater the current flow.

Set the door latch using a screwdriver before voltage drop testing
Preparing the Vehicle
The vehicle must enter sleep mode before testing.
I typically:
• Open all doors.
• Manually latch each door latch with a screwdriver.
• Leave the doors physically open but electronically “closed.”
• Wait for modules to go to sleep.
This allows access to interior fuse panels without waking up the vehicle.
How to Perform Voltage Drop Testing
Step 1: Set your digital multimeter to millivolts (mV).
Step 2: Touch the probes to the fuse test points.
Step 3: Measure every fuse without removing it.
Step 4: Locate the fuse showing the highest voltage drop.
Step 5: Use a fuse voltage-drop conversion chart to determine the actual current draw.
Step 6: Trace the components powered by that circuit. Disconnect each component individually until the voltage drop disappears. The last component disconnected is usually the source of the drain.

Mistakes That Can Ruin Your Diagnosis
I’ve seen DIYers waste hours because of these common mistakes.
Not Waiting for Sleep Mode — Many modules remain active for 30 minutes or more. Testing too early creates false readings.
Reinstalling Removed Fuses — Removing and reinstalling a fuse wakes up the module on that circuit. This restarts the sleep timer.
Using the Wrong Meter Range — Always verify your meter settings before connecting it. One wrong setting can blow the internal fuse.
Ignoring the Charging System — A weak alternator can create symptoms identical to a battery drain. Always verify the charging voltage first.
Signs You Have a Parasitic Battery Drain
Look for these symptoms:
• Battery dies overnight
• The vehicle won’t start after sitting for several days
• The battery repeatedly tests good but goes dead
• The new battery fails quickly
• Frequent jump-starts are needed
• The battery warning light occasionally appears
These are classic indicators that it’s time to find what’s draining your car battery.
For more information on the causes of parasitic battery drain, read Understanding the Causes of Parasitic Battery Drain
My Expert Tips for Preventing Battery Drain Problems
• Drive Long Enough to Recharge
• Short trips prevent full battery recovery.
• Inspect Aftermarket Electronics
• Poor installations create many battery drain complaints.
• Keep Battery Terminals Clean
• Corrosion increases resistance and complicates diagnosis.
• Test Battery and Charging System Annually
• A simple annual test can identify problems before they become major repairs.
• Address Electrical Problems Immediately — Small parasitic drains often grow larger over time.
Final Thoughts on How to Find What’s Draining Your Car Battery
When a battery repeatedly goes dead, don’t assume the battery is bad. In my experience, a hidden parasitic draw is often the real culprit.
The key is using a structured diagnostic approach. Whether you choose current draw testing or voltage drop testing, both methods can accurately find what’s draining your car battery if performed correctly.
My personal preference is voltage drop testing because it’s faster, safer, and less likely to wake sleeping modules. But whichever method you choose, patience and attention to detail are the keys to success.
Find the drain early, and you’ll save yourself the expense of replacing batteries, alternators, and other parts that weren’t actually the problem.mp clamp.
©, 2020 Rick Muscoplat
Posted on by Rick Muscoplat