
When to Replace an Oxygen Sensor: Tests to Perform
Which codes mean it’s time to replace an oxygen sensor
The oxygen sensor plays a critical role in ensuring your engine runs efficiently, reducing emissions, and maintaining optimal fuel economy. However, like all components, it can wear out over time, leading to various issues with your vehicle’s performance. When the ECM senses a problem with the oxygen sensor, it sets a trouble code. But that doesn’t always mean the sensor is bad. In many cases, the sensor is telling the truth, and the root cause is due to an air/fuel problem. Knowing when and when not to replace an oxygen sensor is crucial for maintaining your car’s health and avoiding costly repairs.
Do you replace an oxygen sensor based on mileage?
That depends. The first-generation oxygen sensors tended to wear out between 60,000 and 90,000 miles. They didn’t always set a trouble code as they wore out, so it was common for the shop to automatically replace an oxygen sensor if it had reached that mileage range. Those first-generation “narrow-band” sensors were fairly inexpensive, so it sometimes made sense to skip the testing and replace them.
However, the more modern “wide-band” air/fuel ratio sensors are far more sophisticated and 2 to 3 times the price of a narrow-band sensor. They also don’t wear out at predictable mileage ranges like their predecessors. So you should test a wide-band sensor, rather than automatically replacing it.
Not all oxygen sensor codes require a new oxygen sensor
I’ve listed all the generic oxygen sensor-related trouble codes. I’m going to break down what they mean and which tests you should perform before replacing the sensor.
Let’s start with oxygen sensor location definitions
Bank refers to the sensor’s location on a “V” style engine. Bank 1 is the engine’s side with cylinder #1, while bank #2 is the opposite.
Sensor 1, Sensor 2, and Sensor 3 refer to whether the sensor is located in front of the catalytic converter (sensor 1), after the catalytic converter (sensor 2), or after a secondary catalytic converter (sensor 3).
Understanding oxygen sensor heaters
An oxygen sensor must reach a certain temperature before providing accurate readings. Car makers learned long ago that an oxygen sensor can be heated to the right temperature with hot exhaust gas but drop below that minimum temperature when the engine is idling in cold weather. They began using oxygen sensors with a built-in heater to correct that issue. The heater keeps the sensing elements at the correct temperature at all times. An oxygen sensor heater runs off of battery voltage, and the circuit is always fused.
An oxygen sensor heater code does NOT always mean you should replace and oxygen sensor, because the problem could be a fuse, wiring harness, or connector issue.
So, if you see any of the oxygen sensor-related trouble codes shown below, do NOT automatically replace an oxygen sensor. Start by checking the oxygen sensor heater fuse and checking for heater power and ground right at the oxygen sensor electrical connector. You may need a wiring diagram to determine which oxygen sensor terminals to check.
How the ECM checks the oxygen sensor heater
When you start the engine, the ECM knows the oxygen sensor is receiving power to the heater by monitoring the voltage drop on the heater circuit. If it sees a large voltage drop, it knows the heater is getting power. If the voltage drop is higher or lower than expected, it knows there’s a problem. The issue can be increased caused by resistance in the power feed to the heater (usually caused by corrosion in the connection or splice). If there’s no voltage drop, the ECM assumes there’s an open in the circuit, either from the wiring harness or the heater itself. Either way, a heater low or high voltage code is something that must be diagnosed before you automatically replace the sensor.
How to diagnose an oxygen sensor heater code
• Test for Power and Ground— Disconnect the electrical connector at the specified oxygen sensor. Then, using a multimeter and a wiring diagram, turn the key to RUN, check for battery voltage, and ground on the heater circuit at the terminal in the harness. If you find both, that confirms the problem is the sensor. Replace the sensor listed in the code. If you don’t find battery voltage or good ground, check the fuse and test for an open in the harness or connector. Replacing an oxygen sensor at this point would be a complete waste of money.
Common oxygen sensor heater codes
P0030 Heated Oxygen Sensor (H02S) Heater Control Circuit Bank 1 Sensor 1
P0031 Heated Oxygen Sensor (HO2S) Heater Circuit Low Voltage Bank 1 Sensor 1
P0032 Heated Oxygen Sensor (HO2S) Heater Circuit High Voltage Bank 1 Sensor 1
P0036 Heated Oxygen Sensor (HO2S) Heater Control Circuit Bank 1 Sensor 2
P0037 Heated Oxygen Sensor (HO2S) Heater Circuit Low Voltage Bank 1 Sensor 2
P0038 Heated Oxygen Sensor (HO2S) Heater Circuit High Voltage Bank 1 Sensor 2
P0042 HO2S Heater Control Circuit (Bank 1, Sensor 3)
P0043 HO2S Heater Control Circuit Low (Bank 1, Sensor 3)
P0044 HO2S Heater Control Circuit High (Bank 1, Sensor 3)
P0050 Heated Oxygen Sensor (HO2S) Heater Circuit Bank 2 Sensor 1
P0051 Heated Oxygen Sensor (HO2S) Heater Circuit Low Voltage Bank 2 Sensor 1
P0052 Heated Oxygen Sensor (HO2S) Heater Circuit High Voltage Bank 2 Sensor 1
P0053 HO2S Heater Resistance Bank 1 Sensor 1 (PCM)
P0054 HO2S Heater Resistance Bank 1 Sensor 2 (PCM)
P0055 HO2S Heater Resistance Bank 1 Sensor 3 (PCM)
P0056 Heated Oxygen Sensor (HO2S) Heater Circuit Bank 2 Sensor 2
P0057 Heated Oxygen Sensor (HO2S) Heater Circuit Low Voltage Bank 2 Sensor 2
P0058 Heated Oxygen Sensor (HO2S) Heater Circuit High Voltage Bank 2 Sensor 2
P0059 HO2S Heater Resistance (Bank 2, Sensor 1)
P0060 HO2S Heater Resistance (Bank 2, Sensor 2)
P0061 HO2S Heater Resistance (Bank 2, Sensor 3)
P0062 HO2S Heater Control Circuit (Bank 2, Sensor 3)
P0063 HO2S Heater Control Circuit Low (Bank 2, Sensor 3)
P0135 O2 Sensor Heater Circuit Malfunction (Bank 1 Sensor 1)
Understand oxygen sensor circuit trouble codes
This is the next big area of misunderstanding for DIYers
The codes below tell you the ECM is seeing a problem in the sensing portion of the circuit. For example, a P0130 means the ECM sees a circuit malfunction. The code doesn’t say, “oxygen sensor is bad” It only says the circuit is bad. That could mean there’s a problem with the wiring harness, the connector or the sensor itself. If you automatically replace the sensor without checking the circuit, you could be wasting your time and money.
How does the ECM know the circuit has a problem?
The ECM sends a reference voltage to the oxygen sensor and expects to see a return voltage that’s within a certain range. If it doesn’t see that return voltage, it’ll set a circuit code. It’s up to you to check for the correct reference voltage at the oxygen sensor connector before replacing an oxygen sensor.
How to test an oxygen sensor for a sensing-circuit related trouble code
Using a wiring diagram, shop manual, and a multimeter, check for the expected reference voltage at the sensor connector. If you see the right reference voltage and ground, that confirms the ECM, harness, and connector are good, and the oxygen sense is indeed bad and must be replaced.
O2 Sensor Circuit Malfunction: check for reference voltage and good return at the oxygen sensor connector
O2 Sensor Circuit Low Voltage: Check for corrosion at the oxygen sensor connector
O2 Sensor Circuit Slow Response: Check for an exhaust leak that’s letting outside air into the exhaust stream
P0130 O2 Sensor Circuit Malfunction (Bank 1 Sensor 1)
P0131 O2 Sensor Circuit Low Voltage (Bank 1 Sensor 1)
P0132 O2 Sensor Circuit High Voltage (Bank 1 Sensor 1)
P0133 O2 Sensor Circuit Slow Response (Bank 1 Sensor 1)
P0134 O2 Sensor Circuit No Activity Detected (Bank 1 Sensor 1)
P0136 O2 Sensor Circuit Malfunction (Bank 1 Sensor 2)
P0137 O2 Sensor Circuit Low Voltage (Bank 1 Sensor 2)
P0138 O2 Sensor Circuit High Voltage (Bank 1 Sensor 2)
P0139 O2 Sensor Circuit Slow Response (Bank 1 Sensor 2)
P0140 O2 Sensor Circuit No Activity Detected (Bank 1 Sensor 2)
P0141 O2 Sensor Heater Circuit Malfunction (Bank 1 Sensor 2)
P0142 O2 Sensor Circuit Malfunction (Bank 1 Sensor 3)
P0143 O2 Sensor Circuit Low Voltage (Bank 1 Sensor 3)
P0144 O2 Sensor Circuit High Voltage (Bank 1 Sensor 3)
P0145 O2 Sensor Circuit Slow Response (Bank 1 Sensor 3)
P0146 O2 Sensor Circuit No Activity Detected (Bank 1 Sensor 3)
P0147 O2 Sensor Heater Circuit Malfunction (Bank 1 Sensor 3)
P0150 O2 Sensor Circuit Malfunction (Bank 2 Sensor 1)
P0151 O2 Sensor Circuit Low Voltage (Bank 2 Sensor 1)
P0152 O2 Sensor Circuit High Voltage (Bank 2 Sensor 1)
P0153 O2 Sensor Circuit Slow Response (Bank 2 Sensor 1)
P0154 O2 Sensor Circuit No Activity Detected (Bank 2 Sensor 1)
P0155 O2 Sensor Heater Circuit Malfunction (Bank 2 Sensor 1)
P0156 O2 Sensor Circuit Malfunction (Bank 2 Sensor 2)
P0157 O2 Sensor Circuit Low Voltage (Bank 2 Sensor 2)
P0158 O2 Sensor Circuit High Voltage (Bank 2 Sensor 2)
P0159 O2 Sensor Circuit Slow Response (Bank 2 Sensor 2)
P0160 O2 Sensor Circuit No Activity Detected (Bank 2 Sensor 2)
P0161 O2 Sensor Heater Circuit Malfunction (Bank 2 Sensor 2)
P0162 O2 Sensor Circuit Malfunction (Bank 2 Sensor 3)
P0163 O2 Sensor Circuit Low Voltage (Bank 2 Sensor 3)
P0164 O2 Sensor Circuit High Voltage (Bank 2 Sensor 3)
P0165 O2 Sensor Circuit Slow Response (Bank 2 Sensor 3)
P0166 O2 Sensor Circuit No Activity Detected (Bank 2 Sensor 3)
P0167 O2 Sensor Heater Circuit Malfunction (Bank 2 Sensor 3)
If you’ve checked all the voltages and have determined you have to replace an oxygen sensor, here’s how to do it.
There are two types of oxygen sensor mounting
Flange-mount and threaded. For flange mount sensors, you apply a rust penetrant and use a socket and ratchet. Soak the nuts and then remove them. Pull out the oxygen sensor and replace

Threaded oxygen sensor

Flange mount oxygen sensor
Tools needed to replace a threaded oxygen sensor
Buy or rent a set of oxygen sensor sockets.
Spray the threads with plenty of rust penetrant before trying to remove and oxygen sensor or you will break it.
Then, slip the socket over the sensor and unscrew it.
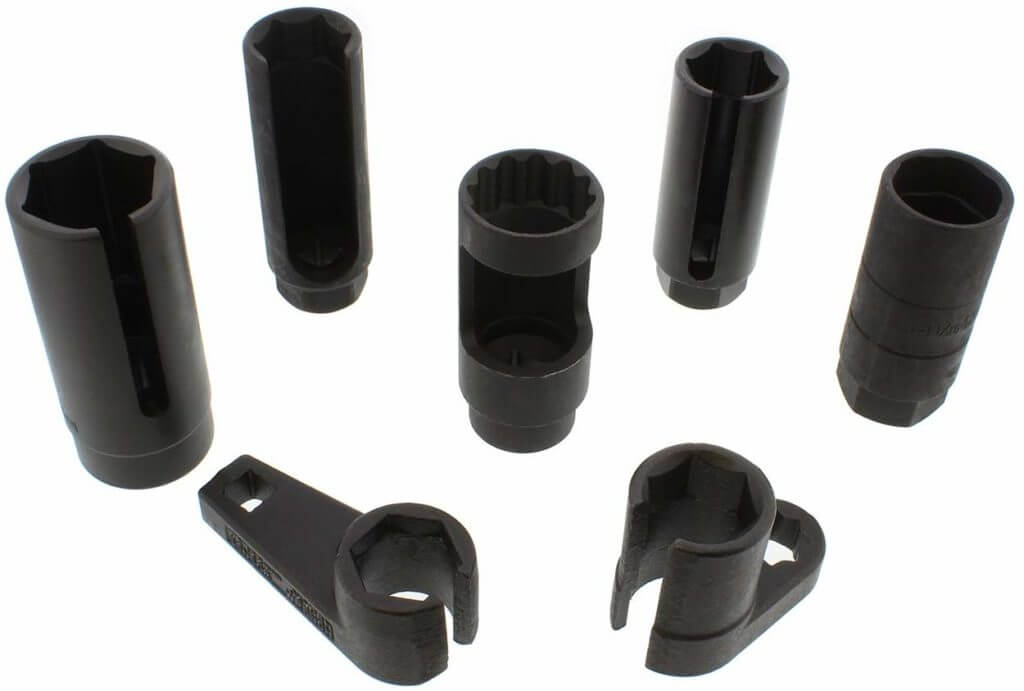
Use a slotted socket to remove and install a threaded oxygen sensor
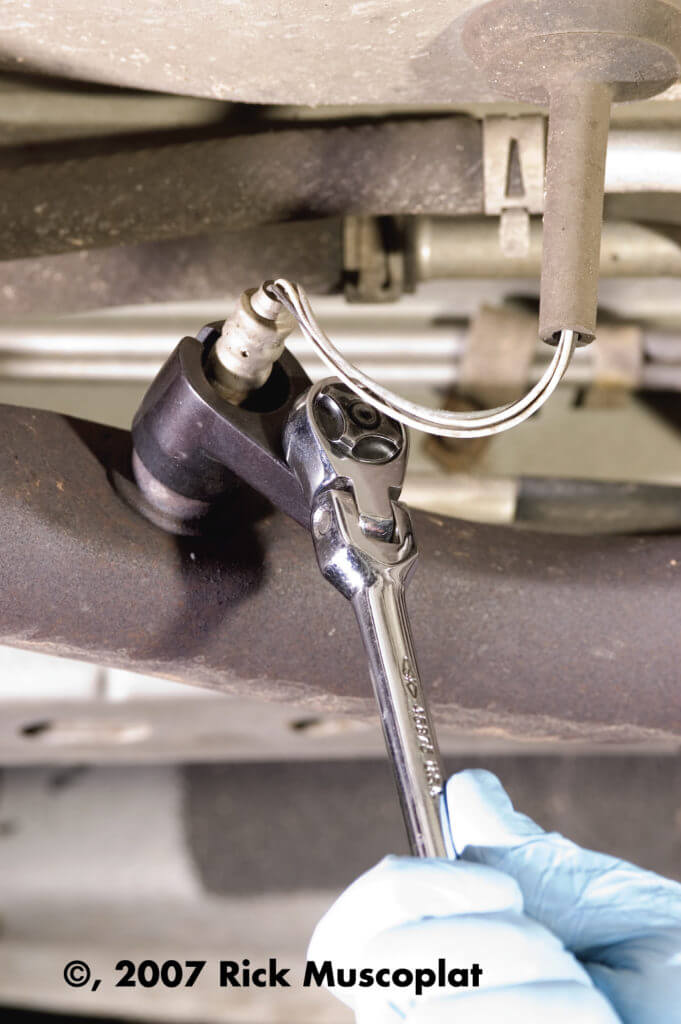
Slide the slotted portion through the wires and then loosen the sensor
©, 2019 Rick Muscoplat
Posted on by Rick Muscoplat