
Alternator Replacement How-To: Tips For Easy Replacement
Alternator replacement tips and how-to
Replacing an alternator can seem like a daunting task, but with the right tools and a bit of patience, it’s a manageable job for many DIY enthusiasts. This alternator replacement how to guide will walk you through the process step-by-step to ensure you can replace your alternator safely and effectively.
Alternator replacement tip #1 — disconnect the battery cables
A wire runs directly from the alternator output terminal to your battery. When the instruction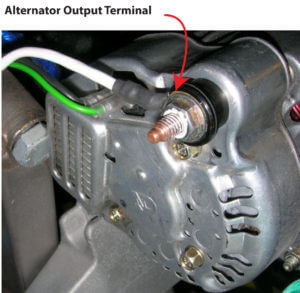 s say to disconnect the battery terminals before replacing the alternator, they mean it. If you disconnect the main wire from the output terminal of the alternator without first disconnecting the battery, The ring terminal you just removed still has power. If it touches any metal part you’ll create a dead short that can blow some expensive fuses and possibly damage expensive computers. Always disconnect the battery terminals before replacing the alternator.
Alternator replacement tip #2 — output terminal fasteners
Don’t lose the small fasteners from the output terminal. You’ll find several nuts and washers connecting the output to the terminal. Note the location and use a magnet when disassembling to avoid losing the fasteners.
Alternator replacement tip #3 — the bushing causes lots of DIY headaches
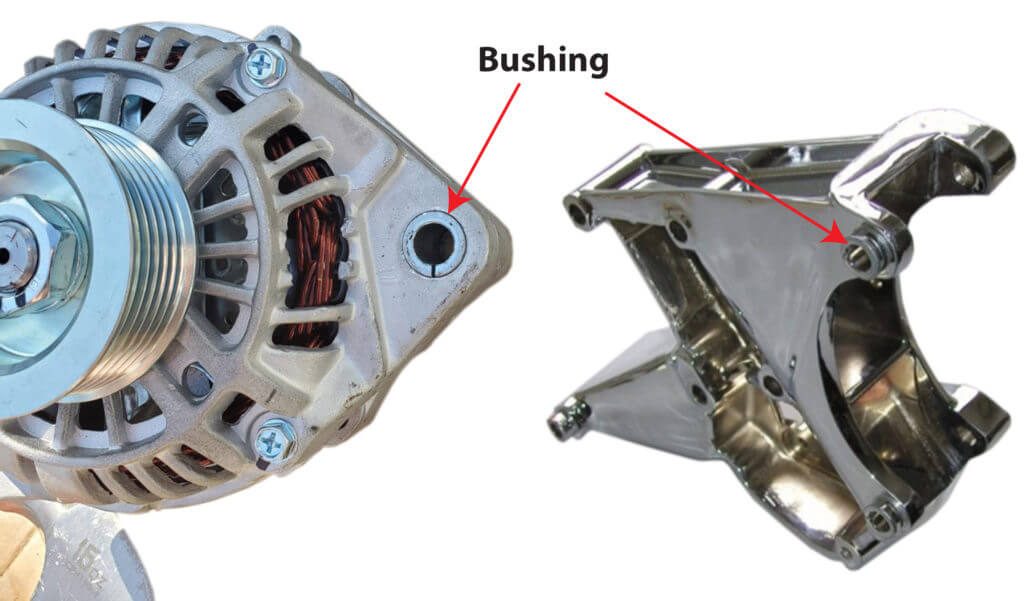
Once you remove the drive belt, you’ll usually find two bolts holding the alternator in the bracket. Just about every alternator bracket contains a split-ring bushing. In some cases, the bushing comes out with the old alternator, and in other installations, the bushing remains in the bracket. Either way, you have to deal with the bushing by either moving it to the new alternator or pushing it backward in the bracket so the new alternator will fit. If you don’t move the bushing in the bracket, I guarantee the new alternator won’t fit. Just tap it backward with a hammer. If it won’t budge, insert a large bolt, washer and nut and try screwing it back in place.
Alternator replacement tip #4
If your old alternator had a one-way clutch, also called an overriding clutch, don’t transfer the old clutch to the new alternator. Always install a new clutch. Reusing the old one will shorten the life of the new alternator because it will transmit belt vibrations to the new bearings.
over-running clutch
Alternator replacement tip #5 — reinstall the connectors and ring terminal first
Always replace the alternator electrical connectors before reconnecting the battery.
Alternator replacement tip #6
Charge the battery and clean the battery posts and battery cable terminals before firing up the new alternator. You want to reduce resistance to the minimum to get the most life out of the new unit.
What to know about alternators and battery charging — Avoid These Common DIY mistakes
When you start your engine, you drain the battery slightly. That power must be replaced and the alternator is what recharges the battery. But, the alternator’s real job is to provide power to run the ignition system, blower motor, heated seats, power seats and windows entertainment system and all the other electrical accessories. In other words, the alternator’s job, in addition to replacing the power lost during starting is to provide power to all your accessories without draining your battery.
Your alternator isn’t a dead battery charger
1) An alternator needs power in order to generate power. If your battery is dead, it can’t power up the electromagnet used by the alternator.
2) An alternator can only output about 1/3 of its rated capacity at idle RPMs. If you jump-started your car and let it idle for 20 minutes, don’t be surprised that the battery is still dead. If you really want to recharge it, drive it at highway speeds so it can output more power
3) Generating power creates heat and high heat and high loads are the #1 killers of alternators. Why burn up your $400 to recharge your battery when you can buy a real battery charger for less than $50?
©, 2020 Rick Muscoplat
Posted on by Rick Muscoplat