
Brake Lights Don’t Turn Off? Here Are the Real Causes
4 reasons why your brake lights stay on with your foot off the pedal
Quick Summary
When your brake lights stay on, the problem almost always comes down to four things:
1) A missing brake switch cushion
2) A misadjusted brake light switch
3) A failed switch
4) An issue with the body control module or relay.
In this guide, I’ll explain why your brake lights don’t turn off, how the brake switch works, and how to diagnose each issue like a pro without guessing or replacing parts unnecessarily.
Article
As an automotive technician, I see this question often: Why do the brake lights stay on even though the driver’s foot is nowhere near the pedal? When the brake lights don’t turn off, the battery drains, your brake lights can burn out prematurely, and—worst of all—you’re sending the wrong signal to every driver behind you.
Fortunately, there are only a few components involved, and once you know how they work, diagnosing why your brake lights stay on becomes straightforward.
Let me walk you through the four causes I see most often and how to fix each one.
How the Brake Light Switch Works (And Why It Matters)
Before you can fix why your brake lights stay on, it helps to understand how the brake switch operates. Depending on the vehicle, the switch may be mounted:
• To a bracket under the dash
• Directly to the brake pedal arm
The brake light switch has a spring-loaded plunger. When your foot is off the brake pedal and the brake arm is in its upright position, the plunger is pressed in, and the brake lights stay off. When you press the pedal, the plunger extends, completing the circuit and turning the lights on.
Proper adjustment is everything. If the switch isn’t positioned correctly or the stopper isn’t present, your brake lights don’t turn off.

Stop light switch plunger contacts the rubber stopper
1. Why Brake Lights Don’t Turn Off After DIY Repairs
Missing Brake Switch Cushion— The number one reason brake lights stay on is a missing or worn-out brake switch cushion (also called a stopper pad). This small rubber or plastic pad sits between the switch and the pedal bracket.
When the stopper pad deteriorates and falls out:
• The plunger slips through the hole, so it never depresses
• The switch never closes
• The brake lights don’t turn off
Check for a missing plastic or rubber brake switch cushion
Most carmakers design the brake switch assembly so the plunger contacts a rubber pad rather than hitting the steel brake pedal bracket. The rubber pad, also referred to as a stopper pad or brake switch cushion, snaps into a hole on the pedal bracket or supporting member. They can wear out or fall out of place. Once that happens, the plunger extends into the hole where
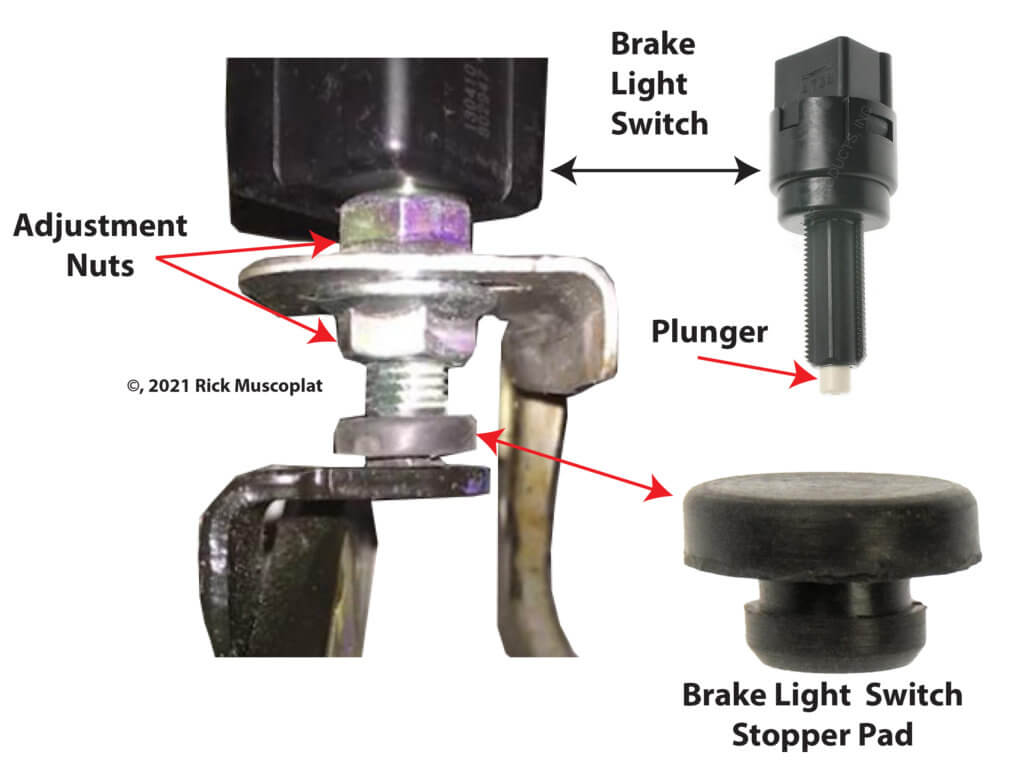
Notice the location of the brake light switch stopper pad/cushion
the pad usually sits, causing the lights to stay on all the time.
So your first step is to look under the dash and locate the brake switch at the upper end of the brake pedal. Locate the brake switch plunger and check for the presence of the rubber pad.
If it’s missing, you

Generic stopper pads from amazon.com
have two choices: purchase a generic replacement at an
auto parts store or a genuine replacement from the dealer. If you purchase a generic replacement, you’ll likely need to modify the retaining button to fit the hole on your bracket. Buying from the dealer is always a better choice; they’re not that expensive (around $10).
If the pad is in place and in good condition, the pad isn’t the problem, and the switch is most likely out of adjustment or worn out.
2. Brake Switch Out of Adjustment
A misadjusted brake switch is the second most common reason brake lights stay on after a driver removes their foot from the brake pedal.
Some switches screw in or out; others twist to lock into position. Even a few millimeters of misalignment can cause the brake lights to not turn off.
Example (2010 Nissan Altima)
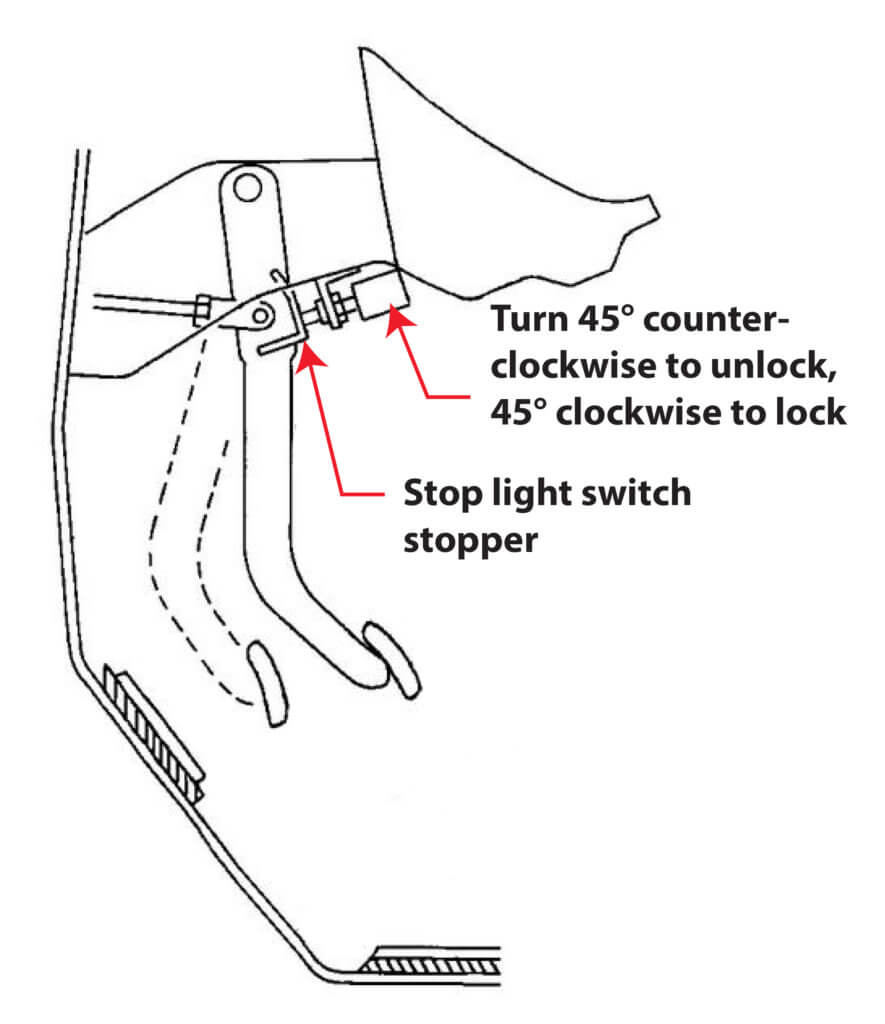
1. Loosen the stop light switch by turning it counterclockwise by 45°.
2. With the pedal pulled up and held by hand, press the stop light switch in until the threaded end contacts the stopper.
3. With the threaded end of the stop light switch contacting the bracket, rotate the switch clockwise by 45° to lock the switch in place
3) How to Test a Brake Switch for Continuity
Using a digital multimeter set to the Ohms scale, touch the two leads to the two terminals on the brake pedal switch. Check for resistance by pressing and releasing the brake pedal.
If the stopper is present and the switch is adjusted correctly, but the brake lights stay on, the brake switch itself may have failed in the ON position.
This is uncommon—but it does happen.
How I test it
• Disconnect the electrical connector from the brake pedal switch
• Identify the brake circuit terminals
• With the pedal fully up, check for continuity at the terminals
• If continuity exists, the switch has failed—replace it.
• A properly functioning switch will show no continuity when the pedal is at rest.
4. BCM or Relay Problems Keeping Brake Lights On
Modern vehicles often use a computer-controlled brake light system. In these cases, the brake switch doesn’t send power directly to the bulbs. Instead:
• The switch sends a “brake request” signal to the BCM
• The BCM activates a relay or solid-state driver
• The relay supplies power to the brake lights
• If the BCM logic freezes, a relay sticks, or a wiring fault occurs, the brake lights don’t turn off even when the switch is functioning correctly.
How I diagnose it
• Verify relay operation
• Check for BCM brake switch input using scan-tool live data
• Inspect wiring harnesses for short-to-power conditions
• This is where a factory wiring diagram becomes essential.
©, 2021 Rick Muscoplat
Posted on by Rick Muscoplat