
How to check the oil level in a car
Learn the right way to check oil level in your car
Regularly checking the oil level in your car is one of the simplest yet most important maintenance tasks you can perform to keep your vehicle running smoothly. Engine oil is essential for lubricating the internal components of the engine, reducing friction, and preventing overheating. Without the proper amount of oil, your engine could suffer severe damage, leading to costly repairs. Fortunately, checking your car’s oil level is a straightforward process that requires only a few minutes of your time. This guide will walk you through the steps to check the oil level in your car effectively.
Why Checking Your Oil Level is Important
All engines, even new ones, burn some amount of oil. So checking the oil level in your car and topping off when needed is critical to keep the correct amount of oil in the engine at all times. Before diving into the steps, it’s essential to understand why maintaining the correct oil level is crucial:
• Lubrication— Engine oil lubricates moving parts, reducing wear and tear. Without an adequate supply of oil, parts can grind against each other, leading to premature wear or even engine failure.
• Cooling— Oil helps dissipate heat generated by the engine. If the oil level is too low, the engine can overheat, causing significant damage.
• Cleaning— Oil also helps keep the engine clean by suspending dirt and debris so it can be filtered out by the oil filter. A low oil level means that contaminants can accumulate, leading to engine inefficiency and potential damage.
• Preventing Corrosion— Oil protects metal components from rust and corrosion. Insufficient oil levels can expose these parts to moisture and air, leading to corrosion.
When to Check Your Oil Level
When you shut off your engine, it takes about five minutes for the oil in the upper part of your engine to drain back down to the oil pan. If you check it right after shutting the engine off, you’ll get a false low reading. That will mislead you into thinking your engine is low on oil
It’s recommended to check your oil level at least once a month or before long trips. Additionally, if you notice any of the following signs, you should check your oil level immediately:
• The oil warning light on your dashboard is illuminated.
• The engine sounds louder than usual or makes unusual noises.
• There is visible oil leaking under your vehicle.
Step-by-Step Guide to Checking the Oil Level
Step 1: Park Your Car on a Level Surface
To get an accurate reading, ensure your car is parked on a flat, level surface. If the car is on a slope, the oil may pool to one side of the oil pan, giving you a false reading. Also, turn off the engine and let it cool down for a few minutes. Checking the oil when the engine is cold or has been off for a while gives the oil time to settle in the oil pan, ensuring an accurate measurement.
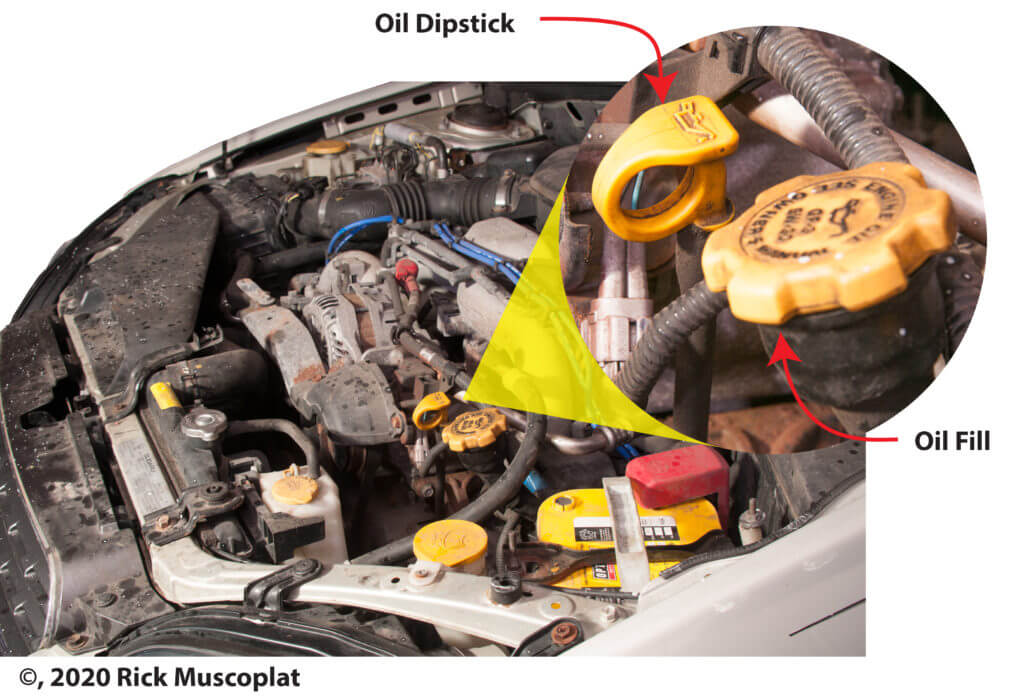
Step 2: Locate the Dipstick
Pop the hood of your car by pulling the hood release lever, usually found near the driver’s seat. Once the hood is open, locate the oil dipstick. The dipstick is typically a long metal rod with a loop or handle at the top, often colored yellow or orange. It’s usually situated near the front of the engine. If you’re unsure where to find it, consult your car’s owner’s manual.
On most late-model engines, the pull ring on the dipstick is yellow, but it may be black on older vehicles.
Step 3: Remove the Dipstick and Wipe It Clean
Once you’ve located the dipstick, pull it out slowly. The end of the dipstick will likely have oil on it, which needs to be wiped off to get an accurate reading.
Use a clean cloth or paper towel to wipe the oil off the dipstick from top to bottom. Removing the oil allows you to see the markings clearly when you reinsert it.
Wiping the dipstick removes any oil splash that’s still on the upper portion of the dipstick and gives you a more accurate reading.
Step 4: Reinsert the Dipstick and Remove It Again
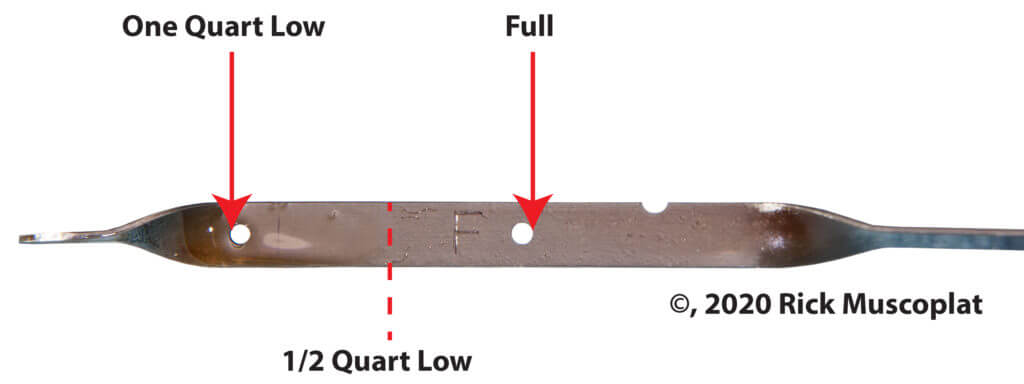
After wiping the dipstick clean, insert it fully back into its tube, making sure it goes all the way down. Pull it out again, and this time, observe where the oil film reaches on the dipstick. The dipstick will have markings, usually indicating “Full,” “Low,” or “Add,” and sometimes there are crosshatch patterns. The oil level should be between the “Full” and “Low” marks or within the crosshatch area. If the oil is at or below the “Low” mark, by at least halfway, you need to add oil.
If your oil dipstick doesn’t look like the one below, see this post showing how to read an oil dipstick that uses dots or hash marks instead.
Step 5: Add Oil if Necessary
If your oil level is low, you’ll need to add more oil. To do this, locate the oil filler cap, usually marked with an oil can icon, on top of the engine. Remove the cap and, using a funnel, slowly add the correct type of oil specified in your owner’s manual. Add a small amount at a time, then recheck the level with the dipstick until it reaches the proper level. Be careful not to overfill, as too much oil can cause engine damage.
Locate the oil fill port and remove the cap. The cap on most late-model engines lists the type and viscosity of the recommended oil. If the oil type isn’t listed on the oil fill cap, refer to your owner’s manual for the oil specifications. Remove the cap and pour the oil into the filler. Wait a few minutes for the new oil to drain down into the oil pan. Then repeat the pull, wipe, reinsert, and pull routine to make sure the oil level is now full.
©, 2020 Rick Muscoplat and Alex Steil
Posted on by Rick Muscoplat