
How to Remove a Stuck Oil Filter Like a Pro
Best Way to Remove a Stuck Oil Filter: Tools That Actually Work
Quick Summary:
The best way to remove a stuck oil filter isn’t with brute force or a screwdriver driven through the center of the filter. Instead, it’s the right tool and technique. In this guide, you’ll learn why stabbing it with a screwdriver is the worst mistake you can make, and which filter wrenches actually work every single time.
Article
Removing a stuck oil filter is a common occurrence for DIYers who overtighten their spin-on oil filters. Every week, I get questions from readers asking, “What’s the best way to remove a stuck oil filter?”—and too often, they’ve already tried the old “screwdriver trick.” That’s the last thing you want to do. In fact, jamming a screwdriver through the filter is the WORST thing to do because it just tears the filter can to shreds, as you can see in the pictures below,
Why You Should Never Use a Screwdriver to Remove a Stuck Oil Filter
If the filter didn’t come off with a band wrench and the can is dented at all, driving a screwdriver through it will weaken the metal even more, potentially causing it to tear. Once the can tears open, you’ve turned a 10-minute job into an all-day nightmare.
If you take nothing else away from this article, remember this:
Never use a screwdriver to remove a stuck oil filter. You’ll regret it every single time.
See these pictures? Once you tear the can, the only way to remove the tapping plate is to get a sharp, cold chisel and hammer a slot into the outer edge, and try to spin it off. Chances are you won’t have a lot of working room, and you’ll succeed in turning a relatively minor problem into a freaking nightmare.

Here’s what happens when you jam a screwdriver into a stuck oil filter. You create a MUCH bigger problem. Don’t do it! You’ve been warned

The Best Way to Remove a Stuck Oil Filter
If you’re using a band-style wrench and it isn’t working, STOP. You need a different tool. If you continue using a band-style wrench, you’ll collapse the can. And, if a cup-style wrench isn’t working, it’ll just strip out the flutes.
1. Use a Grit-Lined Band Wrench— If you already have a band-style wrench, improve its grip with adhesive-backed sandpaper. Stick 80-grit

Lisle tools 57020 Swivel grip band style oil filter wrench with anti-slip grit
strips inside the band, with the grit facing in. This increases friction and helps the wrench bite into the metal shell, preventing it from slipping.
Or better yet, buy a Lisle 57020 Swivel-Grip Band Wrench—it’s permanently lined with anti-slip grit and won’t let go once you start turning.
2. Use a Clamping or Jaw-Style Oil Filter Wrench— For the toughest jobs, I use a Lisle 63600 Ratcheting Oil Filter Wrench. This tool automatically tightens its jaws on the fluted end of the filter as you apply torque. The more you turn, the tighter it grips. It’s never failed me.
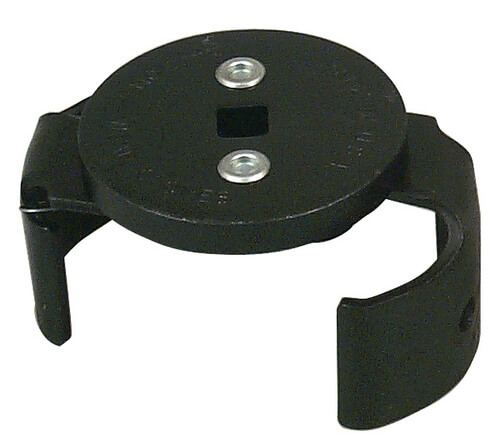
Lisle also makes smaller versions like the 63250 model, which works perfectly for compact import filters between 2½” and 3⅛” in diameter.
3. Use a strap wrench-style tool — Loop the strap around the base of the oil filter canister, as close to the engine block as possible. That’s where you’ll get the most grip and torque. Connect a long-handled ratchet to the metal portion to gain more leverage. Then rotate until the filter breaks loose.

What to Do If the Filter Can Is Already Torn Off
If you’ve already damaged the filter and you’re staring at the metal base plate, don’t panic—but be prepared for some tedious work. Use a sharp, cold chisel and a small hammer to get it to rotate.
Hold the chisel at a sharp angle and tap it to cut a groove. Then change the angle of the chisel so it’s more parallel to the tapping plate. Then tap the chisel to try to rotate the plate. Be gentle—you’re working close to an aluminum housing that’s easy to damage. Move slowly and evenly around the perimeter until the plate breaks free.
Why Oil Filters Get Stuck in the First Place
Most stuck oil filter problems are self-inflicted. Here’s why:
Over-tightening — The directions printed right on the filter say to lightly oil the gasket and hand-tighten the filter ¾ of a turn after it seats. But too many people crank it down with both hands like they’re torquing lug nuts. That crushes the O-ring gasket and bonds it to the mounting flange.
Dry gasket installation—If you don’t lubricate the gasket before spinning it on, it can stick to the mounting surface and “weld” itself in place after the engine heats and cools a few times.
Leaving the old gasket behind— Always check the block when you remove a filter. A double gasket will almost always cause a massive leak, and worse—it can make removal next time nearly impossible
How to Prevent a Stuck Oil Filter in the Future
Once you’ve managed to remove a stuck oil filter, take steps to make sure it never happens again:
• Check to make sure the old gasket came off with the old filter before spinning on the new one.
• Lightly oil the gasket before installation.
• Hand-tighten only—no tools.
• Never exceed ¾ of a turn after the gasket seats.
• Replace filters regularly; don’t leave them in place for years.
Following these steps means you’ll never again have to search for how to remove a stuck oil filter.
©, 2015 Rick Muscoplat
Posted on by Rick Muscoplat