
How to replace a PCV valve yourself
Learn how to replace a PCV valve yourself
The Positive Crankcase Ventilation (PCV) valve is a crucial
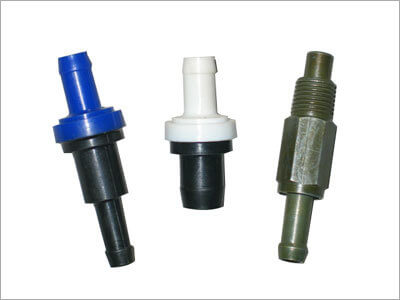
Find the correct PCV valve for your engine and replace it.
component of your vehicle’s emission control system. It helps reroute unburned gases from the crankcase back into the combustion chamber, reducing harmful emissions and improving engine efficiency. Over time, the PCV valve can become clogged or fail, necessitating replacement. Here’s a step-by-step guide to replacing your PCV valve.
Here are the tools you’ll need to replace a PCV valve
• Replacement PCV valve
• Pliers or a wrench (depending on your vehicle’s setup)
• Nitrile gloves
• Screwdriver (if needed)
• Rags or paper towels
• Engine degreaser (optional)
Step-by-Step Guide to Replacing your PCV Valve
1) Locate the PCV Valve— Consult your vehicle’s manual to find the exact location of the PCV valve. Typically, it is found on or near the valve cover, connected by a hose to the intake manifold.
2) Prepare the Engine— Ensure the engine is cool to avoid burns. Disconnect the negative battery terminal to prevent any electrical mishaps.
3) Access the PCV Valve— Depending on your vehicle, you may need to remove an engine cover or other components to access the PCV valve. Use a screwdriver or wrench as needed.
4) Remove the PCV Valve— The PCV valve is usually connected to a hose. Gently disconnect the hose by twisting and pulling it off. Use pliers or a wrench to remove the valve if it’s screwed in. Some valves are just pushed into a rubber grommet and can be pulled out by hand.
5) Inspect and Clean— Inspect the old valve and the surrounding area. Look for signs of oil sludge or debris, which could indicate other engine issues. Clean the valve opening with a rag or paper towel. Use engine degreaser if necessary, but avoid letting any debris fall into the valve cover.
6) Install the New PCV Valve— Insert the new PCV valve into the valve cover. Ensure it fits snugly and securely. Reconnect the hose to the new valve. Make sure the connection is tight to avoid any leaks.
7) Reassemble— Reattach any components or engine covers you removed. Reconnect the negative battery terminal.
8) Start the engine and let it idle for a few minutes. Check for any unusual noises or leaks around the PCV valve.
9) Final Check— Take a short test drive to ensure everything is functioning properly. Monitor the engine for smooth operation and check for any warning lights on the dashboard.
Replace the PCV valve grommet as well.
Over time, the PCV valve grommet can harden and
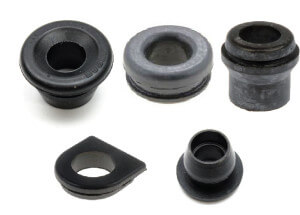
PCV valve grommets come in many different shapes
crack, creating a leak. Auto parts stores sell replacement grommets, and they’re easy to install, so check the condition of your grommet and replace it if it appears hard or cracked.
How the PCV Valve works
The PCV’s job is to meter the flow of the vapors from the crankcase to the intake manifold. The flow rate of the valve is tailored to the engine.
How the PCV valve works at idle
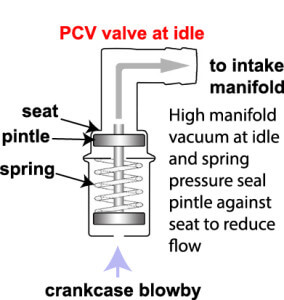
At idle, the PCV valve restricts airflow
Blowby is minimal at idle and manifold vacuum is high, so the spring in the PCV valve pushes the pintle towards the seat to reduce air flow.
How the valve works at cruising speeds
As you increase engine RPMS and manifold vacuum falls, the spring pushes the pintle away from the seat, allowing more air to flow.
Valve operation during a backfire
The valve closes to prevent a backfire from igniting crankcase vapors and damaging your engine.
If the engine or ignition timing is off or a valve sticks, the engine may experience a backfire. The PCV valve is designed to close to prevent flames from entering the crankcase, igniting the flammable vapors and damaging the engine.
What goes wrong with a PCV valve?
Since the PCV valve is a flow control device for crankcase blowby vapors, it’s subjected to varnish, oil, and sludge buildup. Those accumulations can impede the movement of the pintle. As a result, the pintle may not move towards the seat at idle, allowing too much airflow and, in effect, looking like a vacuum leak to the computer. This unexpected and unmetered air will cause the computer to enrich the mixture, and that will cause higher-than-expected idle speeds.
Likewise, if the spring and pintle don’t move properly at cruising speeds, the engine will experience reduced airflow, and crankcase pressures will build. That causes two problems: oil leaks at gaskets due to increased crankcase pressure and a slightly leaner mixture than the computer expects to see.
Servicing a PCV valve
How do you know if your PCV needs replacement? First, consult the maintenance guide. Some engines require PCV replacement as often as 30,000 miles, while others recommend replacement at up to 60,000 miles. Many times, you can remove the PCV valve and shake it. If the pintel and spring are operating properly you’ll hear distinct metallic sounds. It’ll sound squishy if it’s gummed up with sludge or varnish. If in doubt, replace the PCV valve. They cost less than $10 unless your vehicle has the newer heated design.
Never try to clean the PCV valve. You may succeed in removing some of the varnish buildup, but you’ll never really know if you’ve removed all of it. Plus, you don’t know how much the spring and the pintle seat have worn.
©, 2015 Rick Muscoplat
Posted on by Rick Muscoplat