
P0136: What it means and how to fix it
Learn about trouble code P0136, what it means, and how to diagnose and fix it.
When that dreaded check engine light pops up on your dashboard, it’s never a good sign. One of the common trouble codes that could appear is the P0136 trouble code. If you’ve scanned your vehicle and received this code, it means there’s an issue with the O2 sensor heater circuit in Bank 1, Sensor 2. This sensor plays a crucial role in monitoring your vehicle’s emissions and ensuring your engine runs efficiently.
In this guide, I’ll walk you through what the P0136 trouble code means, its most common causes, and how to diagnose and fix it like a pro.
What Is A P0136 Trouble Code?
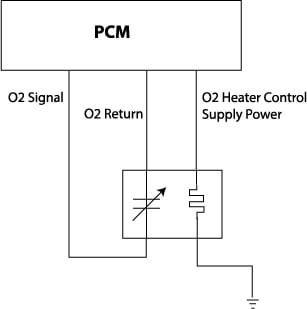
Notice that the heater circuit is separate from the sensing portion of the oxygen sensor. In simple terms, it’s like plugging in a space heater to heat up the sensor to 600°F so it can function.
A P0136 code is defined as an Oxygen Sensor Heater Circuit Malfunction (Bank 1 Sensor 2). This sensor is located on the engine bank that houses the #1 cylinder and is located AFTER the catalytic converter. This sensor monitors the catalytic converter’s performance by gathering voltage readings based on the oxygen level in the exhaust exiting the converter.
Your vehicle’s powertrain control module (ECM) expects the O2 sensor heater circuit to function within a specific voltage range. If the sensor output is too stable or fluctuates improperly, the ECM logs the P0136 trouble code, triggering the check engine light.
Avoid this mistake when dealing with a P0136
The code says, “Oxygen Sensor Heater Circuit Malfunction.” It doesn’t say, “the oxygen sensor is bad.” The sensing portion of the O2 Sensor is different than the heater portion. In some cases, a blown fuse, corrosion in the electrical connector, or a short to ground in the wiring harness can cause a P0136 trouble code.
Why an oxygen sensor needs a heater
An oxygen sensor uses a zirconia ceramic element to produce a voltage signal based on the difference in oxygen levels between the exhaust gas and the ambient air. However, this zirconia element can only operate once heated to around 600°F or 315°C to become electrically conductive. Carmakers used to rely on the hot exhaust gas to heat the sensor but learned they couldn’t rely on exhaust gas temperature alone to maintain the 600°F temperature needed to keep the sensor running. So they installed an electrical heater inside the sensor.
How the ECM Sets the P0136 Trouble Code
When you turn the ignition switch to RUN, power is provided to the oxygen sensor’s heater circuit. The heater gets its ground from the ECM set it can monitor the return voltage drop. If the wiring and the heater are good, the ECM will see a small voltage drop, confirming the wiring and heater are working. If it doesn’t see any voltage on the return ground, it will set a P0136 code. That can mean the heater isn’t getting power, the heater has failed and is in an “open” condition, or there’s a break in the return ground to the ECM.
However, suppose the ECM sees a return voltage on the ground circuit that is higher than the expected voltage drop. In that case, it also sets a P0136, indicating that the heater is failing or there’s a short to heater ground.
Why an oxygen sensor needs a heater
An oxygen sensor uses a zirconia ceramic element to produce a voltage signal based on the difference in oxygen levels between the exhaust gas and the ambient air. However, this zirconia element must be heated to a high temperature (around 600°F or 315°C) to become electrically conductive and function correctly. Carmakers used to rely on the hot exhaust gas to heat the sensor but learned that they couldn’t rely on exhaust gas temperature alone to maintain the 600°F temperature needed to keep the sensor running. So they installed an electrical heater inside the sensor.
How to Diagnose and Fix a P0136 Trouble Code
1) Check the condition of the wiring harness from the ECM to the downstream sensor. Look for signs of chaffing, burns, rodent chewing marks, etc. If the harness is good, proceed to the next step.
2) Disconnect the downstream O2 sensor electrical connector. Check for bent pins and corrosion.
3) Turn the key to the RUN position and use a multimeter or computer-safe test light to check for power and ground on the heater circuit terminals in the wiring harness. If you don’t see power, check the fuse and/or heater circuit power relay. If you don’t see ground, inspect the harness from the connector to the ECM to find the open.
4) Reconnect the connector to the harness and backprobe the power and ground with the key in the run position. You should see a large voltage drop on the ground side. If not, the heater is bad, and the sensor must be replaced.
5) If all the above check out, then the problem lies in the ECM.

To learn how to replace an oxygen sensor, click here
© 2012 Rick Muscoplat
Posted on by Rick Muscoplat