
Rodent Wire Damage and How to Fix It
How to Fix Rodent Wire Damage to Your Car’s Electrical System
There’s much disagreement on why mice and rats chew on your car’s wiring harnesses. Some say it’s because the insulation is made from soy and attracts mice. But rodent experts strongly disagree and say that the warm habitat inside your engine compartment attracts rodents, and once there, they do what they do everywhere: they chew. But knowing the real reason why they’ve chewed up your wires doesn’t help much when you’re facing a significant repair bill. Having fixed rodent wire damage on several vehicles with similar damage over the years, I’ve developed a systematic approach that saves time and money. Here’s my comprehensive guide to repairing electrical connectors damaged by our unwanted furry visitors.
Assessing the Rodent Wire Damage
I always conduct a thorough inspection before attempting any repair. Rodent wire damage can occur in two ways: the rodents chew the insulation off a section of a wiring harness or the wires of an electrical connector. If you’ve left your car unused for a while, you may find both kinds of rodent wire damage.
The severity of damage determines my approach.

Here, the mice have chewed right through the headlight connector
If rodents have chewed through the wires near an electrical connector, the fix involves replacing the connector with a repair pigtail. That’s a fairly easy DIY repair.
However, if the damage is to wires in a harness, the fix involves splicing in the replacement section or replacing the harness. Replacing the harness is the best but most expensive route. Most dealers recommend it because they typically don’t offer harness repair services. Minor fraying might require simple insulation repair, while destroyed connectors necessitate a full replacement. I carefully trace each damaged wire to understand its function in the vehicle’s electrical system.

This image shows typical rodent damage to a harness
Gathering the Right Tools and Materials For Rodent Damage Repair
Investing in quality materials ensures longevity. I’ve learned that skimping on connectors or using electrical tape alone instead of heat-shrink tubing often leads to future failures.
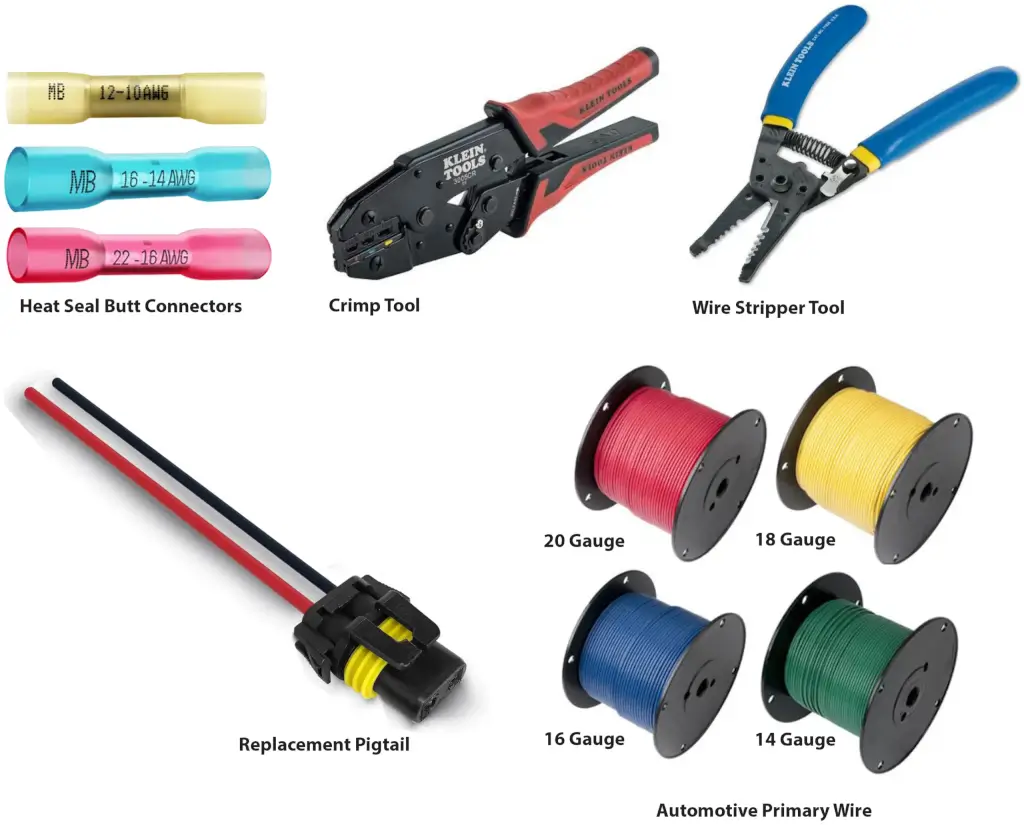
Here’s what you’ll need:
Wire strippers/cutters
A high-quality crimping tool
An assortment of butt-style crimp connectors with heat shrink ends or
An assortment of butt-style crimp connectors and heat shrink tubing in various diameters
Replacement pigtail(s)
Several sizes of automotive wiring (if you’re repairing wire harness damage)

Splicing In A Replacement Wire Section Using a Butt Connector
1. Disconnect the Battery— Safety comes first. I always disconnect the negative terminal of the battery before working on any electrical components. This prevents short circuits and potential damage to sensitive electronic modules.
2. Clean the Affected Area Safely— Wear an N95 respirator and nitrile gloves when cleaning up rodent droppings, urine, or nesting material. Clean the area with disinfectant. Leaving droppings and urine can cause corrosion and present health hazards.
3. Take Pictures With Your Phone— Before cutting any damaged wires, I photograph the connections and label each wire. This documentation proves invaluable during reassembly, especially with complex multi-wire connectors.
4. Choose a matching wire gauge— The replacement wire must be the same or larger than the damaged wire. Never splice in a smaller gauge wire.
5. Cut out the damaged wire section— Work on one wire at a time, remove the damaged section, and install a replacement wire using a butt connector and crimp tool shown below.
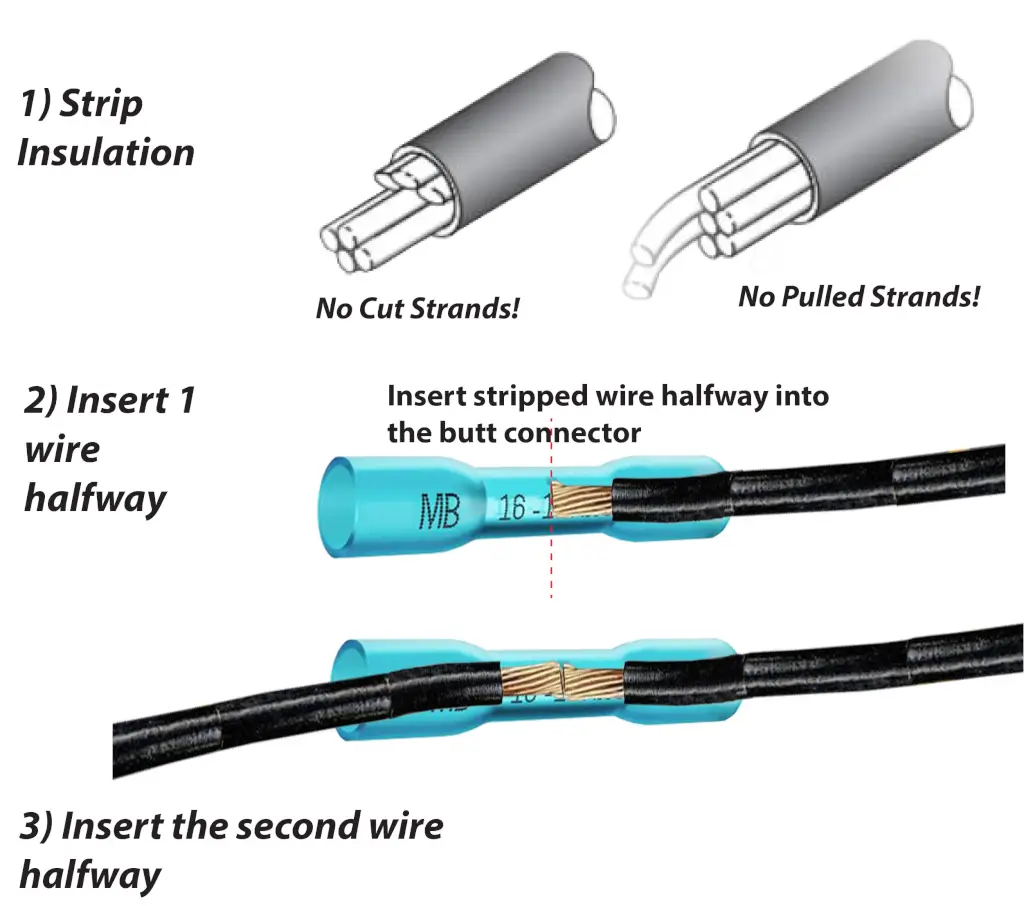
6. Making a Butt Connection— For each damaged wire:
• Choose a butt connector with the same wire gauge as the wire you’re splicing.
• Cut back the chewed wire to get to a clean, undamaged section
• Then strip approximately 1/4 inch of insulation to go into the butt connector.
• Insert each wire into the butt connector and hold it securely in place.
• Insert the butt connector into the matching color slot and operate the handles. The tool will provide the correct level of crimp force

Replace a Rodent Damaged Electrical Connector
Replacing a damaged pigtail is just like splicing in a replacement section, except that you must pay particular attention to the pinout of the connector. The rodent-damaged headlight connector shown below shows that the replacement pigtail doesn’t have the same wire colors as the factory connector. If replacing a connector, I ensure the new connector matches the original in pin configuration and locking mechanism

Where to find replacement pigtails
Findpigtails.com
Connectorexperts.com
Pigtail.biz
Repairconnector.com
Wiringdepot.com
Whiteproducts.com
©, 2025 Rick Muscoplat
Posted on by Rick Muscoplat