
When to Replace a Cabin Air Filter
When to Replace a Cabin Air Filter Based on Real Driving Conditions
Quick Summary
Carmakers often list a change interval for the cabin air filter. The problem with those recommendations is that no carmaker knows how often you use your HVAC system or how dusty/dirty your driving environment is. In other words, it depends on how and where you drive. Performing a visual inspection, along with sensing a reduced airflow, musty odors, louder blower noise, and worsening allergies, are your best indicators. Ignoring it doesn’t just affect air quality; it can reduce HVAC performance and even shorten blower motor life. Fortunately, for most vehicles, replacing a cabin air filter is one of the easiest DIY maintenance jobs most drivers can handle in minutes.
Article
Replacing a cabin air filter isn’t about mileage
Cabin air filters work differently from engine air or oil filters or other mileage-based maintenance items. Here’s why:
Cabin Air Filter volume varies wildly: Two cars driven the same distance can have vastly different air filter usage. If you drive 50 miles with the fan on high, you’ll pull more outside air through the filter than someone else driving the same distance with the blower fan off or on its lowest speed. In other words, the filter doesn’t care about your odometer—it cares about how many cubic feet of air it’s processed.
Environmental conditions matter more: A car driven in dusty, polluted, or pollen-heavy environments clogs much faster than one driven in clean air. If you’re regularly on dirt or gravel roads, driving in construction zones, or in high-pollen areas, your filter could become saturated in as few as months. Someone in a cleaner environment might go years on the same mileage.
This is why manufacturers typically recommend cabin air filter replacement at set intervals (1-2 years) rather than by mileage. The best practice, however, is actually checking it yourself.
How to check the condition of the filter
There’s no scientifically reliable way to determine the condition of the cabin air filter by its color. It can look gray or brown and still pass an acceptable volume of air. On the flip side, a filter that doesn’t look terrible can still be clogged due to debris embedded deep in the pleats.
Conduct a visual inspection
Remove the filter and spread the pleats. If you see an accumulation of dust, dirt, or bugs at the bottom of the pleats, it’s time to replace the filter.
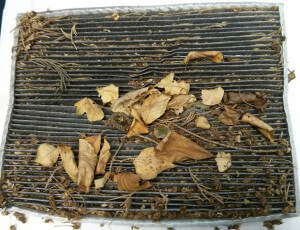
The cabin air filter traps debris from the fresh air, such as leaves, dust, and pollen. This one should have been replaced long ago
Symptoms of a clogged filter
• Reduced Airflow— If you notice that the airflow from the vents is weaker than usual, it could be a sign that the cabin air filter is clogged with dirt and debris.
• Unpleasant Odors— A musty or stale smell coming from the vents, especially when the air conditioner or heater is on, is a strong indicator that the filter is dirty and needs replacement.
• Increased Dust on Interior Surfaces— If you find more dust accumulating on the dashboard and other interior surfaces, it might mean the cabin air filter is no longer effective at trapping particles.
• Allergy Symptoms— If you or your passengers experience increased allergy symptoms like sneezing, coughing, or watery eyes while driving, it could be due to a dirty cabin air filter that’s allowing allergens into the cabin.
•Your blower motor is louder than normal— A clogged filter can make the blower motor strain, causing more noise than normal.
Cabin air filters pick up more soot in winter
Engines produce more soot in cold weather, and your cabin air filter is what collects that soot, so you don’t breathe it in the cabin. That’s why it’s important to check/change the cabin air filter before AC season starts.
What happens when you don’t change your cabin air filter?
Just like a clogged furnace filter, a clogged cabin air filter reduces airflow across the heater core or AC evaporator core. That reduces your car’s heating and cooling efficiency. In the summer, your AC will have to run longer and harder to keep you cool, and that will reduce your gas mileage and put added wear on the AC system. Worse, the clogged air filter strains the blower motor, causing a higher-than-average current draw and premature failure. In other words, you can damage the blower motor by not changing the cabin air filter.
Choosing the Right Cabin Air Filter
When it’s time to replace your cabin air filter, it’s important to choose the right one for your vehicle. There are different types of cabin air filters available:
• Particulate Filters— These are the most basic type of cabin air filter, designed to trap dust, pollen, and other particles. They are generally the most affordable option.
• Activated Carbon Filters— In addition to trapping particles, these filters contain activated carbon, which helps absorb odors and harmful gases, such as exhaust fumes and ozone. They are a good choice if you drive in areas with poor air quality or if you’re sensitive to odors.
• Electrostatic Filters— These filters use an electrostatic charge to attract and trap particles. They are highly efficient at filtering out fine particles, such as smoke and bacteria, making them ideal for those with severe allergies or respiratory conditions.
How to Replace a Cabin Air Filter: Step-by-Step Guide
Replacing a cabin air filter is a relatively simple task that most vehicle owners can do themselves with minimal tools. Here’s a step-by-step guide to help you through the process:
Step 1: Locate the Cabin Air Filter— The cabin air filter is usually located behind the glove compartment, under the dashboard, or in the engine bay near the windshield. Your vehicle’s owner’s manual will provide the exact location.
Step 2: Access the Cabin Air Filter— If your filter is behind the Glove Compartment, open the glove compartment and remove any contents. Many late-model vehicles have a glove box damper mechanism to prevent the glove box from dropping down. Look for a screw or snap lock to disconnect the damper, then lower the glove box far enough to access the cabin air filter.
Look for the stops or tabs on the sides of the glove compartment and gently push them inward to lower the compartment door further. In some vehicles, you may need to remove screws or unclip the glove compartment from its hinges.
If under the dashboard, you might need to remove a panel on the passenger side. This usually requires a screwdriver.
If in the Engine Bay: Open the hood and locate the cabin air filter housing, which is typically near the base of the windshield. You may need to remove clips or screws to open the housing.
Step 3: Remove the Old Cabin Air Filter
Once you’ve accessed the filter, carefully slide it out of its housing. Take note of the filter’s orientation (airflow direction) as you remove it, as you’ll need to install the new filter in the same way.
Step 4: Inspect and Clean the Filter Housing
Before inserting the new filter, inspect the filter housing for dirt, debris, or leaves. Clean the area with a vacuum or a damp cloth, if necessary, to ensure there’s no debris that could obstruct the new filter.
Step 5: Install the New Cabin Air Filter
Slide the new cabin air filter into the housing, making sure it’s oriented correctly according to the airflow direction marked on the filter. If the filter housing has a cover, secure it back in place using the clips or screws you removed earlier.
Step 6: Reassemble the Glove Compartment or Panel
If you removed the glove compartment or an under-dash panel, reattach it by reversing the steps you took to remove it. Ensure everything is secure and properly aligned.
©, 2020 Rick Muscoplat
Posted on by Rick Muscoplat