
AC compressor clutch not engaging: How to troubleshoot
Why Your AC Compressor Clutch Won’t Engage (Complete Diagnostic Guide)
Quick Summary
Here are the most common reasons why your AC compressor clutch won’t engage.
1) The system is very low on refrigerant pressure due to a leak — When the system is low on charge, the low-pressure switch prevents the clutch from engaging to protect the compressor from self-destructing (more on that in the article below).
2) The clutch coil has an open condition, is shorted to ground, or has very high internal resistance.
3) Electrical issues — A blown fuse, a bad relay, or a cut/chewed wire.
4) The air gap is too large — The air gap between the pulley and the clutch plate must be within spec. If it’s too large, the magnetic force can’t pull it in to engage the compressor
5) There’s a disabling condition — There’s a trouble code present that prevents AC operation, or a sensor reading is out of spec, such as the engine coolant temperature sensor or evaporator temperature sensor.
The key to fixing it correctly is testing—not guessing.
The Real Reasons an AC Compressor Clutch Won’t Engage — In Depth
1. Low Refrigerant (The #1 Cause) — The most common reason your AC compressor clutch won’t engage is low refrigerant. All auto AC systems have a low-pressure cutoff switch. If pressure drops too low:
• The low-pressure switch prevents the clutch from engaging to prevent compressor damage
• The clutch coil never gets power
Why a low refrigerant charge prevents the compressor clutch from engaging
It’s all about lubrication
Refrigerant carries lubricating oil throughout the system. That may seem odd because the refrigerant lines, condenser, and evaporator don’t need lubrication. But it makes perfect sense when you understand that, unlike pistons in your engine, there are no oil rings on AC compressor pistons. In other words, cylinder lubrication has to come from the top down, not from the sump up.
When the system is low on charge, it’s also low on oil. If the compressor were allowed to engage in that scenario, the compressor would self-destruct due to a lack of oil. The low-pressure cut-off switch detects low pressure and prevents the AC clutch from engaging, protecting the compressor. That’s the main reason why you should never jumper the low-pressure switch to run the compressor, even if you’re doing it to recharge the system.
2. High System Pressure Lockout — Just like low pressure, excessive pressure can also shut things down. If your system is overcharged or airflow is blocked (bad fan, clogged condenser), the high-pressure switch prevents the compressor clutch from engaging. This is one of the most overlooked causes when diagnosing why the AC compressor clutch won’t engage.
3. Electrical Problems (Very Common) — If I don’t see clutch engagement, I immediately check power.
Common electrical causes include:
• Blown AC clutch fuse
• Faulty AC relay
• Broken wiring
• Poor ground
If the clutch isn’t getting voltage, it simply can’t engage—no matter how good the compressor is.
4. Bad AC Clutch Coil — If power and ground are present but the clutch still won’t engage, I go straight to the coil. The clutch coil creates the magnetic field that pulls the clutch plate in. If it fails:
• It can’t create a magnetic force to pull in the clutch plate to engage with the pully
• No compressor engagement
• No cooling
This is a classic reason the AC compressor clutch won’t engage even when everything else checks out.
5. Excessive Clutch Air Gap — This is a sneaky one that most people miss. When the compressor clutch is disengaged, the clutch plate sits away from the pulley. If the gap between the clutch plate and pulley is too wide:
• The coil can’t pull the clutch in
• The system appears dead
I’ve fixed many cases of the AC compressor clutch not engaging just by correcting the air gap.
6. Computer-Controlled Lockouts (Modern Vehicles) — This is where diagnostics get more advanced.
Today’s vehicles won’t allow compressor engagement if:
• Engine is overheating
• The idle is unstable
• Certain trouble codes are present
• The evaporator temperature sensor is telling the computers that the evaporator is too cold (freeze protection)
So even if the AC system is fine, the computer may intentionally prevent the clutch from engaging.
Why You Should Never Jump Across a Low-Pressure Switch to Engage the Compressor Clutch to Recharge the System
Jumpering across a low-pressure switch to force the compressor clutch to engage is one of those shortcuts that can turn a minor AC problem into a very expensive one. The low-pressure switch is specifically designed to prevent the compressor from running when the refrigerant charge is too low. Without adequate refrigerant, there’s also insufficient compressor oil circulating through the system — oil in an AC system travels with the refrigerant — so forcing the compressor to run in a low-charge condition is essentially running it dry. Even a short period of oil-starved operation can score the pistons, damage reed valves, and destroy internal bearings, turning a $30 recharge job into a $400–$1,200 compressor replacement.
The only legitimate reason to briefly jumper a low-pressure switch is during controlled diagnostic work by a technician actively monitoring system pressures with a manifold gauge set and knowing exactly what the pressures are doing in real time. Even then, it’s a momentary test for just a few seconds. If your low-pressure switch is cutting the clutch out, the correct path is to connect gauges, determine the actual low-side pressure, diagnose the root cause, and fix it properly before ever asking the compressor to run.
Find the cause using a professional diagnostic strategy
Step 1: Use Scan Tool Data (Critical Step) — Always start your diagnosis using the live data feature on your scan tool, turn on the AC, and, with the engine running, check these values:
• AC request — Is it showing ON or OFF? If the AC request shows ON, that confirms the HVAC head is communicating with the Body Control Module (BCM) and Engine Control Module (ECM). If it shows OFF, even though you’ve requested AC, the problem is in the HVAC head or the data bus.
• AC clutch command — Is it showing ON or OFF? If the data shows ON, there are no disabling factors present (high- or low-pressure issues, trouble codes, or engine overheating), and the system should be supplying power to the AC compressor clutch.
• Engine temperature — An overheated reading will prevent compressor clutch engagement. Solve the engine overheating reading before proceeding.
• High and Low Pressure sensor readings — Pressures that are outside of set limits will prevent clutch engagement. Conduct a static pressure reading test on the high- and low-side of the system.
Step 2) Check for power and ground at the compressor clutch coil — If the scan tool shows an AC request ON, Clutch command ON, and good pressure readings, but the clutch isn’t engaging, check for power and ground at the compressor.
Some AC compressor connectors have a single terminal that provides power, with the compressor body providing ground. Two-wire clutch connectors have a power and ground wire.
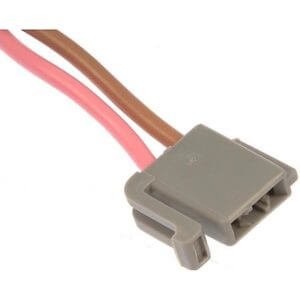
Compressor clutch connector
To test:
• Disconnect the connector from the compressor.
• Using a multimeter set to DC volts, check for battery voltage on the power wire and a good ground at the connector terminals.
• If you see power but the clutch isn’t engaging, the problem is either af bad AC clutch coil (Step 4) or an air-gap issue (Step 5).
• If you don’t see power, check a wiring diagram to locate the AC clutch fuse and clutch relay. Test both. If they test good, check for an open in the harness or at the clutch coil terminals. See Step 6 for more details.
Step 3: Diagnose why the computer won’t command the clutch to engage
• Low charge — Connect your manifold gauge to the high and low side ports. With the engine off, check static pressures. Consult a shop manual for low-pressure switch engagement and cut-off pressures for your vehicle.
Here are some typical AC low-pressure switch values for R-134a systems
The low-pressure switch:
Operates the compressor clutch at 34-psi and above, but prevents the clutch operation at pressures less than 10–psi
Operates the compressor clutch at 47-psi and above, but prevents compressor clutch operation at less than 25–psi
Operates the compressor clutch at 40-psi and above, but prevents the compressor clutch operation at less than 32–psi
Operates the compressor clutch at 34-psi and above, but prevents compressor clutch operation at less than 8–psi
Operates the compressor clutch at 47-psi and above, but prevents the compressor clutch operation at less than 25–psi
• Overcharge condition — Connect your manifold gauge to the high and low side ports. With the engine running and the AC turned on for at least five minutes, check the running pressures. Consult the shop manual for your vehicle for high-pressure switch engagement and cut-off pressures.
Typical R-134a high-pressure switch operating pressures
The high-pressure switch:
Prevents compressor clutch operation at pressures at or above 300 psi. Operates the compressor clutch at pressures of 260 psi or below.
Prevents compressor clutch operation at pressures at or above 275 psi.
Operates the compressor clutch at pressures of 260 psi or below.
Prevents compressor clutch operation at pressures at or above 275 psi. Operates the compressor clutch at pressures of 235 psi or below.
Step 4: Check the clutch coil — If you have power and ground at the clutch coil, along with live data showing AC request ON and AC clutch on, then the problem lies with either the clutch coil or the air gap.
Using a multimeter set to Ohms, connect the leads to the clutch coil terminals
• Check coil resistance and compare to specs in the shop manual
• If the reading shows OL ∞, the clutch coil has an open condition and must be replaced
• If the fuse has blown and been replaced, check for a short-to-ground condition. Connect one meter lead.
Step 5: Check the air gap — the space between the clutch plate (hub) and the pulley face. Too wide and the clutch won’t engage properly; too narrow and it may drag or not release
Typical Air Gap Range — 0.015″ – 0.040″ (0.4mm – 1.0mm). This is the general industry range, but always check the specific spec for your vehicle/compressor.
Common Specs by Compressor Brand
Sanden (SD series) 0.016″ – 0.031″ (0.4 – 0.8mm)
Denso 0.014″ – 0.026″ (0.35 – 0.65mm)
Delphi / Harrison V5, V7 0.020″ – 0.035″ (0.5 – 0.9mm)
Nippondenso 10P / 6P 0.016″ – 0.028″ (0.4 – 0.7mm)
Ford FS-10 0.018″ – 0.033″ (0.46 – 0.84mm)
GM A6 / R4 0.020″ – 0.040″ (0.5 – 1.0mm)
Mitsubishi 0.014″ – 0.026″ (0.35 – 0.65mm)
How to Measure AC Compressor Clutch Air Gap
Tools needed: Feeler gauge set
• With the system off, locate the clutch plate (the front disc that spins when AC is on)
• Slide the feeler gauge blades into the gap between the clutch plate and the pulley face
• Measure at 3–4 points around the circumference (12, 3, 6, and 9 o’clock positions)
• The gap should be even all the way around — an uneven gap indicates a bent plate or worn bearing

Measuring the compressor clutch air gap
What Uneven or Wrong Gap Causes
• Gap too wide — Clutch slips, slow/weak/no engagement, clicking noise, clutch burns out
• Gap too narrow — Clutch drags/won’t fully disengage, premature wear
• Uneven gap — Vibration, intermittent engagement, chattering noise
Adjusting the Air Gap
The gap is adjusted using shims located behind the clutch plate on the compressor shaft.
• Gap too wide → Remove a shim to move the plate closer to the pulley
• Gap too narrow → Add a shim to push the plate further from the pulley
• Shims typically come in thicknesses of 0.010″, 0.020″, and 0.030″ (or metric equivalents)
• Most clutch rebuild/replacement kits include an assortment of shims
Quick Rule of Thumb
If you don’t have the exact spec, 0.020″ – 0.030″ (about the thickness of a credit card is ~0.030″) is a safe middle-ground target for most domestic and import compressors.
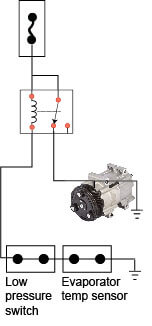
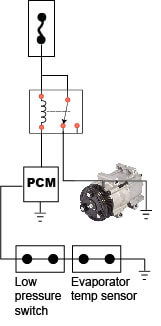
Step 6: Check the fuse, relay, and wiring harness — In most older vehicles, the low- and high-pressure switches power to the compressor clutch. However, in late model vehicles, the high- and low-pressure switches are inputs to the ECM, which controls the compressor clutch relay.
Using a multimeter set to Ohms:
• Check the compressor fuse
• Check for power coming into the compressor clutch relay control coil and clutch contacts.
• Check for ground on the clutch relay control coil.
• Check for voltage drop on the clutch contact terminal of the relay.
• With the clutch connector disconnected at the clutch, check for power at the low and high pressure switches.
In a computer-controlled system, the compressor clutch relay is grounded by the computer.
In some vehicles, the compressor clutch relay is activated and deactivated by the low-pressure switch and the evaporator temperature sensor.
How to test the compressor clutch relay
Remove the relay from the socket. Refer to this relay diagram to determine which 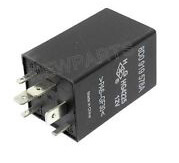 pins in the socket should have battery voltage when the key is in the RUN position and which should have ground when the high and low pressures are within limits.
If the power and ground check out in the relay socket, test the relay by swapping in a similarly sized relay. If you hear the relay click when activating the AC, move on to the next step to check the integrity of the wiring harness and ground.
Step 7: Check the evaporator temperature sensor — The sensor reports to the ECM/BCM, which shuts down the compressor if the evaporator temperature drops too low due to evaporator freeze-up. Not all vehicles have an evaporator temperature sensor, so check the shop manual to see if you have one, where it’s located, and what the readings should be.
How to Add Refrigerant When Your AC Compressor Clutch Won’t Engage
When the system is too low on refrigerant, the low-pressure switch cuts power to the clutch coil, and the compressor won’t run at all, creating a frustrating catch-22: you can’t add refrigerant the normal way because the compressor isn’t running and won’t suck in refrigerant. This is a very common situation, and there’s a straightforward way to work around it safely without jumpering across the low-pressure switch.
With the engine off, connect your recharge hose to the low side port (the larger of the two ports, usually has an “L” cap). Do not start the engine. Squeeze the trigger on the recharge can and slowly introduce a refrigerant directly into the low side. The system will fill due to the pressure differential between the can and the system. Watch the gauge on the recharge can and continue to hold the trigger until the gauge stops rising. At that point, try starting the engine and turning on the AC. If the clutch engages, you’re good to continue charging. If not, try this next hack.
Raise the can’s pressure by holding it in hot water
Grab a deep bowl from your kitchen. Run the hot water until it reaches its maximum temperature. Fill the bowl. Then take it out to the vehicle and try charging again with the refrigerant can submerged in the hot water. The hot water will increase the pressure differential, forcing more refrigerant into the system until the internal pressure is high enough to activate the low-pressure switch and engage the compressor clutch. You’re just trying to raise the low-side pressure enough to satisfy the low-pressure switch, typically above 25–40 psi, depending on the vehicle. You may have to refill the bowl with hot water several times.
If the clutch kicks in, the compressor starts pulling refrigerant through the system, and you can continue adding the rest of the charge normally while monitoring the gauge. If the clutch still won’t engage, repeat the process of adding small bursts with the engine off to raise pressure a bit more, then try again.
One important caution — if you’ve added a full can or close to it and the clutch still refuses to engage, stop and don’t keep adding refrigerant. At that point, your car’s AC system has encountered a serious leak. The system has lost not only refrigerant, but a significant amount of oil. Worse yet, it now has air and moisture in the system, which will interact with the refrigerant and oil, forming acids and sludge. If you continue to force in refrigerant, you may get it to produce cold air, but after a while, you’ll experience a complete system failure requiring a major repair.
Most common reasons why car AC won’t cool
©, 2018 Rick Muscoplat
Posted on by Rick Muscoplat