
Brake Caliper Dos and Don’ts: Top Tips for Safe Brake Work
The Top Dos and Don’ts When Working on a Brake Caliper
Working on a brake caliper is one of those jobs that, if done right, can restore braking performance and save you money. But if you make a mistake, you’re looking at compromised safety, uneven braking, or even complete brake failure. I’ve been working on cars for years, and I can tell you firsthand that brake work demands precision and attention to detail. So here’s my list of the top ten dos and don’ts when working on a brake caliper.
The Dos
1. Do Inspect the dust boot on the caliper piston— The dust boot keeps water and dirt out of the piston area. If the boot is damaged in any way, 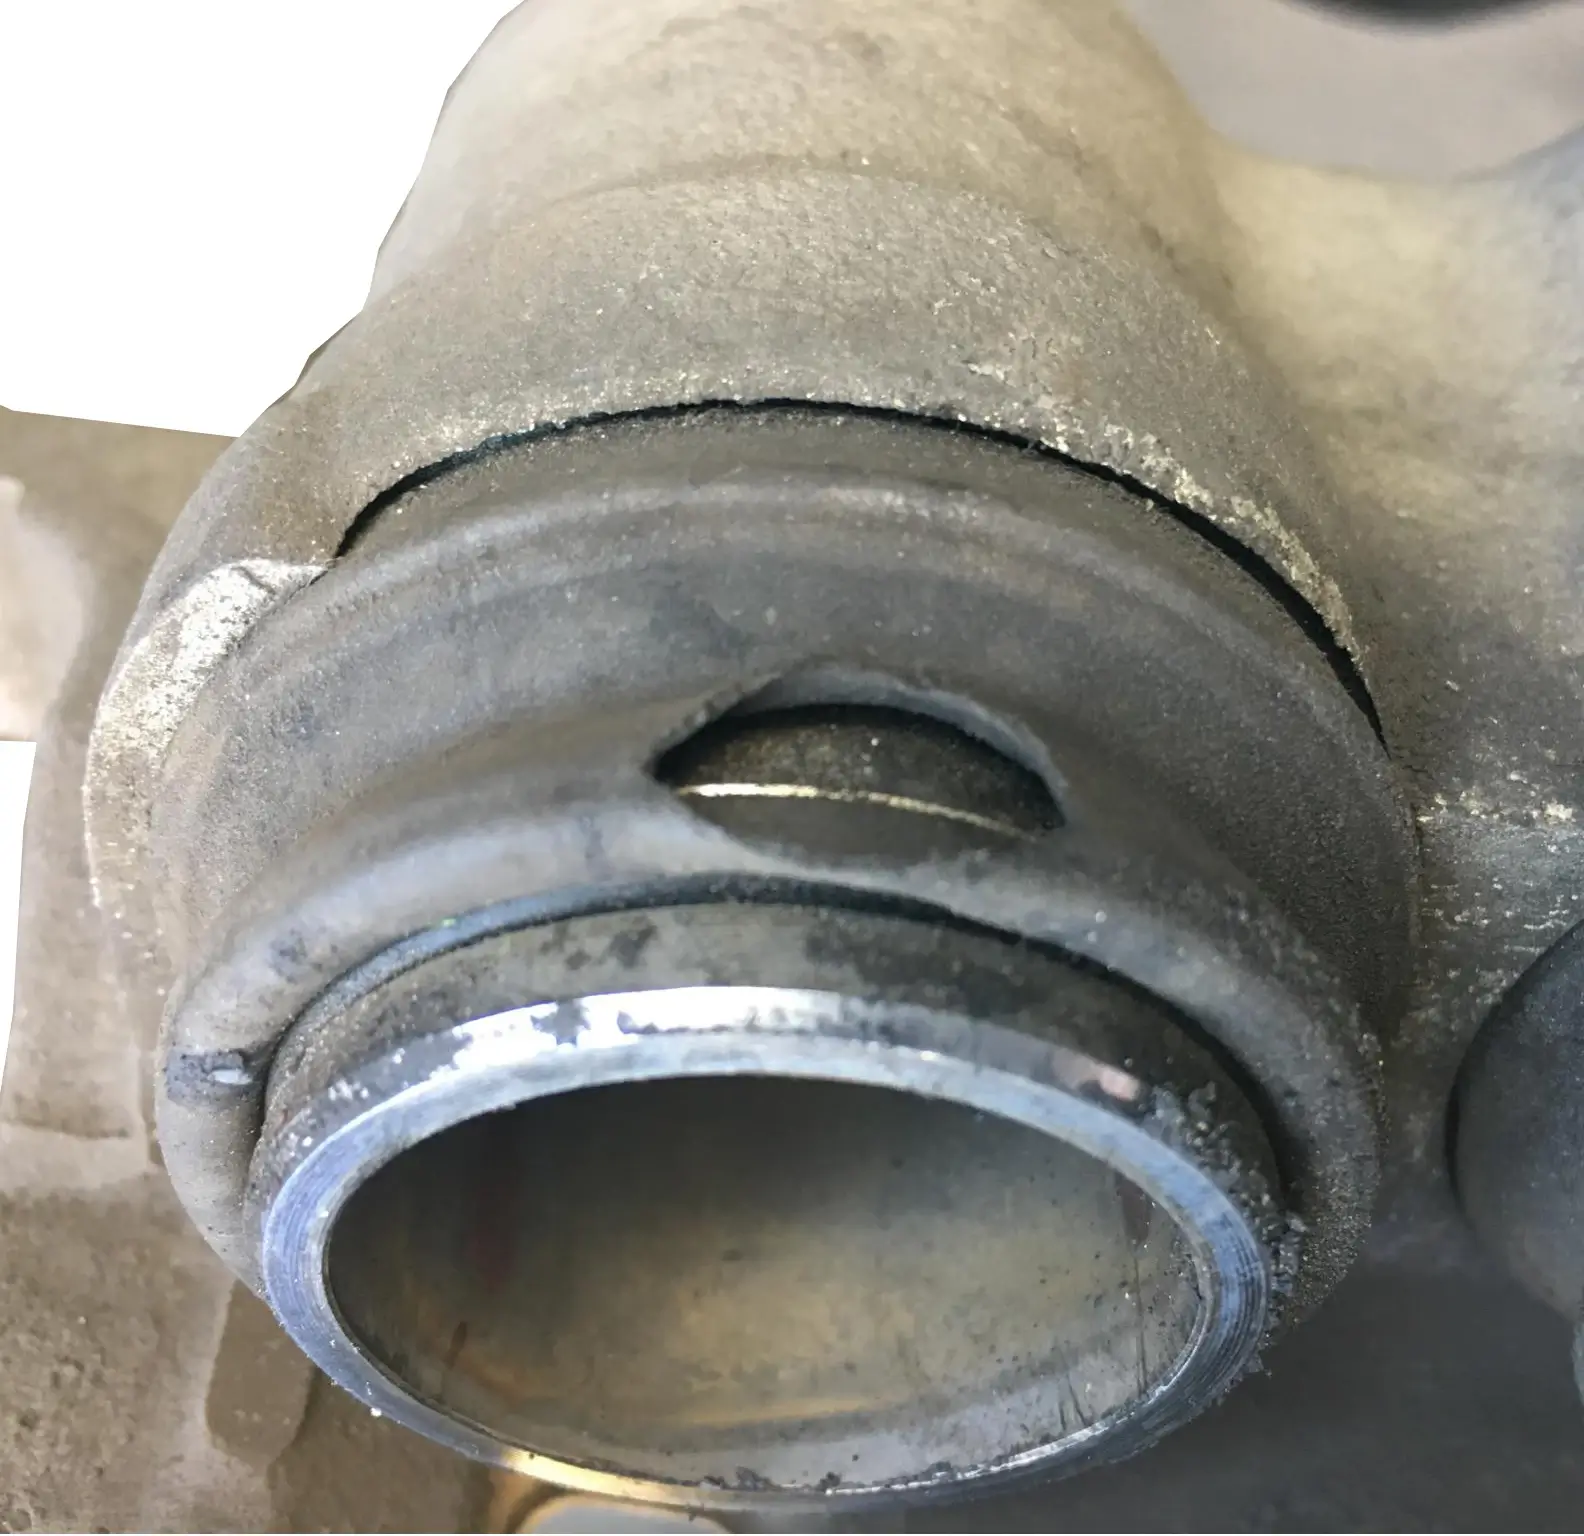 it must be replaced. Water entering from the tear can t grind up the square-cut O-ring. The square-cut O-ring serves two purposes: It keeps the brake fluid inside the caliper, and it rolls the piston back in place when you release the brake pedal.
Check that the boot is properly seated on the piston and in the groove on the caliper housing.
This is especially important on rear brake calipers with an integral parking brake. In those brakes, rotating the piston can cause the dust boot to twist and tear, causing later problems.

Twisted brake caliper piston dust boot
To prevent twisting, clean the boot and apply a few drops of brake fluid around the sealing edge where it meets the piston. The brake fluid will lubricate the seal and allow the piston to rotate without twisting the seal. Brake fluid will not harm the boot.
2. Do Inspect the Condition of the Piston— If the dust seal is torn, inspect the condition of the piston before proceeding. If you notice any rust on the piston, it must be replaced. Never reuse a rusted piston; it will damage the square-cut O-ring seal.
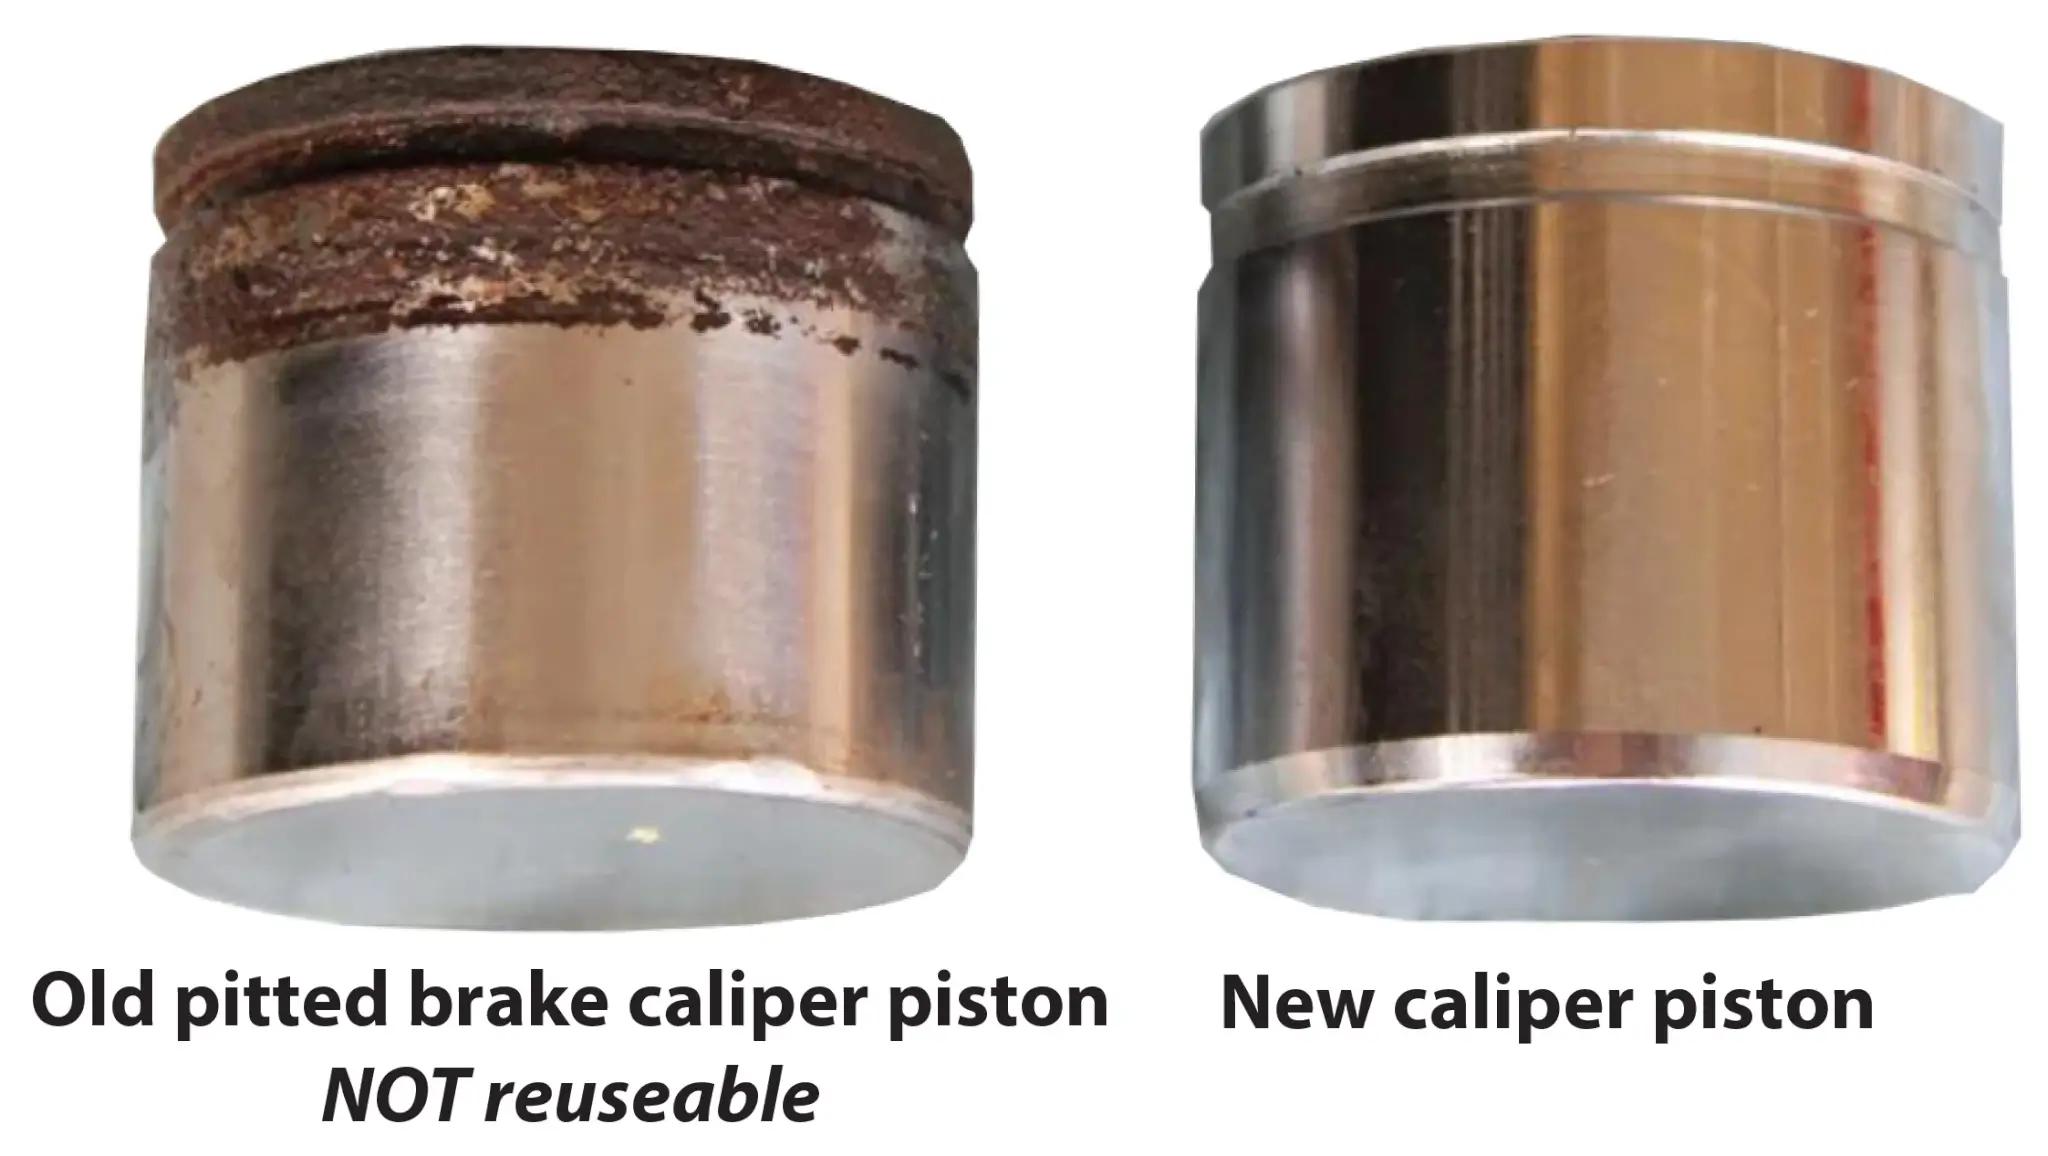
The rust ring on the left piston will grind away on the square-cut O-ring, causing it to leak. Replace the piston with a new one, or buy a rebuilt caliper.
3. Do Inspect and Replace a Cracked/Damaged Phenolic Piston— Carmakers use phenolic pistons in brake calipers primarily for their superior heat insulation and corrosion-resistance properties. Phenolic pistons are made from a composite resin material reinforced with fibers that provide several advantages over traditional metal pistons.

Damaged phenolic brake caliper piston
While phenolic pistons offer some benefits over metal pistons, they also have some notable downsides that can affect their performance and longevity. The plastic becomes brittle over time, causing cracking and chipping. In some cases, the plastic can swell from the brake fluid, causing binding and failure to release the brake pads.
If you notice any chipping, swelling or cracking, you must replace the pistons or purchase a rebuilt caliper. Some brake calipers are designed specifically for phenolic pistons with specific clearances and seals. A metal piston may not fit or seal properly, leading to fluid leaks or premature seal failure.
4. Do Check for the Smooth Retraction of the Piston Into the Caliper Bore During Compression— A sticking or damaged caliper piston can cause uneven braking, excessive pad wear, or brake drag. Once the piston starts retracting, it should push into the bore smoothly with no signs of binding. If you have to apply any excessive force, stop. That’s a sign of an O-ring failure or a rusted piston that requires a rebuild or a new caliper.

The piston should retract smoothly without any binding or excessive force.
5. Do Clean and regrease the caliper slide pins— These pins are designed to help the caliper move freely, ensuring even pressure on both brake pads. The primary reason for issues with slide pins is neglecting lubrication. Regardless of design variations, lubrication is always necessary.
Caliper guide pins allow the caliper to float correctly, ensuring even brake pad wear. Always remove the slide pins to remove the old grease from the pins and the bores. Note the position of the pins when removing them so you can put them back in the same place.
Use a high-temperature silicone-based brake grease on these pins, but don’t overdo it. Too much grease can attract dirt and cause binding.

Each of these is rated for use in automotive brakes. They stand up well to high temperatures and are not petroleum-based, so they won’t damage the rubber boots or sleeves.
I always buy a caliper slide pin boot kit when doing a brake job. The kit comes with new boots for the pins and new anti-rattle sleeves. The boots keep water and grit out, so they’re very important to increase the life of your brake job.
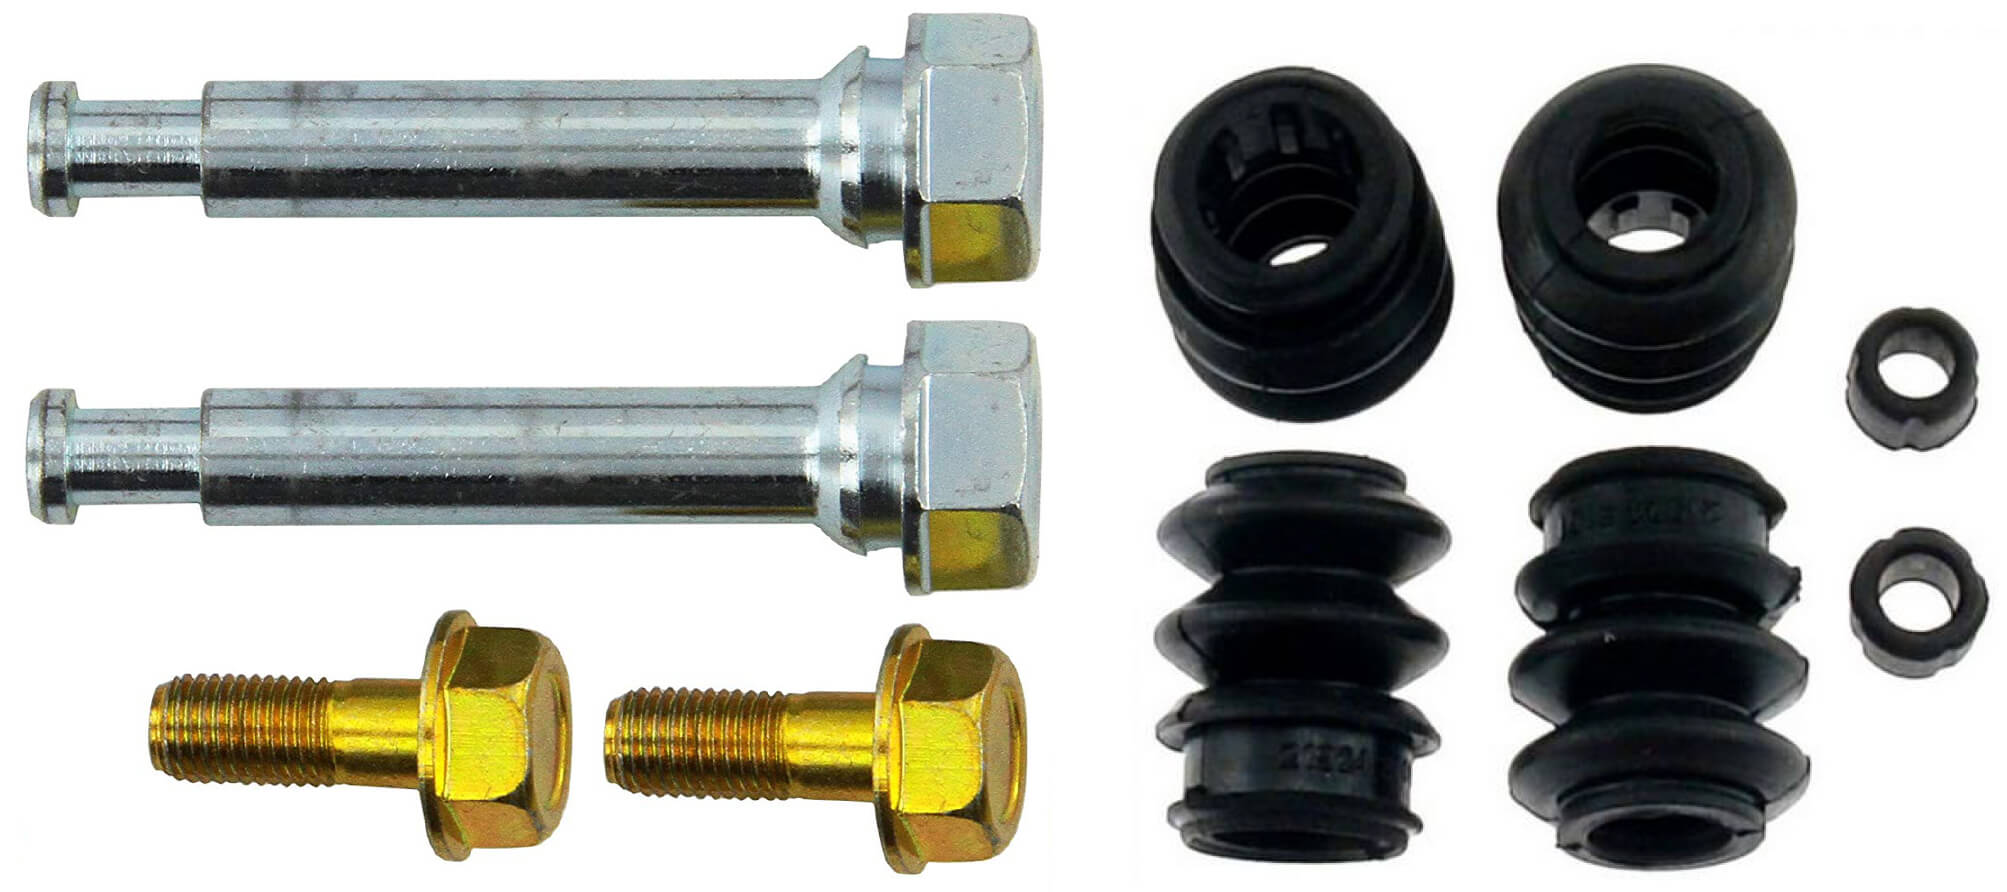
New caliper slide pins, boots, and sleeves
When you have the caliper off, take a close look at everything—caliper pins, boots, piston seals, and even the brake pads. If you see torn boots or sticking sliders, fix them now. Ignoring small problems leads to bigger ones down the road.
6. Do Use the Correct Brake Fluid— Always check your vehicle’s manual for the recommended brake fluid type. Mixing DOT 3, DOT 4, or DOT 5.1 incorrectly can cause braking issues. And never use DOT 5 silicone-based fluid unless your system is designed for it.
7. Do Torque Everything to Spec— Caliper bracket and slide bolts must be torqued to the manufacturer’s specifications. Over-tightening can strip threads, and under-tightening can lead to dangerous braking failures. Always use a torque wrench and verify specs before reassembly.
The Don’ts
1. Don’t Let the Brake Caliper Hang by the Hose— One of the worst mistakes you can make is letting the caliper dangle by the brake hose. The weight of the caliper can stress and damage the brake hose, leading to leaks or even a failure under braking. Secure the caliper with a hook, zip tie, or bungee cord.
2. Don’t Reuse Old Brake Caliper Hardware Anti-Rattle Clips— The clips will lo

High heat degrades the spring tension of the anti-rattle clips and rust can cause the brake pad “ears” to bind
se tension over the life of brake job due to heat and corrosion. Quality brake pads come with new clips and shims. Use them!
3. Don’t Reuse Old Crush Washers on Banjo Bolts
Never reuse the old crush washers on the banjo bolt if you’re replacing or disconnecting a brake line from the caliper. These washers ensure a leak-proof seal, and reusing them can lead to brake fluid leaks and potential brake failure.
4. Don’t Compress the Piston Without Opening the Bleeder— When pushing the caliper piston back in, it’s crucial to open the bleeder screw. Forcing old, contaminated fluid back into the master cylinder can introduce debris into the system and damage ABS components. Always bleed the fluid out instead of sending it upstream.
5. Don’t Over-Lubricate— Some people think slathering brake grease on the caliper pins, anti-rattle clips, and the back of pads will solve all their squeaking problems. While a light application of high-temperature grease on contact points can help, too much can lead to contamination of the pads or rotors, reducing braking efficiency.
6. Don’t Skip Bleeding the Brakes Properly— Air in the brake system will make your brake pedal feel spongy and can severely reduce braking performance. Always bleed the brakes after caliper work, following the correct sequence (typically starting with the wheel furthest from the master cylinder). If your vehicle has ABS, follow the correct bleeding procedure to avoid air pockets in the ABS module.
©, 2025 Rick Muscoplat
Posted on by Rick Muscoplat