
Brake Pad Bedding: What it does and why it’s important
The Brake Pad Bedding Procedure — How to do it and why it’s so important
Quick Read Summary: Performing a brake pad bedding procedure after installing new brake pads is critical to the proper operation of your brakes. Bedding is the process of heating the brake pads so they deposit a thin, uniform “transfer layer” of brake friction material on the face of the brake rotor. The bedding process is especially important if you’ve installed ceramic or NAO-style brake pads, because they rely on film-on-film friction to stop your car. If you skip this step, you’ll have uneven braking, brake noise, and poor braking.
Why the Bedding Procedure Matters
When you install new pads and rotors, the surfaces are raw—they don’t mate perfectly. The bedding procedure corrects that by transferring a controlled layer of friction material from the pad surface to the rotor face. This is called the transfer layer, and it’s what makes braking smooth and predictable.
Without it, you’ll get uneven deposits that create hot spots and cause that pulsing brake pedal everyone mistakenly calls “warped rotors.”
The Science Behind Brake Pad Bedding
Brake pad friction materials behave differently depending on their design. Here’s how the two major types react during the bedding procedure:
1. Abrasive Pads (Semi-Metallic)— These pads rely on friction between the pad and the rotor surface itself. As they wear, they remove a small amount of rotor metal. This friction type creates more dust and rotor wear but can handle high heat loads. It’s important to bed these in gently to avoid uneven wear.
2. Adherent Pads (Ceramic or NAO)— These pads depend on the transfer layer—the microscopic film of pad material that fuses to the rotor surface during the brake pad bedding process. Once established, that layer helps your brakes grab consistently with less wear, less noise, and better feel.
How to Perform the Brake Pad Bedding Procedure
Different brake manufacturers specify slightly different techniques. For example, manufacturers of racing pads recommend accelerating to a high speed and braking hard to perform the bedding procedure. However, manufacturers of street pads recommend driving to only 30 MPH, and braking gently with a cooling-off period between stops. That’s why it’s always best to refer to the manufacturer’s instructions for the recommended procedure for the pads you bought. But this general bedding procedure works well if no instructions are provided:
Accelerate to around 30 MPH— Street pads shouldn’t be bedded from high speeds.
Initial Slowdowns – Perform about 20 gradual slowdowns from 30 mph to 0 mph using moderate braking pressure. Come to a complete stop.
Cooling Period – Wait 30 seconds between stops to let the pads cool and prevent overheating.
Avoid Hard Stops – Slamming the brakes or holding the pedal while stopped can overheat the pad surface, leading to uneven deposits on the rotor.
In some cases, full bedding can require up to 200 stops before the system fully stabilizes. When that’s not possible—like after a shop repair—do the initial steps, then drive gently for the first few days. Your normal driving will complete the process.
Why You Might See Smoke or Smell During Bedding
During brake pad bedding, you may  notice smoke or a sharp smell. That’s perfectly normal. What you’re seeing is the curing of the binding resins in the pads. As they heat and outgas, they stabilize and harden, locking in the pad’s designed friction characteristics.
This “resin maturing” is why brakes often perform their best after a short break-in period.
What Happens If You Skip the Bedding Procedure
Failing to perform proper brake pad bedding can cause:
• Uneven pad deposits leading to brake pulsation.
• Hot spots that discolor the rotor and reduce friction.
• Reduced braking power due to lack of a proper transfer layer.
• Noisy brakes and premature wear.
• Skipping the bedding procedure is like running a marathon without stretching—you might still finish, but you’ll damage something along the way.
Common Brake Installation Mistakes That Mimic Bedding Problems
Even a perfect bedding procedure can’t fix bad installation habits. These are the most common mistakes I see:
1. Not Cleaning New Rotors— New rotors arrive coated with machining debris and oil. A quick spray of brake cleaner isn’t enough. I always wash new rotors with hot water and Dawn dish soap. The difference is noticeable—you’ll see metallic dust rinse off that brake cleaner missed.
2. Leaving Rust on the Wheel Hub— If you don’t remove all hub rust, the rotor won’t sit perfectly flat. That tiny misalignment (as little as 0.002”) causes lateral runout, which leads to disc thickness variation and pedal pulsation. Despite popular belief, rotors don’t actually warp—your uneven hub surface causes the issue.
3. Not Using a Torque Wrench to tighten lug nuts— Uneven lug nut torque means uneven rotor clamping pressure, which also creates runout. Always torque your lugs properly using a star pattern and the correct specs.
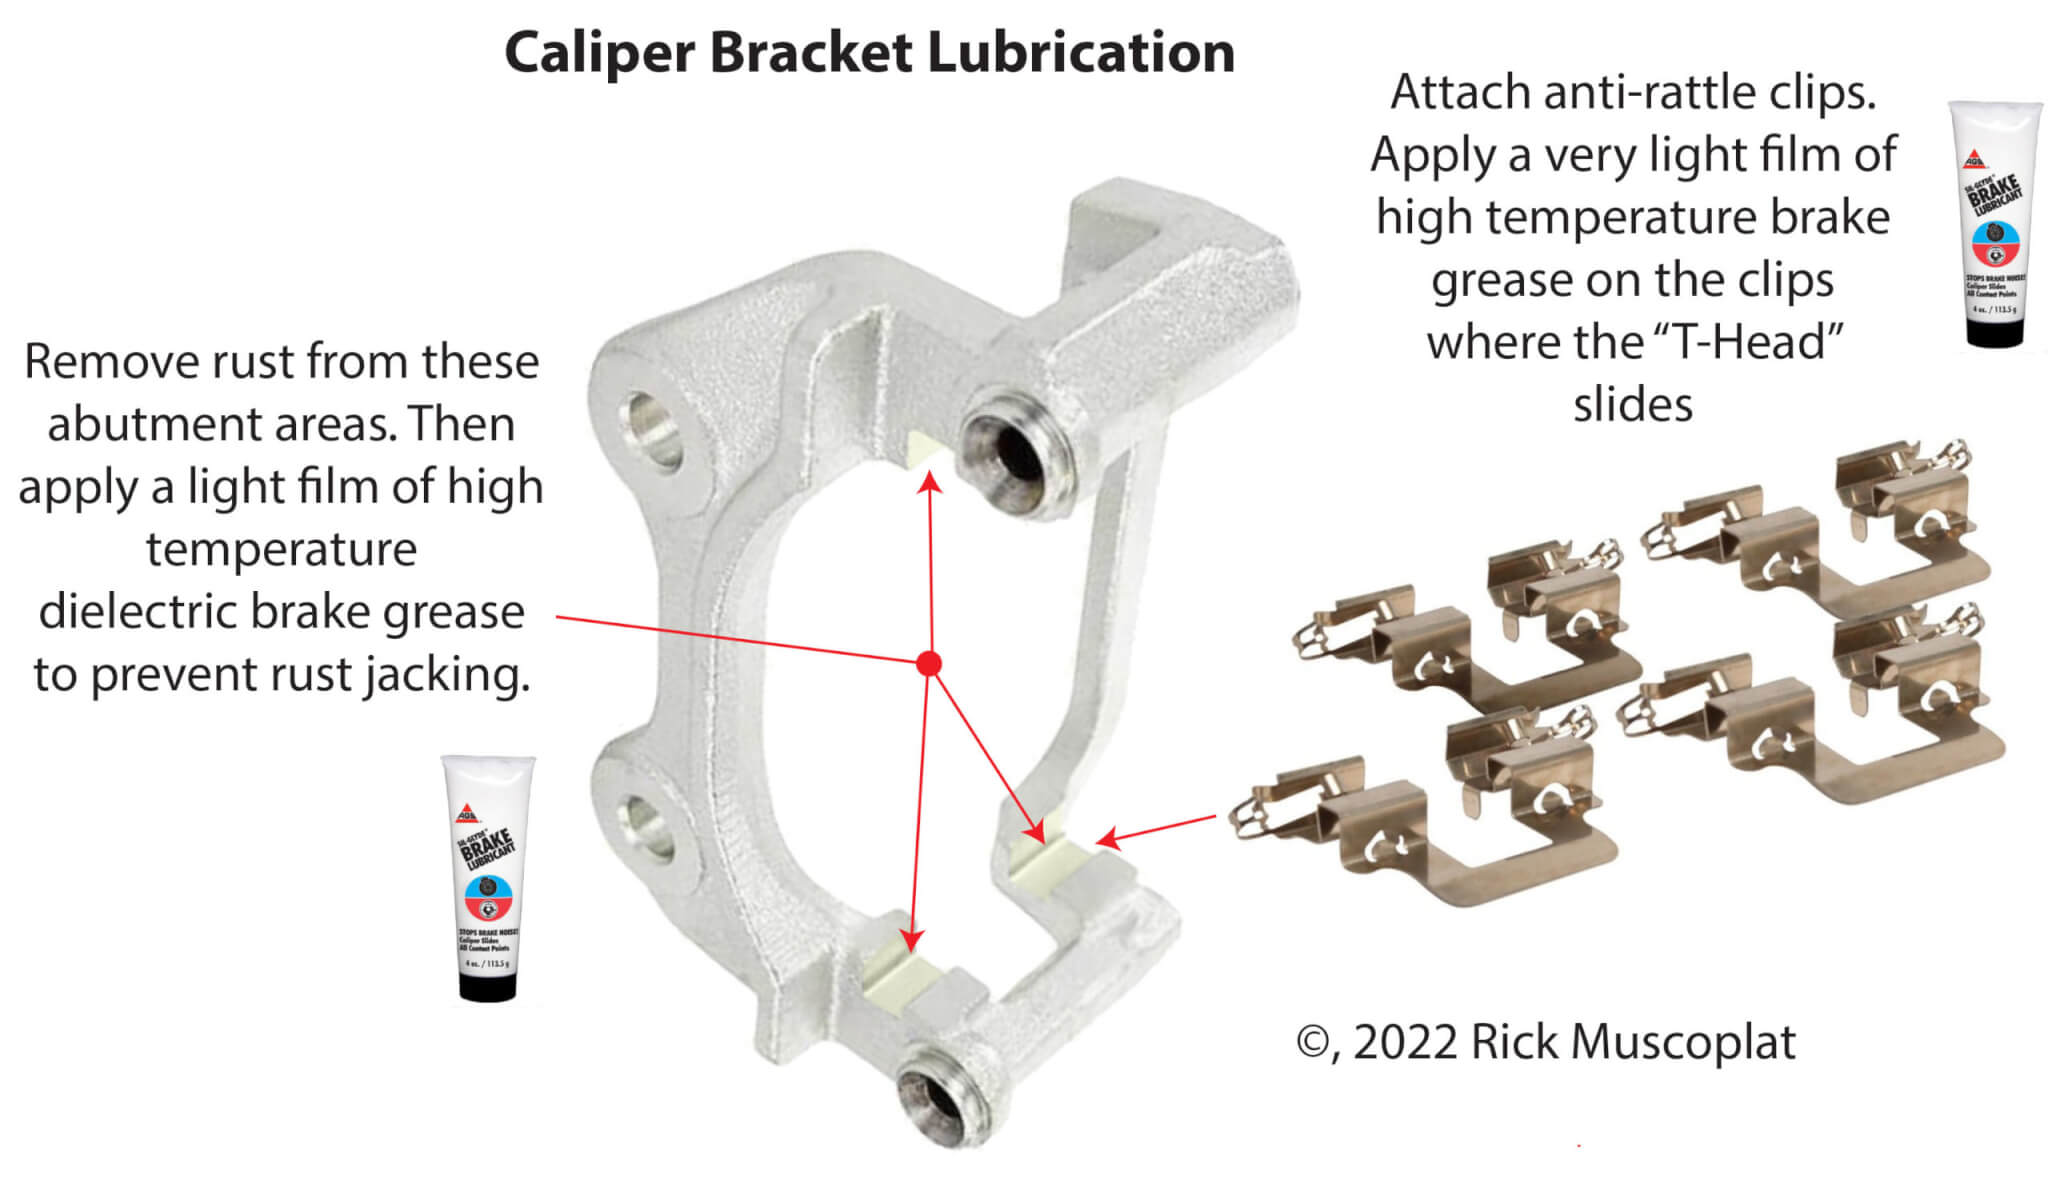
4. Ignoring Caliper Hardware— Dirty or rusty caliper slides and abutment points cause sticking and uneven pad wear. I always clean these thoroughly and apply high-temperature synthetic brake grease to all contact points and the back of the shims.
5. Using the wrong brake lubricant— Avoid all petroleum-based greases. That includes all anti-seize products! Use only synthetic high-temperature brake grease to lubricate caliper slide pins. Apply dielectric grease UNDER the anti-rattle clips to reduce rust formation and rust jacking, which can cause pad binding and uneven pad wear.
Final Thoughts
As someone who’s diagnosed countless so-called “warped rotor” complaints, I can confidently say most of them were caused by improper brake pad bedding or sloppy installation. The bedding procedure takes just a few minutes but ensures the pads and rotors perform together as designed. Skip it, and you’re just asking for vibration, noise, and poor braking.
Do it right the first time, and your brakes will stay smooth, quiet, and strong for tens of thousands of miles.
©, 2019 Rick Muscoplat
Posted on by Rick Muscoplat