
Detail a car
How to detail a car
Car detailing a car is a two-step process; interior car detailing and exterior car detailing. The time you need to complete the process depends on whether you need to shampoo the interior carpet and upholstery and whether you intend to buff out paint scratches. A professional detailer can do all that in about 3 hours, but it takes most DIYers an entire day to detail a car.
This is a 2-part series. Detailing a car exterior is next. Click here to read that post
If you plan to shampoo the interior upholstery and carpet, it’s best to detail the car’s exterior first or break the project into two days, so you can leave the windows open once you finish shampooing. You don’t want to leave the windows closed after you shampoo the upholstery.
How to detail car interior
Anybody can detail a car interior if they have the time and patience. Here’s a list of the tools and products you’ll need:
Car Interior detailing tools and supplies
Detailing brushes
Carpet and upholstery brush
Microfiber towels
Shop vacuum with nozzle attachments
Upholstery and carpet shampoo
Glass cleaner
Vinyl cleaner
Matte finish vinyl protectant
Leather cleaner and conditioner
Silicone spray
Dry Teflon Lube
White lithium grease

Step-by-step for detailing car interior
Car detailing tip: Start from the top and work your way down to the floor.
• Vacuum and clean the headliner. If you see any stains, clean them with upholstery cleaner and a brush. Do NOT over-saturate! The headliner is a multi-layer composite held together with adhesive. Over-wetting can cause the liner to separate!
• Clean the rearview mirror with glass cleaner and microfiber towel
• Clean A, B and C pillar vinyl surfaces with vinyl cleaner and microfiber towels
• Clean dash crevices with brushes and shop vacuum attachments 
• Clean dash vinyl with vinyl cleaner and microfiber towels. Clean steering wheel and steering column covers. Do not apply vinyl protectant at this point.
• Dust instrument cluster gauges and radio lenses with a damp microfiber towel. Then clean using a clean dry microfiber towel and glass cleaner. Do NOT clean lenses without first removing dust! You will scratch the lenses.
• Clean vinyl on door and console panels using vinyl cleaner and microfiber towels. Do not clean fabric on doors at this point.
• Scrub fabric seats with stiff brush to dislodge dirt and grit while you vacuum seat back and seat cushions.
• Use detailing brushes and shop vacuum attachments to clean the console. Dust first to remove abrasive particles before cleaning shiny plastic parts.

Mother’s carpet brush
• Remove the floor mats and vacuum the carpet with the shop vacuum. Vacuum under the seats and between the console. Then vacuum a second time using the carpet brush to dislodge dirt and grit embedded deep in the carpet. Don’t skip this step! Vacuum alone won’t pull out that deeply embedded dirt.
Notice that you haven’t cleaned the windows yet. That’s because the upholstery and carpet brushing kicks up a lot of dust and dirt and it’ll just settle on the glass again.
Shampoo the car seats and carpet
Start with the seats and door panels. Follow the direction on the upholstery cleaner and apply to the seat backs and cushions and carpet on door panels. Scrub and then vacuum off the excess moisture. Do NOT wash the seal belt straps unless the product is specifically rated for that purpose. If the upholstery cleaner isn’t rated for that, use a mild solution of dishwashing detergent and water to clean the seat belt webbing.
Clean the carpet last. Apply the carpet cleaner and brush in two direction. Then vacuum off the excess. Leave the windows only and let the seats and carpet dry.
Once the carpet and upholstery is dry, wipe the dash vinyl with a dry microfiber towel and then apply matte finish vinyl UV protectant on all vinyl components on the dash, console and door panels. Do NOT use shiny protectant! It will reflect into your windshield and decrease your view, especially at night. Using shiny vinyl protectant is the #1 mistake DIYers make when detailing.
Lubricate the door window channels
Use either spray silicone or Dry Teflon lube to lubricate car door
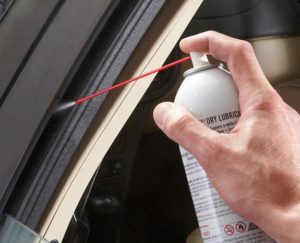
Lubricate glass channels with silicone or dry teflon lube spray
glass channels. Then run the window up and down a few times to spread the lube. Dry teflon lube goes on wet and dries to a white powder, so it may make the channels look white. Silicone spray doesn’t change the color but can attracts dust and dirt. If you use Dry Teflon lube, wait a few minutes for the solvent to dry before operating the window up and down to spread the Teflon. Lubricate glass channels with silicone or dry Teflon lube spray
Clean all interior glass with glass cleaner and a microfiber towel. Lower the glass slightly to remove any rubber residue at the top of the window.
Lubricate car door hinges
Use a white lithium grease to lubricate car door hinges.  White lithium works much better than light lubricating products like WD-40 and it lasts much longer. However, it is messy. So shoot the white lithium onto the door hinges. Then open and close the door several times to work the liquid into the hinge before the solvent evaporates. Then use a paper towel or old rag to wipe off the excess. Perform this step before you clean the door jamb interior in the next step.
Clean the painted areas in the door jambs and the interior painted portion of the doors.
Spray silicone or Dry Teflon Lube onto a microfiber towel and let it dry for a minute before wiping the lube around all the door weatherstripping. That allows time for the solvent to evaporate. Do not spray directly onto the rubber weatherstripping. The solvent in the spray can cause the weatherstripping to swell.
Lubricating the car door weatherstripping prevents sticking in hot weather and weatherstrip freezing in cold weather.

©, 2019 Rick Muscoplat