
How to Diagnose a Bad Serpentine Belt Tensioner Before It Fails:
Diagnose a Serpentine Drive Belt Tensioner Like a Pro
When your car starts making strange noises or you lose power steering or AC, the culprit might not be the belt itself, but the serpentine drive belt tensioner. As an experienced technician, I’ve diagnosed and replaced countless tensioners, and I can tell you: catching the early signs can save you from a roadside breakdown or engine damage. Let me walk you through how I diagnose a failing serpentine drive belt tensioner, what belt tensioner symptoms you should watch for, and how to test it using a belt tensioner tool.
What Happens If You Ignore Belt Tensioner Symptoms?
I’ve seen many engines suffer serious damage because drivers ignored early belt tensioner symptoms. Here’s what can go wrong:
•The belt slips and overheats the engine due to a failed water pump.
•The alternator can’t recharge the battery, leading to electrical failures.
•Power steering can be lost at the worst possible time—like while turning into traffic.
By the time the belt comes off, you’re looking at a tow and possibly thousands in repairs. That’s why I always check the serpentine drive belt tensioner during every belt replacement or routine inspection.
A serpentine belt tensioner has TWO jobs
Job #1: Maintain proper serpentine belt tension— To maintain belt tension, an automatic belt tensioner uses a strong torsion spring to apply force to the belt at all times. The strong spring tension also compensates for belt wear. Contrary to popular belief, serpentine belts don’t stretch, but the mini “V” ribs do wear. That causes the belt to ride deeper in the pulley grooves, and that changes the belt length. The spring inside the tensioner is designed to absorb the slack caused by belt wear and maintain proper belt tension.
Job #2: Dampen vibrations— Engines don’t provide smooth rotation at the crankshaft pulley (harmonic balancer). They provide power in a series of pulses; each power pulse results from a cylinder’s contribution to power during the power stroke. So, the harmonic balancer pulses with each power stroke. That pulls the belt, causing the tensioner arm to move up or down. Then, between pulses, the belt relaxes slightly, and the tensioner returns to its normal position. Without a dampening mechanism in the tensioner, the power pulses would cause the belt to vibrate and make noise—like a guitar being plucked.
All tensioners include a vibration-dampening mechanism. When the dampening mechanism wears out, the belt makes noise and transmits that vibration to other components, such as the alternator, power steering pump, and AC compressor. That vibration can cause premature bearing failure on those components. That’s why a properly operating belt tensioner is so important.
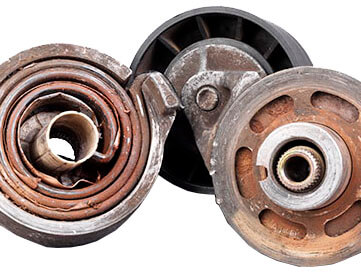
See the belt tensioner components below.

Components of an automatic belt tensioner
Common Belt Tensioner Symptoms You Should Never Ignore
1. Squealing or Chirping Noise
A loud squealing sound when you start the car or accelerate usually means the serpentine drive belt tensioner isn’t holding enough tension. That slack allows the belt to slip, especially in cold weather or when accessories are under load.
2. Belt Flapping or Slapping
If you notice the serpentine belt fluttering or slapping against nearby components, it’s a telltale sign the belt tensioner symptoms have gone from bad to worse. The tensioner pulley may be worn out or the internal spring may have lost tension.
3. Misaligned or Shiny Belt
A misaligned tensioner pulley will cause uneven wear on the belt. If I see shiny or frayed edges on the belt, I always inspect the serpentine drive belt tensioner for misalignment or bearing failure.
4. Noisy Tensioner Pulley
Sometimes, it’s not the belt making noise—it’s the serpentine drive belt tensioner itself. Worn pulley bearings can sound like a grinding or rattling noise. That’s one of the classic belt tensioner symptoms that many drivers overlook.
5) Excessive Tensioner Arm Movement— The dampening mechanism inside
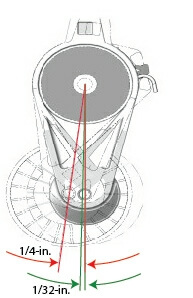
Normal movement is 1/32″. Movement beyond 1/32″ up to 1/4″ is a sign of a worn-out dampening mechanism,
the tensioner is designed to dampen engine power pulses. However, the dampening mechanism is a wear item. After 100,000 miles, the dampener wears, allowing the tensioner arm to move excessively.
A normal tensioner will move approximately 1/32″ with the engine running, but movement of up to 1/4″ is an indication of a worn-out dampening mechanism. That requires replacement.
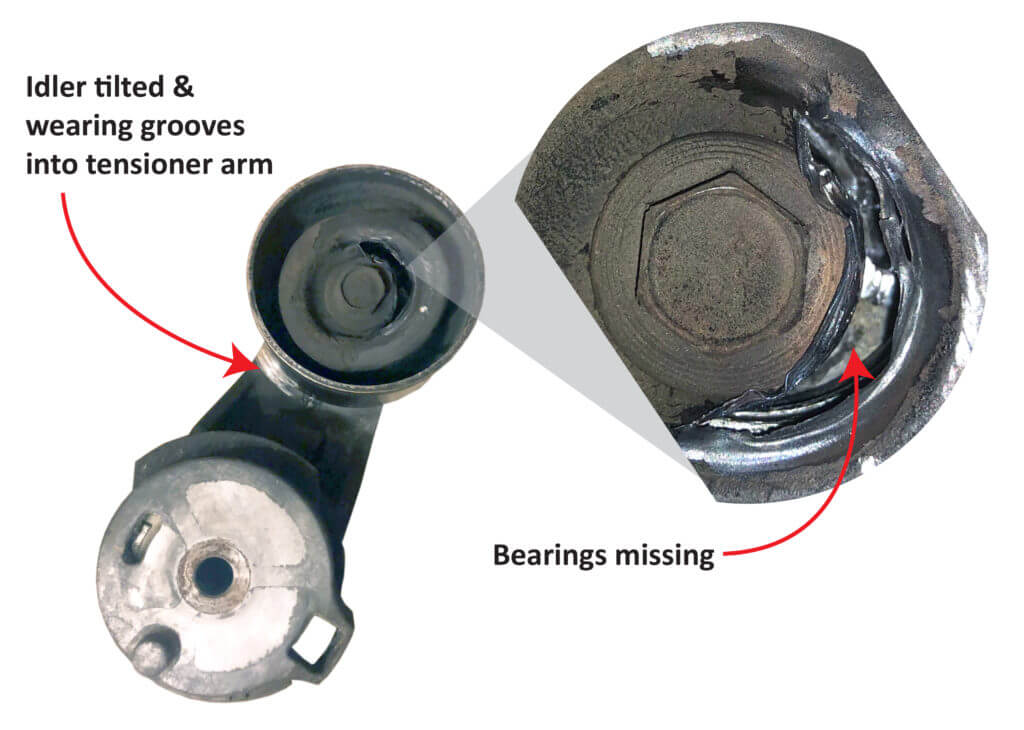
6) Off-Center Belt Tracking— As the pivot bushing wears, the tensioner arm is no longer parallel to the mounting base. This can cause the belt to ride to the side of the pulleys or even dislodge the belt from the pulleys.
View the tensioner from the top and notice the angle of the tensioner arm compared to the base. Also, notice the wear pattern on the tensioner and other smooth pulleys. A worn tension will cause the belt to side-track instead of tracking in the middle of the pulley. If the tensioner arm isn’t parallel, it’s worn out and must be replaced.

7) Rust— Any sign of rust on the exterior of the tensioner is an indication that the spring has lost its anti-
Broken/rusted belt tensioner spring
corrosion protection. That causes the spring to bind and apply unequal tension to the belt. Do NOT attempt to oil the spring. That will attract dust and dirt that eventually grinds up the spring.
One common symptom of a rusted spring is a belt squeal right after belt replacement. It’s caused by a binding/rusted spring. After releasing the tensioner to install the new belt, the spring binds, preventing the tensioner from applying full tension to the belt. So, it slips and squeals.
8) Worn pulley bearing— The pulley on the tensioner can develop worn bearings, leading to grinding or whining noises. Spin the pulley by hand to detect roughness or resistance.
Perform a mechanical test of the belt tensioner and idler rollers with the engine off
A belt tensioner tool is essential for both testing and removing the tensioner. With the engine off, I insert the tool into the square drive or bolt head and slowly move the tensioner through its range. It should move smoothly and spring back firmly. If there’s resistance, binding, or weak spring return, the tensioner is shot. 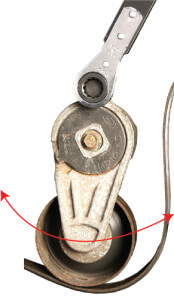
With the belt off, check the tensioner idler’s condition. Look for a worn bearing or damaged idler face. Then, check all the idlers in the belt drive system for ease of rotation.
Check for Pulley Wobble or Play
With the tensioner tool in place, I’ll also check the pulley itself. If I can rock it side to side or see obvious misalignment with the belt path, it’s time to replace it. These are classic belt tensioner symptoms that point to a worn bushing or bearing.
Perform a running test using an automotive stethoscope
Reinstall the belt and start the engine. Using an automotive stethoscope, probe to the non-rotating portion of the tensioner idler bearing and the stationary portion of the tensioner. Listen for these sounds:
A worn serpentine belt tensioner can make several different noises.
• Worn bearings make a rumbling sound or a very high-pitched metallic screech.
• A worn or rusted tensioner spring makes a creaking, rusty sound as you rotate it to replace a belt.
As the tensioner spring rusts, it makes a creaking sound. As the idler roller bearing wears, it makes a high-pitched screeching sound.
When and How to Replace the Serpentine Drive Belt Tensioner
If your tensioner shows signs of failure, don’t just replace the belt—replace the serpentine drive belt tensioner too. Modern EPDM style belts have a life of approximately 100K miles. That’s how long the tensioner lasts too. If you don’t change the tensioner when you install a new belt, you’ll have to replace the tensioner within the next 2o miles anyway. Why not replace it with the belt and eliminate the possibility of a failure on the road?
Here’s how I do it:
1) Use a belt tensioner tool to release the tension and remove the belt.
2) Unbolt the tensioner from the engine block or bracket.
3) Compare the old and new parts to confirm correct fit.
4) Bolt the new tensioner in place and route the belt according to the diagram.
5) Use the belt tensioner tool again to apply proper tension and double-check alignment.
6) I always torque the fasteners to spec and rotate the engine by hand before starting it up.
© 2012 Rick Muscoplat
Posted on by Rick Muscoplat