
Fix an exhaust leak without welding
How to Fix an Exhaust Leak With a Band Clamp and Muffler Bandage
Quick Summary
To fix a small exhaust leak in an otherwise solid exhaust pipe, use a high-temperature muffler bandage secured with a properly sized band clamp (not a hose clamp).
• A high-temperature muffler bandage provides the heat-resistant sealing layer
• The band clamp holds it tightly against the pipe and protects the repair from vibration.
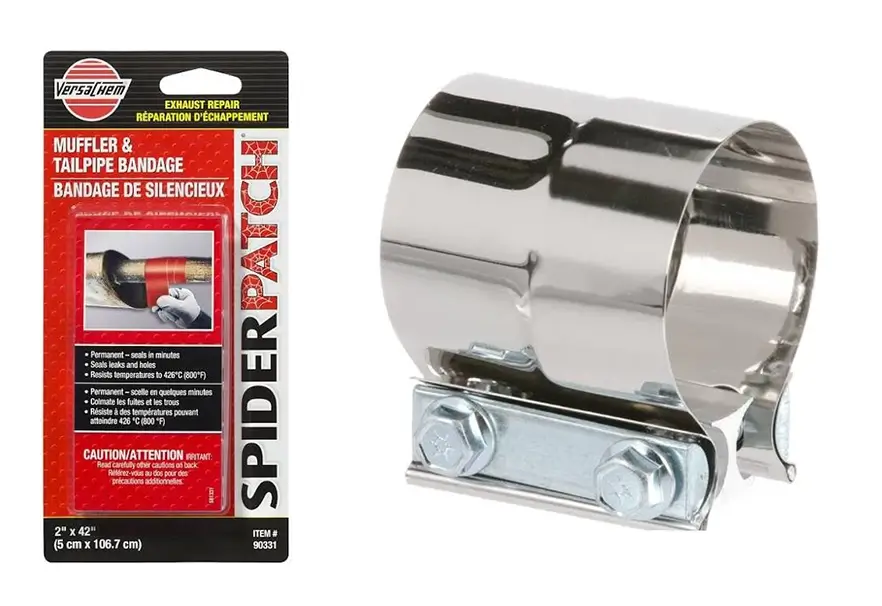
Muffler bandage and band clamp used to fix an exhaust leak
This method works best on small, localized holes in structurally sound exhaust tubing. If the surrounding pipe is badly rusted, cracked, soft, or perforated in several places, replacing the damaged section is the better repair.
How to Fix an Exhaust Leak With a Band Clamp and Muffler Bandage
A small exhaust leak can turn a relatively quiet vehicle into a noisy one surprisingly quickly. More importantly, exhaust leaks shouldn’t be ignored. Exhaust gases contain carbon monoxide, making a leaking exhaust a potential safety concern as well as a mechanical problem.
For a pinhole or small rust hole in a straight, accessible section of pipe, a muffler bandage reinforced by a band clamp can provide an effective repair without cutting or welding.
What You’ll Need for the Exhaust Pipe Repair
Before starting, gather:
• High-temperature muffler or exhaust repair bandage
• Stainless-steel exhaust band clamp sized for the pipe
• Wire brush and/or coarse sandpaper
• Gloves and safety glasses
• Clean rag
• Jack stands or ramps if additional clearance is required
• High-temperature exhaust repair paste or putty, if recommended by the bandage manufacturer
What is a muffler bandage?
A muffler & tailpipe bandage is usually constructed with an epoxy-impregnated fiberglass fabric that chemically bonds to mufflers and tailpipes. This bandage seals, repairs holes and leaks in exhaust systems. Most brands are rated to temperatures of 800°F (426°C).
Step 1: Inspect the Exhaust Leak Before Repairing It — Start with the exhaust system cool enough to work around safely. Examine not only the visible hole but several inches of pipe surrounding it.
This is important because a tiny hole can be the first visible symptom of extensive internal corrosion. Tap and inspect the surrounding metal. If it is heavily scaled, paper-thin, crumbling, or riddled with additional pinholes, a clamp-and-bandage repair is unlikely to provide a dependable foundation.
A good candidate is a small isolated hole surrounded by reasonably solid metal.
Step 2: Remove Rust and Contamination Around the Hole — Surface preparation is one of the most important parts of the job. Use a wire brush, sandpaper, or abrasive pad to remove:
• Loose rust
• Flaking scale
• Road grime
• Dirt
• Loose coatings and corrosion
Manufacturers of exhaust repair products specifically instruct users to remove rust and dirt before applying a bandage because the repair needs a clean, stable surface.
Clean an area wider than the bandage and clamp rather than concentrating only on the hole itself.
Why Surface Preparation Matters
A muffler bandage cannot restore strength to metal that is already disintegrating. The repair is only as reliable as the pipe underneath it.
The objective is therefore not to make rusty steel look new. It is to remove everything loose enough to interfere with the bandage’s contact with solid metal.
Step 3: Apply the Muffler Bandage Over the Exhaust Hole —
Follow the instructions for your particular bandage, as activation and curing procedures differ by product. Some require water, some contain heat-curing compounds, and some are designed to work with exhaust repair paste.
Center the repair material over the hole and wrap it firmly around the pipe. Maintain the overlap specified by the manufacturer. For example, Permatex instructs users of one of its muffler and tailpipe bandages to overlap the material by at least 1/2 inch, with greater overlap providing additional protection. Holts specifies overlapping its bandage by about 25 mm to provide double coverage.
The important principle is simple: the damaged area should be completely covered, with adequate sound pipe captured on either side of the leak.
Step 4: Install the Band Clamp Over the Repair — Position the band clamp over the wrapped section so the hole sits near the center of the clamp.
Tighten the clamp progressively and evenly. Its job is to compress the repair material against the exhaust pipe and provide mechanical reinforcement.
Do not assume tighter is always better. Excessive force can deform weakened tubing or damage some repair materials. Exhaust repair kits that combine bandage material with a steel clamp specifically warn against overtightening.
You want a firm, uniform grip without crushing the pipe.
TIP: Don’t even think about substituting a tin can and hose clamps in place of the exhaust band clamp. It won’t last and all your work will be wasted.
Step 5: Allow the Exhaust Bandage to Cure Correctly — Curing is where following the product instructions becomes especially important.
Some exhaust bandages cure through exhaust heat, while others should initially sit before the engine is started. For example, one Permatex bandage uses engine heat to cure its epoxy resin, while another exhaust repair kit specifies starting with a cold exhaust and subsequently idling the engine to harden the repair.
• Do not automatically copy curing instructions from a different brand.
• Once cured, inspect the repair and verify that the clamp remains secure.
When Should You Replace the Exhaust Pipe Instead?
A bandage-and-clamp repair is most appropriate when the defect is small, and the surrounding pipe is still strong.
Replace or professionally repair the affected exhaust section when:
• Rust extends well beyond the visible hole.
• Several holes or cracks are present.
• The pipe flexes or crumbles during cleaning.
• The damage is close to a badly corroded joint or flange.
• The repair repeatedly leaks after curing.
• The exhaust component has lost structural integrity.
A clamp and bandage can fix an exhaust leak, but they cannot rebuild a section of exhaust pipe that no longer has enough sound metal to support the repair.
Final Check: Is a Band Clamp and Muffler Bandage a Good Exhaust Leak Repair?
For a small hole in otherwise solid tubing, yes. A properly installed high-temperature muffler bandage combined with a correctly sized band clamp offers a practical way to seal and reinforce the damaged area. Commercial repair systems use the same basic principle: heat-resistant sealing material covers the damaged section while a metal clamp or support holds the repair securely in place.
The key is knowing the difference between a small exhaust leak and an exhaust pipe that has reached the end of its service life. If the metal is solid, careful preparation, correct bandage overlap, firm clamp pressure, and proper curing can make the repair effective. If the pipe is severely corroded, replacement is the more dependable solution.
©, 2026 Rick Muscoplat
Posted on by Rick Muscoplat