
How to Fix a Water Heater Popping Rumbling Sound
Why Your Water Heater Makes a Popping Rumbling Sound and How to Fix it
Quick summary
When your water heater starts popping or rumbling, it’s almost always due to sediment buildup inside the tank. Water trapped beneath mineral deposits heats up and bubbles through them, creating a popping or rumbling noise. Flushing may help, but persistent noise can require a cleaning procedure to dissolve the buildup.
What Causes a Water Heater Popping Sound?
1) Hard water minerals — Calcium and magnesium dissolved in the water come out of solution when heated. This is the biggest contributor, and it’s why the problem is worse in areas with hard water. The minerals form scale (calcium carbonate) that drops to the tank floor or bakes onto the heating elements of electric water heaters or the tank bottom directly above the gas burner assembly.
2) Sand, silt, and debris — Homes on well water, or on municipal systems that have had main breaks or construction work, can pull in fine particulates that settle in the tank.
3) Rust and corrosion — Once the tank’s glass lining develops tiny cracks, the steel underneath rusts. Rust flakes also come from the anode rod as it wears down. Corroded galvanized supply pipes can also contribute.
4) Anode rod breakdown — The sacrificial rod (magnesium or aluminum) corrodes by design to protect the tank. As it dissolves, it leaves flaky residue that adds to the pile. A fully depleted rod means the tank itself starts corroding.
5) Iron and manganese — Well water often carries these, and they oxidize in the heat and precipitate out as dark sludge.
6) Bacterial byproducts — In low-temperature setups, some bacteria can contribute to slime or sludge, though this is a smaller factor than minerals.

This image shows sediment buildup in a water heater and calcium buildup on the electric heating element
Over time, these deposits form a crust on the tank bottom. In a gas-fired water heater, the burner causes the water to bubble and push through the sediment layer, causing a popping, crackling, or rumbling sound.
In an electric water heater, sediment or scale around the heating elements creates the noise.
Other symptoms of sediment buildup
• Less hot water — You notice that your shower runs out of hot water sooner than in the past. That’s because sediment impedes heat transfer to the water.
• Slower recovery after showers — You notice it takes longer for your water heater to reheat enough hot water for a second family member to shower. to recover enough hot water for a second shower
Is a Water Heater Popping Sound Dangerous?
Sediment-related popping means your water heater needs maintenance, not that it’s about to explode. However, if you ignore the sounds and don’t address the sediment buildup, you will shorten the life of the water heater.
How to Fix a Water Heater Popping Rumbling Sound
1. Locate the owner’s manual for your water heater — Read the water heater shutdown and flushing procedure. Most water heater tanks come with the owner’s manual attached. If yours is missing, find the heater brand, model, and serial number on a label on the side of the tank.
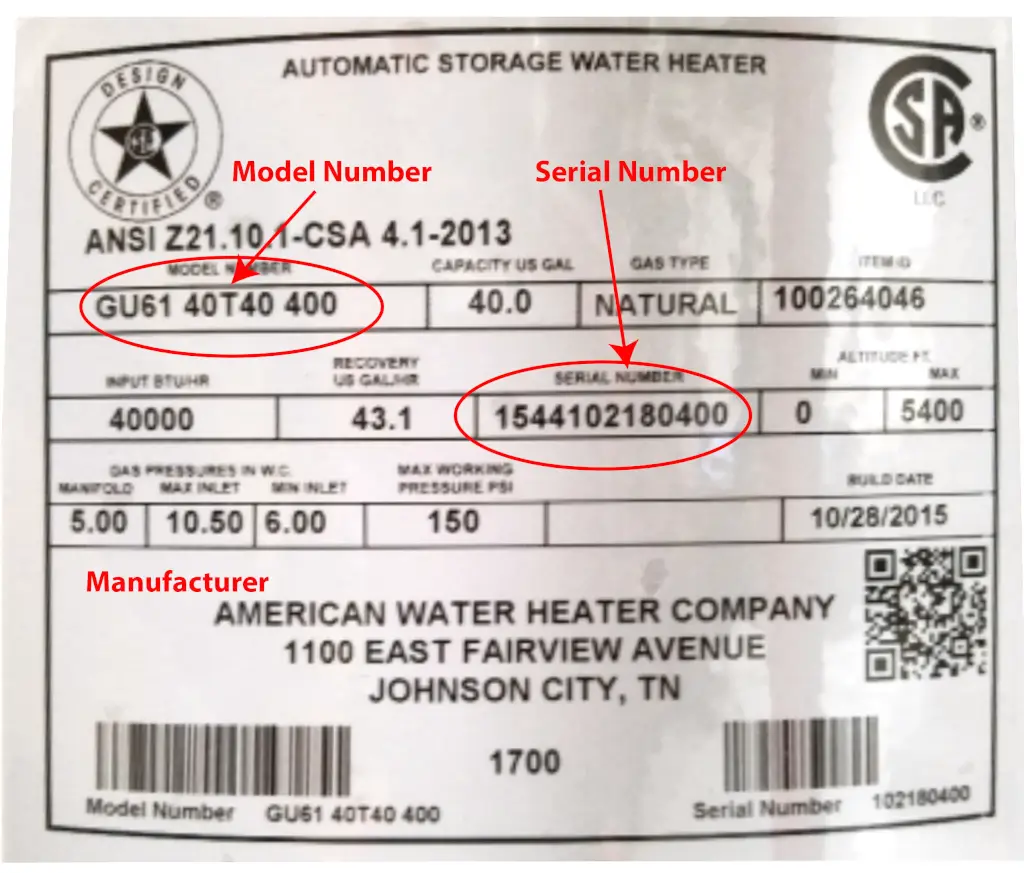
Locate the manufacturer’s label to find the model and serial number
2) Flush your Water Heater
What You’ll need: a garden hose, a bucket, a flathead screwdriver or a 3/4″ socket (for some drain valves), and work gloves.
1) Turn off the power or gas
• Electric Water Heater: Switch off the breaker. Skipping this can burn out the elements when the tank drains.
• Gas Water Heater: Set the thermostat dial to the “Pilot” position. For power vent gas water heaters, turn the switch to the “Off” position.
2) Locate the cold water inlet shut-off valve and close the valve —
Draining water straight from a hot tank can scald you and soften the hose. Let the water cool for a few hours.
3) Connect the garden hose to the drain valve on the water heater — Attach a garden hose to the drain valve near the bottom of the tank. Run the other end to a floor drain, a utility sink, or outside, below the tank level.
4) Open a hot water tap upstairs — Turn on a faucet to let air into the system so the tank drains smoothly. Leave it open for the whole flush.
5) Open the drain valve and drain the tank — Let it empty completely. Expect cloudy, gritty, or rusty water at first. If the flow slows to a trickle, sediment may be clogging the valve (see the tips below).
6) Flush with fresh water — With the drain still open, turn on the cold water supply valve above the tank. Let fresh water run into the tank for a few minutes. Keep flushing until the water runs clear. Repeat the drain-and-flush cycle if the water coming out is still dirty.
7) Close the drain valve and remove the hose — Make sure the valve is fully shut and not dripping.
8) Refill the tank — Keep the upstairs hot tap open until water flows out steadily with no sputtering. That means the tank is full and the air is purged. Then close the tap.
9) Restore power or gas
• Electric: only turn the breaker back on after the tank is completely full. Energizing the elements while dry will destroy them.
• Gas: relight the pilot if needed (follow the label on the unit) and set the thermostat back, ideally around 120°F.
10) Check for leaks — Look at the drain valve and the connections after the tank heats up.
What to do if your water heater makes popping rumbling sounds after flushing
Flushing works for loose sediment, but it can’t remove hardened scale deposits on heating elements or the bottom of the tank. Those deposits require a food-safe descaling additive to dissolve the buildup. Here’s how to do that.
How to Use a Descaler on a Tank-Style Water Heater
These two popular products can descale a water heater: Mag-Erad and Calci-Flush.
Calci-Flush by Rectorseal (~$130 per gallon) comes pre-dissolved in 1-gallon bottles with a cap adapter that fits a standard washing machine hose. Load it into an empty water heater by connecting a washing machine hose to the adapter cap and the water heater drain valve. Step-by-step instructions are detailed below.
Mag-Erad is a powdered product that must be mixed with water before use. It comes in a 2-lb plastic jar (~$27), and the amount needed varies by water heater tank capacity. Step-by-step instructions are detailed below.
How to descale your water heater using Mag-Erad
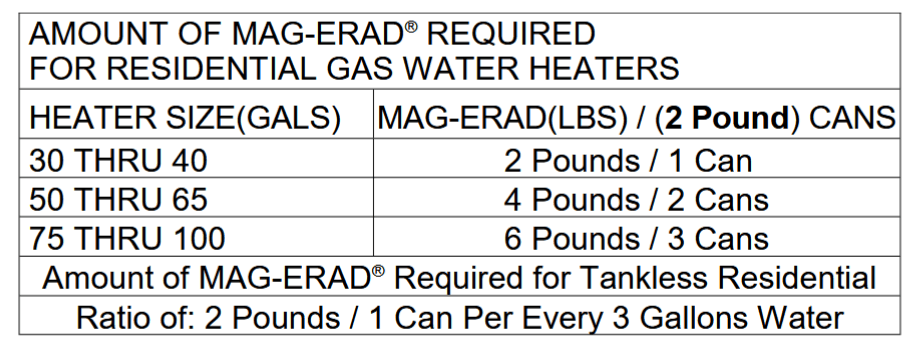
• Purchase enough Mag-Erad descaler product for your water heater (see chart below to determine how much you’ll need for your tank size). For severely scaled water heaters, add one extra jar of Mag-Erad
• You’ll also need: A garden hose, bucket, funnel, a 1-1/16″ socket and breaker bar to remove the anode rod, work gloves, and eye protection.
After following the flushing instructions above, turn off the power or gas and drain the tank.
1) Close the drain valve and remove the hose.
Open a path to pour the descaler in. Common options are to disconnect the hot outlet pipe (or its flex connector) at the top of the tank, or to remove the anode rod. Use whichever opening the product label specifies.
Add the descaler. Mix the product with water as the label directs, then pour it into the tank through a funnel. Add enough water to cover the bottom scale layer and, in an electric unit, to fully submerge the lower element. Don’t mix it with bleach or any other chemical.
Reconnect the hot outlet pipe or anode rod and make sure the connection is tight.
Fill the tank. Open the cold supply with the hot tap still open. When water runs steadily from the tap, the tank is full. Close the tap.
Let it soak. Follow the label’s soak time. For heavy buildup, some users report a few hours. Keep the power or gas off during the soak.
Drain the tank again. Expect cloudy water, chunks of scale, and sediment. If the drain valve clogs, briefly open the cold supply to stir up and push out the debris.
Flush until the water runs clear. Repeat the cold-water flush cycle until the output is clear. A wet vac can help remove large pieces that settle below the drain opening.
Close the drain valve, remove the hose, and refill the tank, purging air at the hot tap as before.
Restore power or gas, but only after the tank is completely full.
Electric: turn the breaker on only once the tank is full, since a dry element burns out fast.
Gas: relight the pilot if needed and set the thermostat to about 120°F.
Check for leaks at the drain valve, outlet connection, and anode rod once the tank has heated.
Tips and cautions
Run a hot tap for a minute or two after the final refill to clear any leftover solution before using the water.
Dispose of the drained solution as the label directs.
If the tank is 10+ years old, descaling can expose leaks that the scale was plugging. Be ready for that.
Don’t use descalers on a tank with a damaged lining or heavy corrosion without checking the manufacturer’s guidance. If the anode rod is badly worn while it’s out, replace it.
I can add this to the water heater article as its own section, with a short “flush vs. descale” comparison if you’d like.
1) Turn off the power or gas.
• Electric: switch off the breaker and leave it off for the entire soak.
• Gas: set the thermostat to “Pilot.”
2) Shut off the cold water supply at the inlet valve.
3) Let the water cool, then open a hot tap in the house so the tank can drain.
Drain the tank completely. Connect a hose to the drain valve and empty it into a floor drain, utility sink, or outdoors. If the water runs rusty or gritty, do a quick flush first (turn the cold supply on briefly with the drain open) to clear the loose sediment. The descaler works on scale, not loose debris.
Close the drain valve and remove the hose.
Open a path to pour the descaler in. Common options are to disconnect the hot outlet pipe (or its flex connector) at the top of the tank, or to remove the anode rod. Use whichever opening the product label specifies.
Add the descaler. Mix the product with water as the label directs, then pour it into the tank through a funnel. Add enough water to cover the bottom scale layer and, in an electric unit, to fully submerge the lower element. Don’t mix it with bleach or any other chemical.
Reconnect the hot outlet pipe or anode rod and make sure the connection is tight.
Fill the tank. Open the cold supply with the hot tap still open. When water runs steadily from the tap, the tank is full. Close the tap.
Let it soak. Follow the label’s soak time. For heavy buildup, some users report a few hours. Keep the power or gas off during the soak.
Drain the tank again. Expect cloudy water, chunks of scale, and sediment. If the drain valve clogs, briefly open the cold supply to stir up and push out the debris.
Flush until the water runs clear. Repeat the cold-water flush cycle until the output is clear. A wet vac can help remove large pieces that settle below the drain opening.
Close the drain valve, remove the hose, and refill the tank, purging air at the hot tap as before.
Restore power or gas, but only after the tank is completely full.
Electric: turn the breaker on only once the tank is full, since a dry element burns out fast.
Gas: relight the pilot if needed and set the thermostat to about 120°F.
Check for leaks at the drain valve, outlet connection, and anode rod once the tank has heated.
Tips and cautions
Run a hot tap for a minute or two after the final refill to clear any leftover solution before using the water.
Dispose of the drained solution as the label directs.
If the tank is 10+ years old, descaling can expose leaks that the scale was plugging. Be ready for that.
Don’t use descalers on a tank with a damaged lining or heavy corrosion without checking the manufacturer’s guidance. If the anode rod is badly worn while it’s out, replace it.
I can add this to the water heater article as its own section, with a short “flush vs. descale” comparison if you’d like.
Drain valve clogged: Briefly turn the cold supply on to stir up and push out the sediment, or tap the tank gently. Don’t force a plastic valve, since they crack easily.
Valve won’t close fully or leaks afterward: Replace it. Brass valves are a worthwhile upgrade over the plastic ones that come on many tanks.
Heavy sediment or very old tank (10+ years): Flushing an old, neglected tank can sometimes expose leaks, so be prepared for that.
Pressure relief valve: Not part of the flush, but it’s a good time to test it by lifting the lever briefly (with a drain pipe or bucket in place).
2. Flush the tank
A water heater sediment flush can remove loose material and reduce popping. It may not remove hardened scale attached to internal surfaces.
For a tank-style heater, the general process is:
Turn off the energy supply according to the manufacturer’s instructions.
Allow the water to cool before draining to reduce scalding risk.
Connect a suitable hose to the drain valve, routing it to an approved location that can safely handle the discharge.
Close the cold-water inlet and open a hot-water faucet as directed by the manual.
Drain and flush using the model’s prescribed procedure. This may include briefly admitting fresh water to move loose sediment.
Close the drain valve and refill the tank, leaving a hot-water faucet open to release air.
Confirm that the tank is completely full and check for leaks before restoring heat.
That final step matters: powering an electric heater before it is full can damage its elements. A. O. Smith explicitly requires a full tank before power is restored. A. O. Smith draining and flushing instructions
If the drain valve clogs or will not close afterward, stop and get professional help.
3. Have stubborn scale evaluated
If your water heater is still popping after flushing, I would reconsider the diagnosis before repeating the same treatment.
Possible explanations include:
Hardened deposits remain inside the tank.
Scale surrounds an electric heating element.
The noise comes from piping or the relief valve.
A burner or another component needs service.
An electric element may require removal, cleaning, or replacement by a qualified technician. Bradford White specifically assigns element cleaning for scale-related noise to a qualified service person. Bradford White-hosted owner’s manual
4. Use descaling chemicals only when approved
I would not pour vinegar or a commercial cleaner into a heater based solely on a general online recommendation.
Products such as Mag-Erad and Un-Lime have been marketed for water-heater deliming, but that does not establish compatibility with every model. Follow the heater manufacturer’s guidance and the cleaner’s label, including concentration, contact time, and rinsing requirements. A. O. Smith technical bulletin on mineral buildup
5. Repair the actual cause if sediment is not responsible
A plumber may need to evaluate household water pressure, thermal expansion, pipe supports, or the need for a water hammer arrestor.
A loud ignition noise requires burner and ignition-system assessment. Repeatedly restarting the heater to “see if it happens again” is not a useful troubleshooting strategy.
How to Prevent Water Heater Popping Noises
Once the noise is resolved, I would make maintenance part of the household routine.
Follow the manufacturer’s flushing schedule. Annual flushing is a common recommendation, but water quality and model requirements affect the interval.
Ask about water hardness if deposits return quickly.
Have safety devices and the anode rod inspected according to the manual.
Address changing performance early, including longer recovery times or declining hot-water capacity.
Use the recommended temperature setting. Increasing the temperature will not remove sediment.
Bradford White recommends regular flushing and explains that accumulated sediment can reduce efficiency and shorten equipment life. Bradford White maintenance guidance
Frequently Asked Questions
Why does my water heater sound like popcorn?
A popcorn-like sound during heating usually comes from water bubbling through mineral deposits inside the tank. Flushing may reduce the noise if loose sediment is responsible.
Can a popping water heater explode?
Popping alone does not mean an explosion is imminent. Excessive temperature or pressure combined with failed safety protection is a different concern. Relief-valve discharge, steam, or unexpectedly scalding water calls for urgent attention.
Why does my water heater pop after a shower?
After a shower, incoming cold water triggers another heating cycle. If sediment is present, the noise may become noticeable as the tank reheats.
Will flushing always stop water heater popping?
No. Flushing can remove loose sediment, but hardened scale or a different mechanical problem may remain. Persistent noise needs further evaluation.
Does a popping water heater need replacement?
Not automatically. I would base that decision on the tank’s condition, repair needs, maintenance history, warranty, and overall performance. Noise by itself is not enough to justify replacement.
What if a tankless water heater makes popping noises?
A tankless unit needs a different troubleshooting process because it has no storage-tank bottom where sediment collects. Have scale, water flow, and combustion operation evaluated, and use the model’s descaling instructions.
The practical approach is to listen for the pattern, check for warning signs, and match the repair to the cause. A water heater popping sound often responds to maintenance, but persistent or changing noise deserves a closer look.
Posted on by Rick Muscoplat