
How to Remove a Stuck Faucet Handle Without Damage
Step-by-Step Faucet Handle Removal Process
Quick Summary
Faucet handles tend to glue themselves to the faucet stem due to:
• Corrosion
• Mineral deposits
• Stripped fasteners
The key to removing stuck faucet handles is using the correct penetrating fluid, some vibration, and controlled force. Never use brute force, or you can damage the faucet stem or even the valve body. Start simple: remove set screws, apply penetrating oil, and gently work the handle loose. If that doesn’t work, move on to heat, vibration, and, if needed, a handle puller tool for severely stuck faucet handles. In the worst case, you may have to saw it off with a Dremel tool fitted with a cutoff wheel.
I’ve removed hundreds of faucet handles over the years, and I can tell you this: the difference between a clean repair and a disaster comes down to patience and technique.
Every faucet handle is held on by something. Most handles use:
• A hidden set screw (usually under a cap or behind the handle)
• A top-mounted screw under a decorative cap
• A friction-fit design with no visible fastener
If you’re working on a stuck faucet handle, missing this step is the fastest way to break something. I’ve seen people snap valve stems because they didn’t realize a set screw was still engaged.
Use an Allen wrench or screwdriver to fully remove the fastener before moving on.
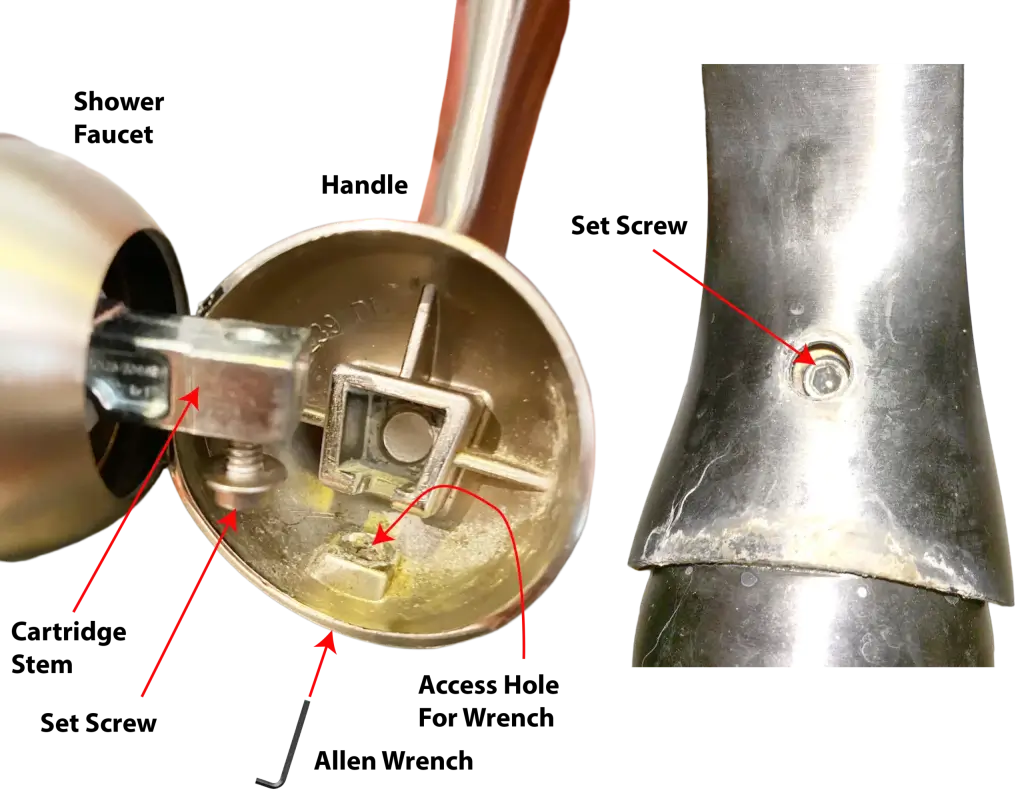
Step 1: Find the Hidden Set Screws
On Single-handle faucets
Most single-handle faucets connect to the faucet cartridge with a hex-style set screw. Faucet handle set screws are most commonly 3/16″ hex (Allen) drive screws. So you’ll need a 3/16″ Allen wrench. The set screw itself is usually a
• #10-24 (coarse thread) — the single most common size found in standard residential faucets
• 10-32 (fine thread) — also very common, especially in Delta and Moen faucets.
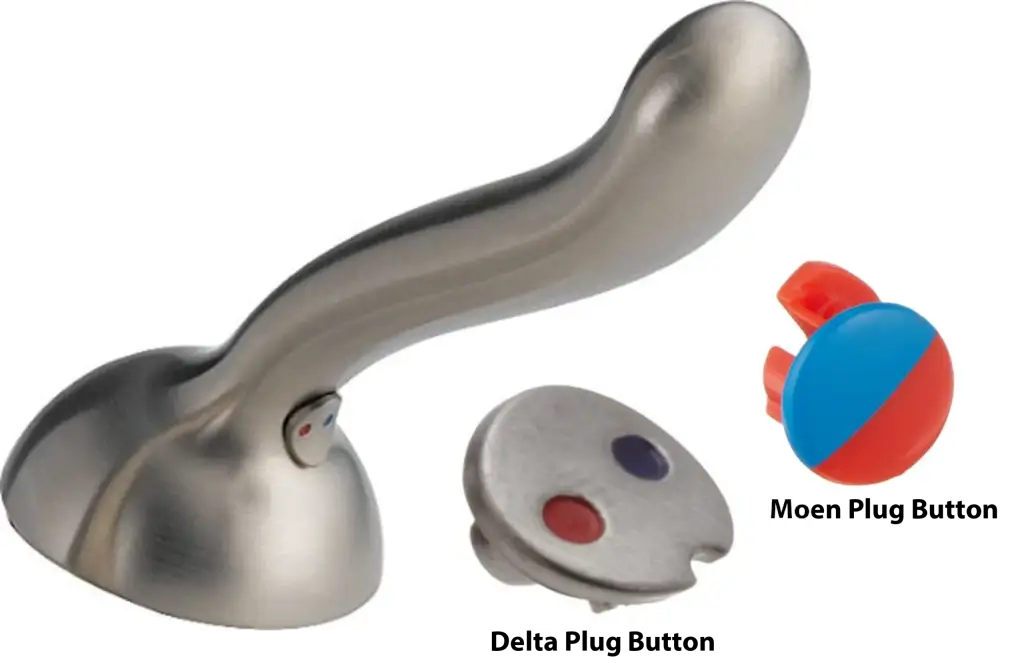
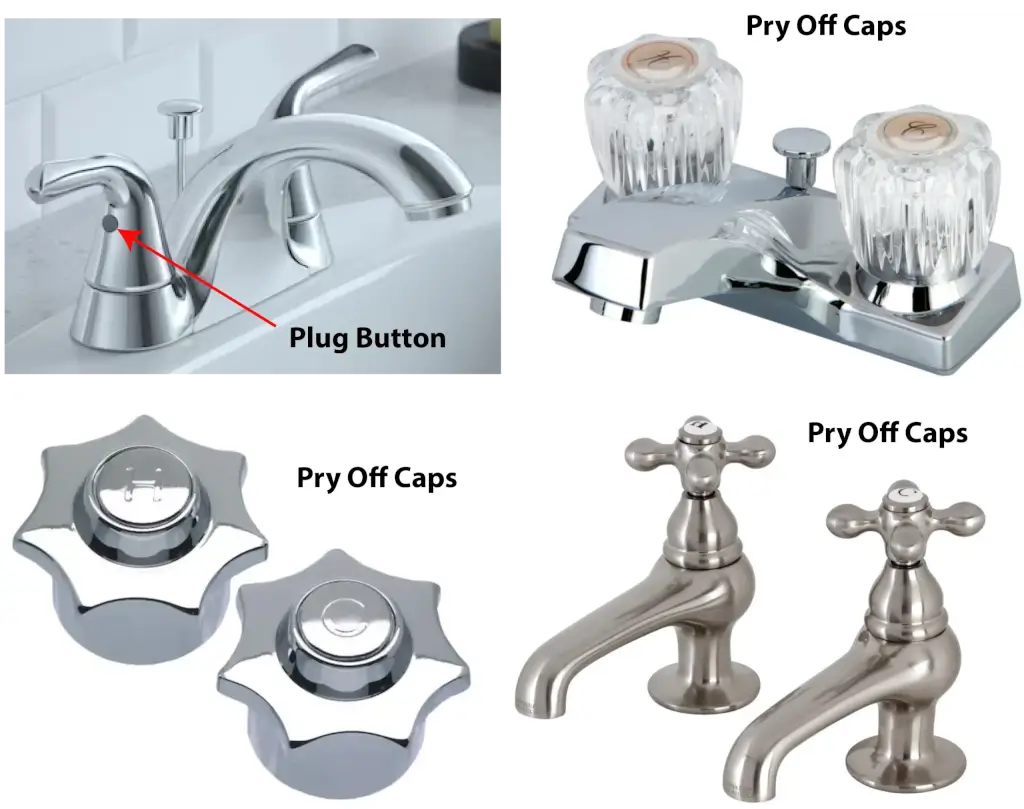
The set screw is usually located on the underside of the handle and covered with a plug button, as shown below.
On Multi-handle faucets
Lavatory and kitchen multi-handle faucets usually connect with a Philips screw hidden under a pry-off cap. However, some use a set screw hidden under a plug button. To remove the cap, gently pry up using the edge of a utility knife blade to avoid scratching the finish.
Step 2 – Try Loosening the Set Screw
If the head of the set screw appears corroded, DON’T ATTEMPT to loosen it. If the Allen wrench isn’t fully seated, it will strip out the head. Instead, clean out the mineral buildup with a few drops of white vinegar or CLR. Let is sit in the screw head for 15 minutes. Then use a toothpick or paper clips to scrape around the hex area to loosen the deposit. Rinse with water and then try seating the Allen wrench.
Step 3 — If The Set Screw Won’t Turn, Apply Penetrant
Apply a squirt of penetrating oil. HINT: WD-40 is NOT a true penetrating oil, and it’s not very effective for loosening stuck screws. Instead, use a real rust penetrant like PB Blaster or Freeze Off (available at any hardware or big-box store).

I prefer PB Blaster or Kroil, but I’ve also used Knock’r loose
Let the penetrant soak for at least 30 minutes. Vibration makes the penetrating fluid work much faster, allowing it to break up corrosion and seep deeper into the threads. To vibrate the handle, rap on it with a screwdriver handle, touch the body of an orbital/palm sander or oscillating tool to the faucet handle and hold it there for several minutes.
Then try loosening the screw.
Step 4 – Use Heat to Break the Corrosion
Heat the faucet handle with a hair dryer or heat gun set to its lowest setting. Concentrate the heat on the area around the set screw. Avoid heating the faucet cartridge and use extra care to avoid heating plastic or fiberglass tub surrounds.
Try loosening the set screw when it’s hot. If that doesn’t work, apply cold water to cool it and try again.
Step 5 – Use a Faucet Handle Puller (Best Tool for Stubborn Cases)
For severely seized handles, a puller tool is
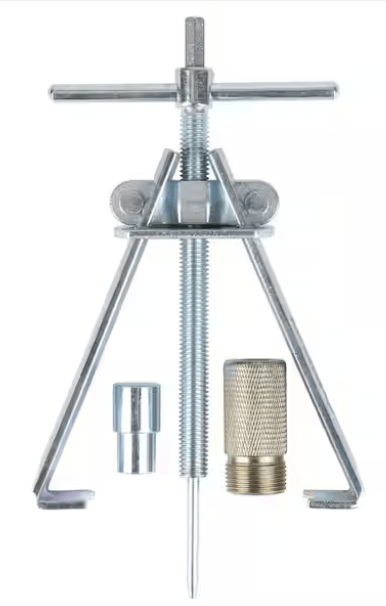
Faucet handle puller
the safest option because it applies even upward pressure while protecting the valve stem.
Step 6 – Last Resort Methods
If nothing else works, you’re in last-resort territory.
At this point, I may:
Carefully cut the handle off using a Dremel tool and a cut-off wheel. Exercise extreme care with this method to avoid damaging the valve stem or surrounding components.
If you’re not experienced, call a plumber.
What NOT to Do (Common Mistakes)
Most faucet damage results from impatience.
Here’s what I never do when dealing with a stuck faucet handle:
• Don’t pry aggressively with a screwdriver
• Don’t twist excessively—it can snap the stem
• Don’t skip penetrating oil
• Don’t assume brute force will work
Final Thoughts on Removing a Stuck Faucet Handle
Removing a stuck faucet handle is one of those jobs that looks simple—but can go sideways fast if you rush it.
The right approach is always:
• Identify the fastener
• Use penetrating oil
• Apply controlled movement
• Step up to heat or tools if needed
In my experience, patience is the difference between a 30-minute repair and a full valve replacement.
Take your time, use the right techniques, and you’ll get that handle off without creating a much bigger problem.
©, 2026 Rick Muscoplat
Posted on by Rick Muscoplat