
How to replace a water pump
How to Replace a Water Pump: Expert Tips and Tricks
Replacing a water pump can be a DIY project on most engines. All you need are sockets and wrenches, along with a clean gasket and new coolant. But there are some common ways DIYers can mess up the project. Here are some expert tips on how to replace a water pump.
Don’t reuse old coolant when replacing the water pump
Using the recommended type of coolant is critical to the life of your water pump, so it’s worth it to use new coolant when installing the new pump. New coolant contains the right anti-corrosion additives and the proper lubricants. Old coolant becomes acid and that can prematurely wear out the new pump.
Flush the cooling system BEFORE you remove the old pump
It makes no sense to use new coolant to an engine that hasn’t been flushed out. Rust and debris can accumulate in an old engine and can contaminate the new coolant with particles. Don’t make the mistake of flushing that crud into the seal of the new pump. Flush it before you remove the old pump.
Never reuse old gasket and seals
Old gaskets and seal should never be reused. If you don’t have new gaskets, don’t install the pump!
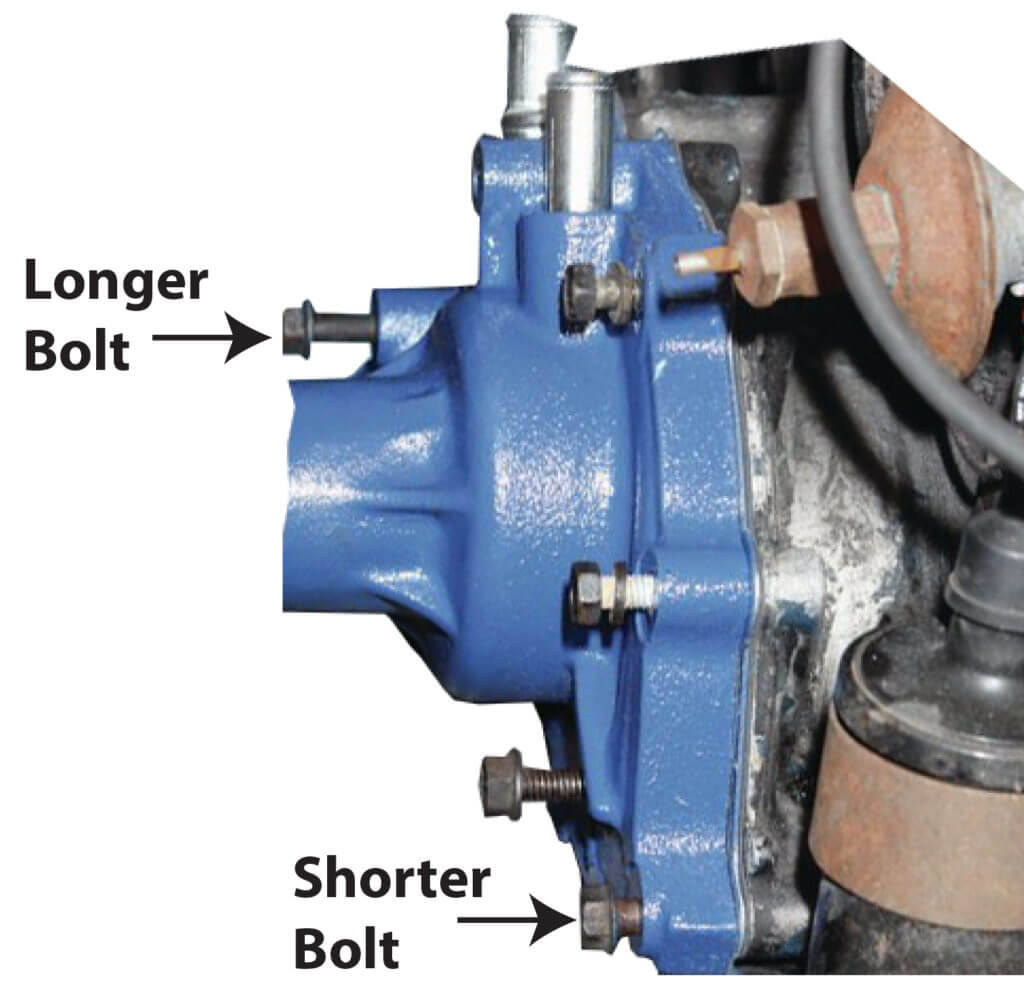
Pay attention to the length of each water pump bolt
Water pumps often include reinforcing ribs that sit higher than the rest of the water pump. The bolts going through those ribs are longer and you must note their location when removing them. Otherwise, you’ll install the long bolts in the wrong holes.
Lubricate the seal on the new pump before you install it
Rotating the water pump shaft when the seal is dry can damage the water in as less as 10 rotations. Since you may have to rotate the pump slightly as you remount the pulley, be cautious and pre-lube the pump seal before you install the pump. Pour fresh coolant into the pump so it fills the area below the impeller. With the seal wet, slowly rotate the shaft. Then install the pump.
Be careful with new gaskets
New style water pump gaskets often contain a soft bead of rubber sealant applied to the paper gasket. Exercise extreme care when handling these gaskets. They tear easily and can be damaged simply by removing the packaging material. The rubber sealing bead must be in impeccable condition or it won’t seal properly.
Never apply a gasket sealer or RTV compound unless directed to
Gaskets with a rubber sealing bead and O-ring seals are designed to be installed DRY. Never apply a gasket sealer or RTV on these rubber beads or O-rings unless specifically instructed to by the instruction. Even when it’s recommended, don’t over-apply the sealant. Excessive gasket sealer is a common DIY mistake! The extra RTV breaks off and clogs the radiator and heater core. Excessive sealant can also break off and clog the thermostat, preventing it from closing properly.
Never use tap water to dilute concentrated coolant
Tap water contains minerals that can damage your cooling system. Use distilled or de-ionized water or buy pre-mixed coolant.
Fill the system before you re-install the water pump pulley
You really want to avoid rotating the water pump until it’s fully immersed in coolant. Once the engine is filled, rotate the water pump shaft about 10 turns to full spread the coolant on the seal.
Burp air out of the cooling system
Follow the instructions in the shop manual to bleed air out of the cooling system before taking it for a test drive. If you can’t get all the air out, use a hand-operated vacuum pump
The water pump may seep coolant out of the weep hole
Some seepage from the weep hole of a new pump is NORMAL. It takes about 10 minutes to run for the water pump seals to fully seat.
©, 2020 Rick Muscoplat
Posted on by Rick Muscoplat