
How to Replace Spark Plugs Like a Professional Mechanic
The Correct Way to Replace Spark Plugs Without Damaging Your Engine
Quick Summary
Modern spark plugs last longer than older designs, but they still wear out and can cause misfires, poor fuel economy, and rough running when they age. The key to success is working on a cold engine, cleaning debris from the plug wells, checking the gap correctly, and using a torque wrench when you install spark plugs. Done correctly, replacing spark plugs restores engine performance and prevents costly ignition system problems down the road.
Article
How to Replace Spark Plugs the Right Way (A Mechanic’s Step-by-Step Guide)
Over the years, I’ve replaced thousands of spark plugs, and I can tell you this simple maintenance job can either go smoothly—or turn into a disaster if you don’t approach it the right way.
Many DIYers think replacing plugs is just a matter of unscrewing the old ones and screwing in new ones. In reality, modern engines—especially those with aluminum cylinder heads—require a bit more care.
When I replace spark plugs, I follow a methodical process that prevents broken plugs, stripped threads, and ignition problems later. If you take your time and use the right techniques, you can install spark plugs safely and restore the performance your engine was designed to deliver.
Use the Right Tools Before You Replace Spark Plugs
One of the first lessons I learned as a technician is that the correct tools make this job much easier.
The most important tool you need when you replace spark plugs is a proper spark plug socket. These sockets are deeper than normal sockets and usually include a rubber insert or magnet to hold the plug securely while removing it from the cylinder head.

Spark plug socket and insert
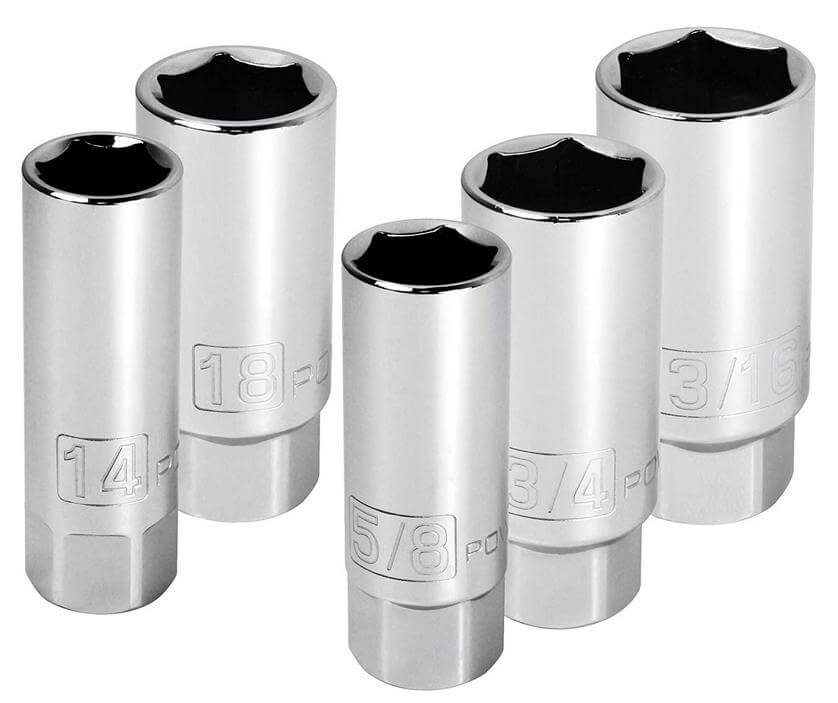
Spark plug socket sizes
13/16” and 5/8” are the two most common sizes for older automotive and outdoor power equipment engines. However, the newer engines require small spark plugs.
• 14mm for the latest European and Asian vehicles and motorcycles
• 12pt thin-walled for many late model BMWs
• 9/16″ for some Ford engines
• 5/8″ or 16mm for newer vehicles (GMC, Nissan, Chevy, Subaru), small engines (Briggs & Stratton, Koehler)
• 11/16″ Older BMW
• 18mm Motorcycles and some small engines
• 3/4″ Lawnmowers, small engines, older GM vehicles
• 13/16″ Older vehicles (large engines.
• 7/8″ Tractors, older vehicles, aviation
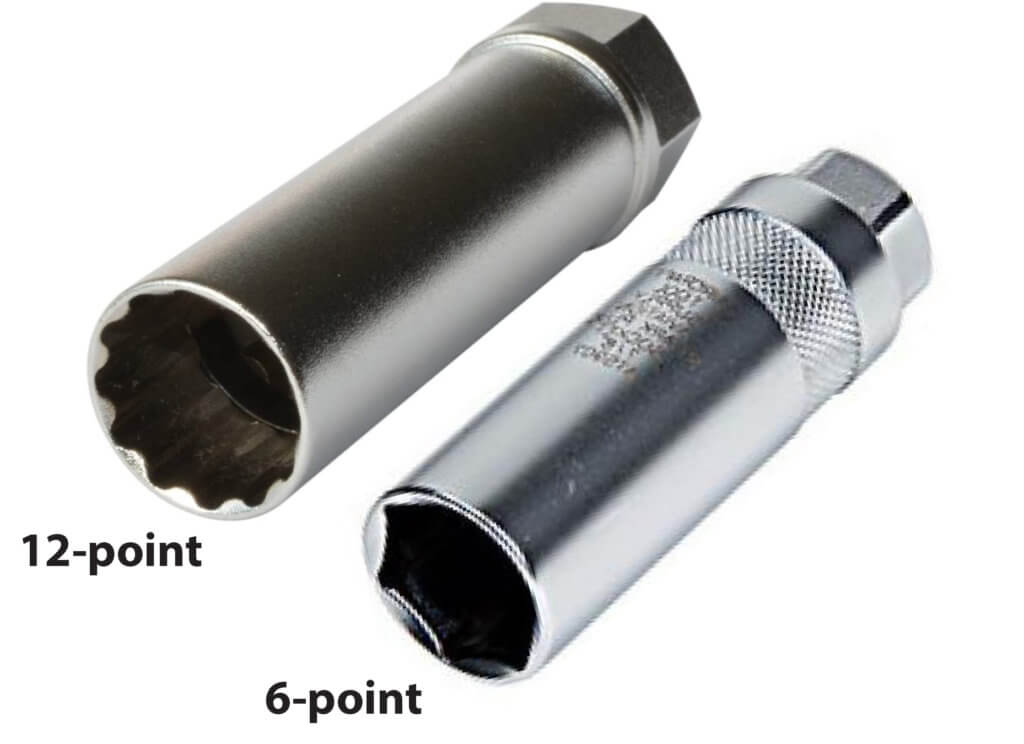
6-point versus 12-point spark plug sockets
Spark plug sockets are available in 6-point and 12-point versions. Both work well on new and slightly used spark plugs. However, if you’re trying to remove a rusted spark plug, a 12-point socket is more likely to strip off the rusted corners of the spark plug.
Specialty spark plug sockets
You’ll often be working in tight quarters, and that’s where flex and extra deep sockets come in handy. The problem with tight quarters isn’t so much in inserting the socket into the engine as in removing the socket and plug. For example, many overhead cam engines have spark plugs buried deep into the cylinder head. You can use a straight socket and an extension to reach into the spark plug tube, but as you try to remove the plug, the extension often disengages from the socket. That’s where a single extra deep socket comes in handy because it eliminates “fishing” the smaller socket and plug from the spark plug tube.
A spark plug socket with an integral flex joint also comes in handy for use in tight spots.
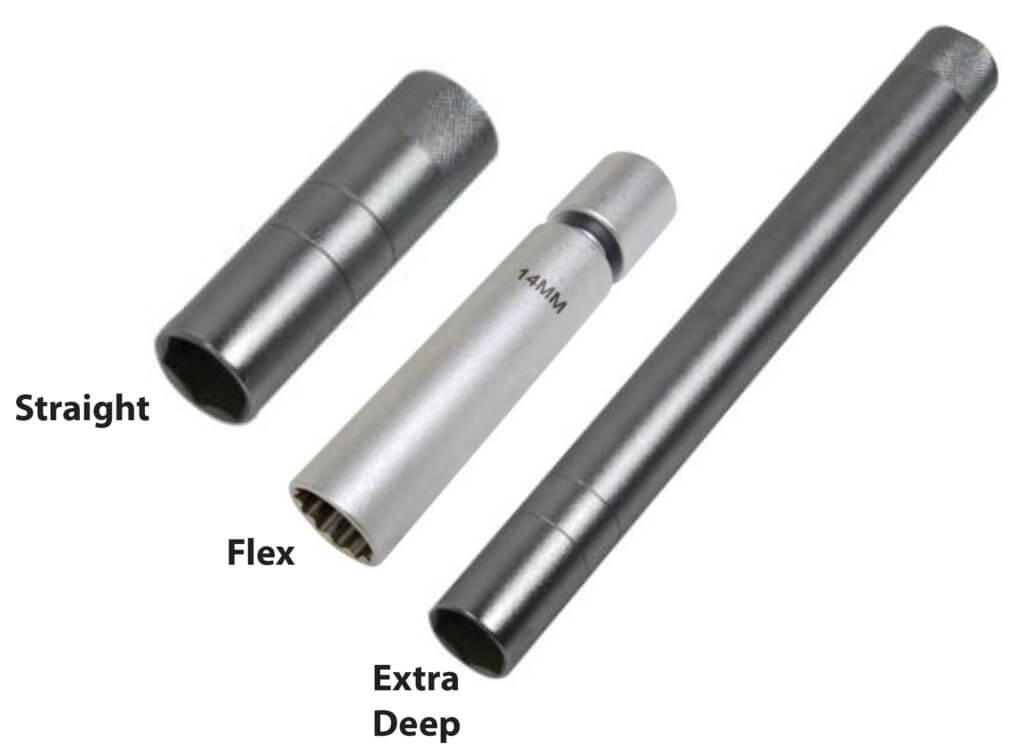
Straight, flex and extra deep spark plug sockets
You’ll need a good ratchet to remove and replace spark plugs
You’ll need extra leverage to remove spark plugs buried deep in the engine compartment. A bent handle with an integral flex head is the best tool for the job. It’s longer than a normal ratchet and the flex head allows you to maintain the leverage while still fitting into tight places
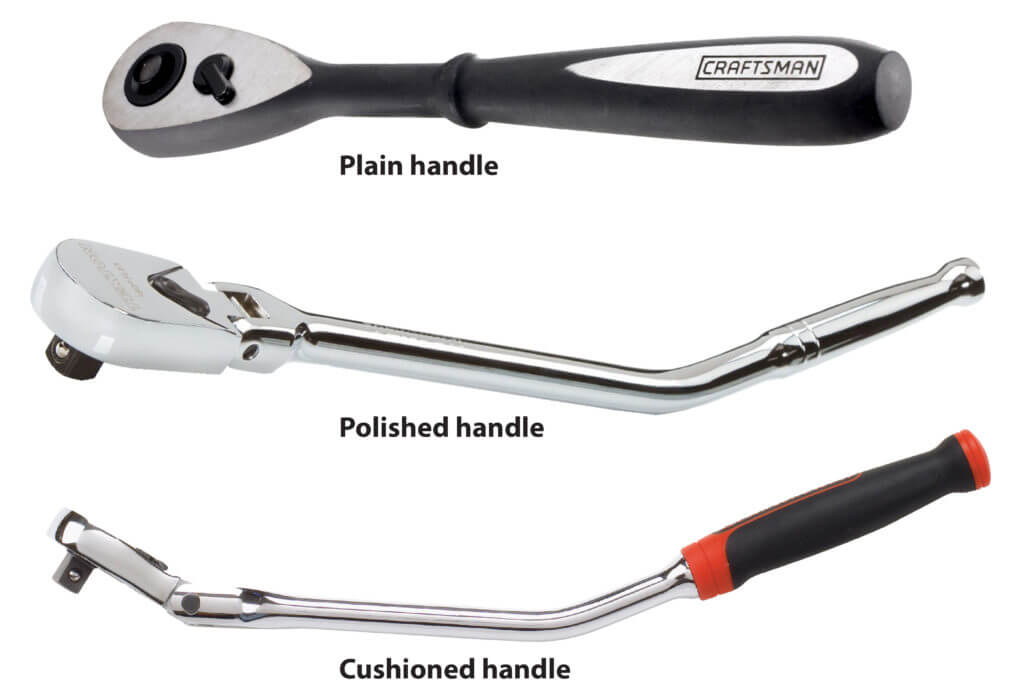
Ratchet handle types
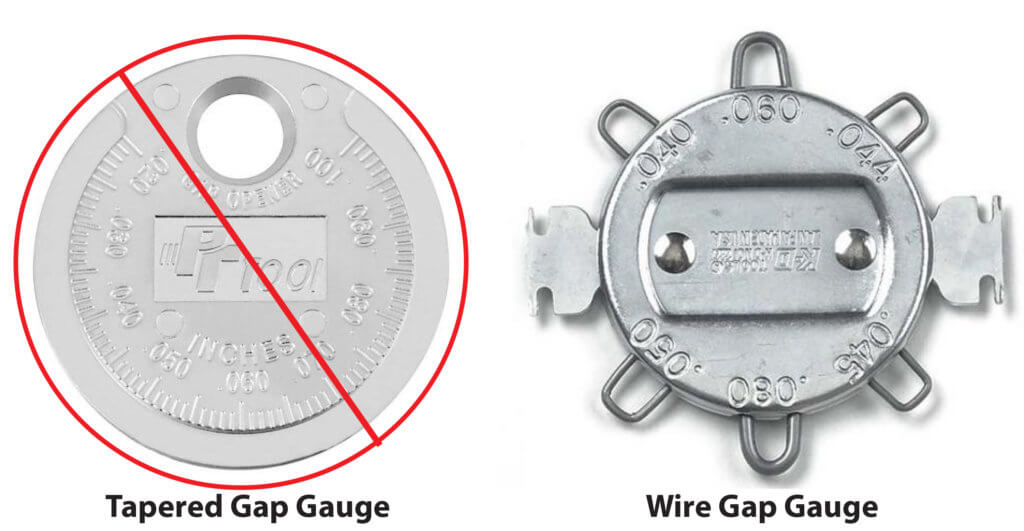
You’ll need a wire spark plug gap gauge to check spark plug gap
There are two types of gap gauges: wire and tapered. The tapered gap gauge seems easier to use because you just slide the tapered edge between the center electrode and the side electrode, then force the gap open with the tapered edge. That design worked well on older copper spark plugs. But it doesn’t work well on newer platinum and iridium-tipped spark plugs. On those plugs, the precious metal is welded to the tip, and the tapered gauge can literally break the tip off the center electrode. If you own a tapered gauge, throw it out. Always use a wire gap gauge.
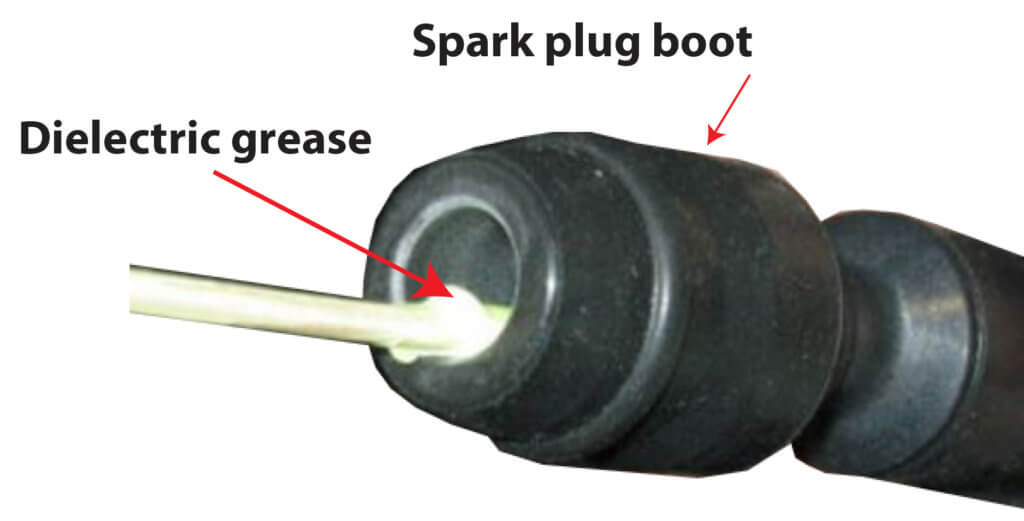
You’ll need dielectric Tune-Up Grease to replace spark plugs
Dielectric grease is an insulator and a lubricant. Apply it to the inside of the spark plug boot or coil boot to prevent the high voltage from firing down the side of the spark plug. As an added bonus, the dielectric grease prevents the boot from welding itself to the porcelain, making it much easier to remove the boot at the next spark plug change.
Squirt a small dollop of dielectric grease into the spark plug boot, then spread it around the inside of the boot with the tip of a clean Philips screwdriver.
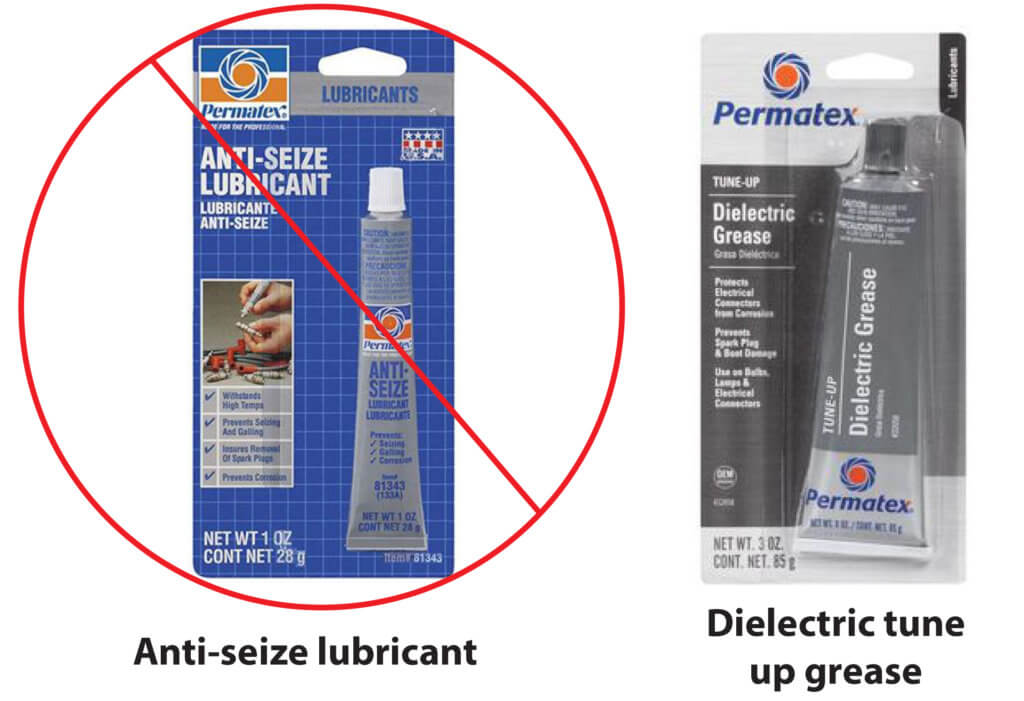
Don’t use anti-seize on spark plug threads
When long-life spark plugs were first introduced, spark plug manufacturers recommended applying a light coat of anti-seize compound to the spark plug threads to prevent them from seizing in the cylinder head. That recommendation is now obsolete! Modern spark plugs come from the factory with a nickel plating to prevent seizing in the cylinder head. If you apply anti-seize on top of that coating, chances are you’ll over-torque the spark plug and distort the metal shell, causing it to leak and misfire. Do NOT apply anti-seize to a spark plug unless specifically recommended by the plug manufacturer!
You’ll need a torque wrench to replace spark plugs
Engine manufacturers have always listed a torque spec for the spark plug, but nobody ever used a torque wrench. But that was back in the days when all cylinder heads were made out of cast iron. Today, they’re mostly aluminum alloys. If you over-tighten or under-tighten a spark plug in an aluminum head, you can damage the threads in the cylinder head, or break the spark plug seal between the metal shell and the porcelain. I’m not kidding about this, you can do serious engine damage costing hundreds of dollars by improper spark plug torque.
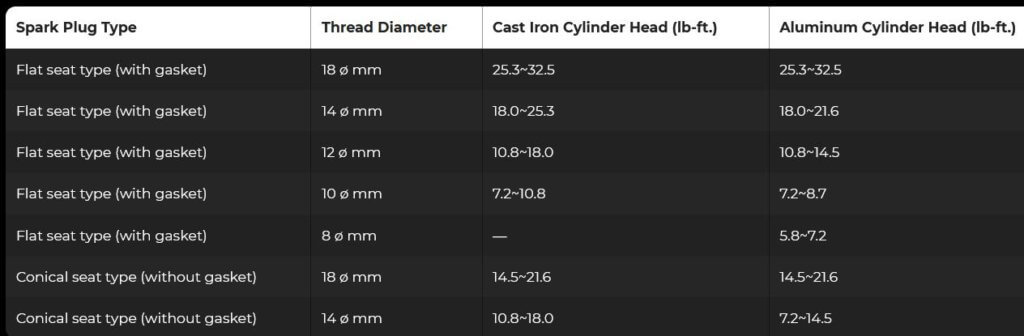
So, use a torque wrench OR use the tightening charts provided by the spark plug manufacturers.
The recommended spark plug torque is based on the type of plug seat, gasket or tapered, cylinder head material, and size of the plug. Here’s a chart from NGK.
If you don’t have a torque wrench, follow this guide from spark plug manufacturer AUTOLITE for how to tighten by hand.

Click on the image to view the PDF
Proper engine temperature for spark plug removal
Carmakers always recommend removing and replacing spark plugs when the engine is COLD. That way, the spark plugs and spark plug threads have the least amount of thermal expansion, so removing spark plugs is easier and there’s less chance of damaging the spark plug threads.
If you remove spark plugs from a hot engine with an aluminum cylinder head, you risk stripping the threads in the head.
Clean the spark plug area before removing the plug
Whether you‘re working on a car or truck engine or a small engine in your lawnmower, always clean around the spark plug hole before you begin removing the spark plug. That prevents debris from falling into the cylinder once the spark plug is out. And it allows the new spark plug to thread smoothly.
Blow the crud out of the area with compressed air before loosening the spark plug.
1) Remove the spark plug cable or coil pack
2) Loosen the spark plug with the proper socket
3) If the plug doesn’t budge, DON’T apply brute force. You’ll break the plug. Follow this procedure:
- Apply a liberal spray of rust penetrant (WD-40 is a general-purpose lubricant. It is NOT a rust penetrant. Use a real rust penetrant like PB Blaster, Liquid Wrench, or OR WD-40 Specialist Rust Penetrant.)
- Allow it to soak for 30 minutes. Then try to remove. If you can get it to budge, STOP and apply more rust penetrant. Let it soak for 30 minutes. Then tighten the plug to work the penetrant back into the threads. Continue spraying, unscrewing/tightening until the plug comes out.
Install the new plug, following the torque guides above. Do NOT apply anti-seize to the spark plug threads unless specifically directed by the spark plug manufacturer.
Removing Stubborn Spark Plugs
Most plugs come out easily, but occasionally you’ll encounter a stuck spark plug.
When that happens, the worst thing you can do is force it. Applying too much torque can snap the plug or damage the cylinder head threads.
Instead, I spray a penetrating oil into the plug well and allow it to soak for about 30 minutes. If the plug begins to loosen, I work it slowly back and forth while adding more penetrant.
This patience is critical when you replace spark plugs in engines that have gone many years without maintenance.
©, 2021 Rick Muscoplat
Posted on by Rick Muscoplat