
How to Test a Blower Motor Like a Pro
How to Test a Blower Motor and Blower Motor Resistor
Quick Summary
Most blower failures fall into predictable patterns, and once you know the signs, you can avoid replacing good parts and get straight to the real fault. Here are the common failure issues:
• Blower motor doesn’t run at all — A blown fuse, a faulty relay, an open circuit on either the power or ground side of the circuit, a burned-out blower motor resistor or transistor, or a variable speed controller can cause this.
• The blower motor runs only at high speed — a faulty blower motor resistor almost always causes this.
• The blower motor runs continuously, even with the key out of the vehicle. A faulty solid-state speed controller always causes this. They often fail in the full-on position. whether that’s a bad motor, a burned-out resistor, a faulty transistor, or a variable-speed controller.
Article
How I Begin Every Blower Motor Diagnosis
Whenever I’m faced with a dead or inconsistent blower, the very first thing I do is pull up a wiring diagram. I’ve tested hundreds of these systems, and testing a blower motor starts with understanding the circuit. Most vehicles use one of just a handful of wiring strategies, so within seconds I can tell whether I’m dealing with a three- or four-speed blower with a resistor, or a variable-speed motor controlled by a solid-state module.
If the vehicle has automatic climate control, it almost always uses a variable-speed motor. Those systems don’t use a traditional resistor block—you won’t be able to test a blower motor resistor because there isn’t one. Instead, they use a blower motor controller that electronically adjusts speed. When that module fails, the blower usually won’t work.
Manual climate systems, on the other hand, typically rely on a resistor or a power transistor. Once I know which type I’m working with, I can move on to the practical steps for testing a blower motor or a blower motor resistor and actually track down the fault.
Understanding Resistors, Transistors, and Controllers—Why It Matters
On three- or four-speed systems, the blower motor resistor is the heart of fan-speed control. When you select a low speed, voltage flows through one or more resistors, dropping the voltage before it reaches the motor. That drop slows

This image shows an older style blower motor resistor with various thickness coils to reduce the voltage
the motor. When you switch to high speed, the circuit bypasses the resistor entirely, feeding full voltage to the blower.
Because of that design, one of the best ways to test a blower motor resistor is to check whether the blower only works at high speed. In that situation, the motor is almost always fine—the resistor pack has simply burned out on its lower-speed elements.
Some manufacturers, like Honda, use power transistors instead of resistors. These components pulse the ground side of the circuit to control speed. Failure often means no blower operation. Again, knowing the system tells me exactly which tests to run.
Variable-speed systems take this to another level. Their controllers use pulse width modulation, rapidly switching the ground circuit on and off. When these controllers fail, you lose all or nearly all blower control. In tho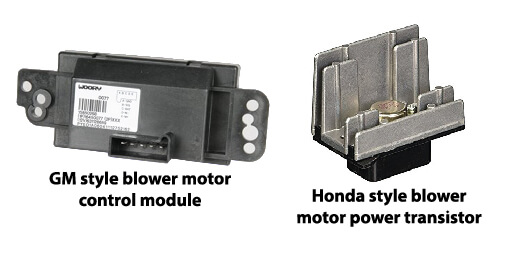 se cases, knowing how to test a blower motor manually is crucial because I need to confirm whether the motor can still run at full speed.
How I Test a Blower Motor and Confirm Whether It’s Healthy
Before I blame the resistor or controller, I always start with the motor itself. Knowing how to test a blower motor directly can save you from replacing the wrong part.
I disconnect the blower motor connector and use a fused jumper wire to apply battery voltage and a solid ground directly to the motor. If the blower runs at full speed during this test, the motor isn’t the problem. If it doesn’t run, the motor is seized, or the internal brushes have failed.
This simple process—jumpering power and ground—remains one of the most reliable ways to test a blower motor and separate mechanical failure from electrical control failure.
Determining Whether Power or Ground is Missing
Once I’ve proven the blower works (or doesn’t) with direct power, I move on to multimeter testing. Every manufacturer uses one of three common wiring strategies:
Power goes through the fan-speed switch, through the resistor, and then to the motor.
Power goes directly to the blower motor, and the motor grounds through the resistor and switch.
Power is relay-controlled, and the resistor or transistor is connected to ground.
If the blower circuit uses speed-switch-controlled power and resistor-grounding, I check for proper voltage and ground at the connector. This test is a core component of correctly testing a blower motor. If power is present but ground is missing, the resistor or switch may be bad; if ground is fine but voltage is low, corroded connections or a failing switch may be the culprit.
If the blower motor is supplied with a constant battery voltage and grounded through the switch and resistor, I perform similar tests, focusing on the ground side first.
Either way, these diagnostic steps allow me to test a blower motor resistor under real-world conditions.

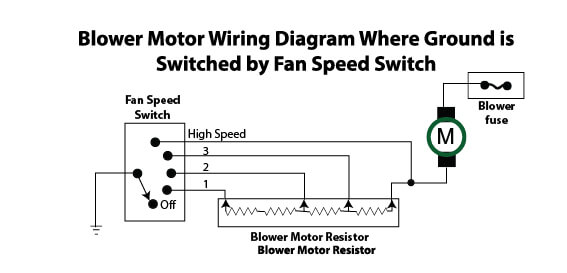
Or, carmakers can supply power to the motor and control blower speeds on the ground side of the circuit. See the wiring diagram for that setup below.
Or, carmakers can opt for a motor resistor AND a high-speed relay. See the wiring diagram below for that setup.

Blower motor wiring diagram for variable speed systems
Variable-speed blower motors don’t use a blower motor resistor. Instead, they use a blower motor speed control or a power transistor. Variable-speed motors are most often used in vehicles with automatic climate control. In those applications, the HVAC control head is a digitally controlled unit and uses various sensor inputs to determine when to supply heat. Based on the driver’s input to the blower speed switch, the HVAC control head sends a digital signal to the blower motor speed control module. The module uses that information to pulse either the motor’s power or ground. See the wiring diagram below for a typical variable-speed motor setup.

If your motor doesn’t work at any speed
If the motor doesn’t work at any speed, the most likely causes are a blown power supply fuse, a poor motor ground connection, a faulty motor speed control module, or a failed motor. On all systems, a failed blower motor is the least likely cause.
Blower motors generally don’t fail out of the clear blue. In most cases, they fail by emitting a high-pitched squeal or screech, indicating the bearing is failing. The squealing noise occurs most often in winter during cold startups and may disappear as the motor warms up. If you ignore the noise, the bearing will continue to wear to the point where the motor won’t start at all.
The reason I’m not including the motor resistor as a suspect is that it typically only controls low speeds. The highest blower speed usually bypasses the motor resistor completely, so it’s not a suspect if the motor doesn’t work at any speed.
Start by checking the blower fuse and HVAC controller fuse. If it’s good, refer to a wiring diagram for your vehicle and conduct these tests:
If you have a variable-speed blower motor system:
Disconnect the electrical connector at the blower motor and jumper power and ground to the motor, bypassing all the speed controls. Run a fused jumper from the battery to the power side of the motor and connect a temporary grounding jumper to the other motor terminal. If the motor runs at full speed, you’ve confirmed it’s not the problem. At that point, the suspects are the blower motor speed control module (most likely) or the HVAC control head (less likely, but not unheard of). Unfortunately, you’ll need a digital scope or scan tool to test those components, so your only option may be to replace the parts one at a time.
If power is supplied to the blower motor through the speed switch and blower motor resistor:
Disconnect the electrical connector at the blower motor. Use a multimeter to check for voltage at the connector while the key is in the RUN position and the blower speed is set to HIGH. You should see battery voltage (12+). If you see battery voltage at the connector, connect one meter lead to the power terminal and the other to the ground terminal. If you get a good ground reading, the problem is most likely a bad motor. If you don’t see good ground, locate the ground connection and clean it. Then, plug the connector back into the motor and check the operation. If it runs, you’ve solved the problem. If it still doesn’t run, replace the motor.
If power is supplied directly to the blower motor and grounded through the speed switch
Disconnect the electrical connector at the blower motor. Use a multimeter to verify battery voltage at the connector while the key is in the RUN position and the blower speed is set to HIGH. If you don’t see battery voltage, you’ve got a wiring or relay problem on the power supply side of the circuit.
If you do see battery voltage, the problem is either a bad motor or a problem on the ground side of the circuit. Run a fused jumper from the battery to the power side of the motor and connect a temporary grounding jumper to the other motor terminal. The motor should run at high speed. If it doesn’t, the motor is bad. If the motor runs, locate the ground connection and clean it. If it still doesn’t run, check the resistor and the speed switch for continuity.
The blower only works at high speed
This is a dead ringer for a bad blower motor resistor, not a bad speed switch. Replace the resistor.
The blower works on slow speeds, but not at high speeds
Check for a bad fuse or a bad high-speed relay. Swap the high-speed relay with another relay with the same part number. 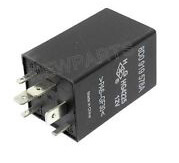 Also, check the fuse for the control side of the high-speed relay. Make sure the ground side of the high-speed relay is working.
The blower works on some speeds but not others
This can be a bad blower motor resistor or a failed speed switch. Refer to your vehicle’s wiring diagram and check for continuity across all three resistors and the speed switch settings.
The blower motor resistor has repeated failures
Check for full airflow at the vents. If airflow seems restricted or lower than normal, 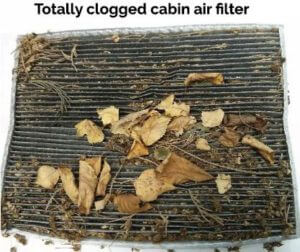 check the cabin air filter. If it’s good, check for debris on the evaporator or heater. Decreased airflow causes the blower motor resistor to overheat and fail. Reduced airflow also causes the blower motor to work harder, draw more current and that can cause repeat blower motor resistor failures.
The blower motor fuse blows repeatedly
The blower motor is drawing too much power. Check the cabin air filter for clogging. Check for airflow restrictions in the duct, paying attention to debris on the evaporator or heater core.
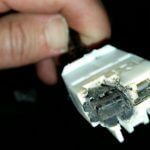
Melted connector at the blower motor
See the section above for the blower motor fuse blowing repeatedly.
The blower motor squeals or screeches at startup
This is a symptom of a failing blower motor bearing. The bearing is not replaceable. Replace the blower motor.
The blower motor doesn’t work in cold weather
A bad bearing in the blower motor. Replace the blower motor.
The blower motor doesn’t shut off
If you have a variable-speed blower motor, replace the 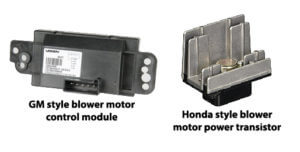 blower motor speed control module. If you have a three or four-speed blower motor, remove the blower motor relay. If the motor stops, replace the relay.
©, 2017 Rick Muscoplat
Posted on by Rick Muscoplat