
How to Use a Jumper Pack to Start Your Car
How to Use a Jumper Pack the Right Way: The Expert Guide You Need
Quick Summary
• Always turn off all electrical accessories in your car before connecting the jumper pack so the starter and battery get maximum power.
• Connect the red clamp to the battery’s positive terminal and the black clamp to a clean, unpainted metal surface on the engine or chassis to reduce spark risk.
• Power on the jumper pack only after the clamps are secure
• Crank the engine for no more than 6 seconds to avoid overheating the jumper pack battery and your starter motor.
• Once the engine starts, turn off the jumper pack and remove the clamps in reverse order—black first, then red.
• Finally, recharge the jumper pack as soon as you get home so it’s ready for the next emergency, since these units slowly lose charge over time.
Article
I’ve helped countless drivers who assumed their jump-starter was ready to go, only to find it dead when they needed it most. The truth is, even the best lithium-jumper packs gradually lose capacity in storage. If you understand how to use a jumper pack the right way—and how to maintain it—you’ll start your engine safely and confidently whenever the battery lets you down.
Step-by-Step: How to Use a Jumper Pack Like a Pro
When I teach people how to use a jumper pack, I always start with safety. Turn everything off—lights, radio, blower motor—to reduce the electrical load on your battery and the jumper battery when you turn the key. Then access the battery, even if it’s under a cover (many newer vehicles hide it).
Step 1 — I clamp the red positive lead to the battery’s positive post—the one marked + or POS. Then I attach the black negative lead to a solid, unpainted metal point on the engine or chassis—not directly to the battery’s negative terminal. That small detail helps prevent sparks near the battery, where explosive gas could linger.
Step 2 — Power on the jumper pack and try starting the engine. I wait a few seconds while the pack gives the dead battery a little boost. Then start the engine for up to 6 seconds. If the engine doesn’t start within 6 seconds, STOP and let the jumper pack battery cool for at least 3 minutes before trying again.
Generating enough power to crank an engine causes the jumper pack to heat up very quickly, so cranking time must be limited to 6-second periods, with a 3-minute cooling-off period between tries. That’s especially important with lithium-jumper packs, since overheating can cause a runaway fire. To prevent fire, many lithium jumper packs automatically shut down after 6 seconds of cranking to prevent the battery from overheating. Read the instructions on your pack to determine the recommended cooling-off period.
Warning: Using the jumper pack to crank an engine for extended periods can overheat it and damage it.
Step 3 — Once the engine starts, I turn off the jumper pack and remove the clamps in reverse order. The black clamp comes off first, then the red. I make sure no metal touches, then give myself a small pat on the back—because knowing how to use a jumper pack safely really matters.
Don’t make the mistake of leaving the cables connected. Many DIYers think they can recharge the jumper pack’s battery faster by leaving it connected to the running engine. However, the voltage of a running engine is much higher than the recommended recharging voltage for a lithium battery.
Recharging your jump starter while the engine is running can cause it to overheat, leading to battery failure. In fact, some lithium-style battery packs will shut down completely if left connected to a running engine
Step 4 — Clean your jumper pack cables after use. Corrosion buildup on battery terminal posts is common on discharged batteries. After using your jump starter, make sure to clean off any corrosion that may have transferred to your clamps.
Avoid These Costly Jump-Starting Mistakes
Avoid reverse polarity — I’ve seen people reverse polarity (red on negative, black on positive)—and trust me, modern electronics don’t like that. Always double-check your connections before connecting the last clamp.
Never try to jump-start a frozen battery — When a battery loses its charge, it can freeze, causing the sides to bulge out. Jumping a frozen battery can cause an explosion or fire.
Don’t lean over the battery while connecting clamps — And don’t leave the jumper pack connected longer than necessary after the engine fires up.
Don’t try to recharge your jumper pack using the alternator — the battery in a jumper pack must be recharged with the factory wall adapter. Reverse charging, using the car’s alternator, can charge the jumper pack battery too fast, causing overheating and even a fire.
How quickly a jumper pack loses its charge
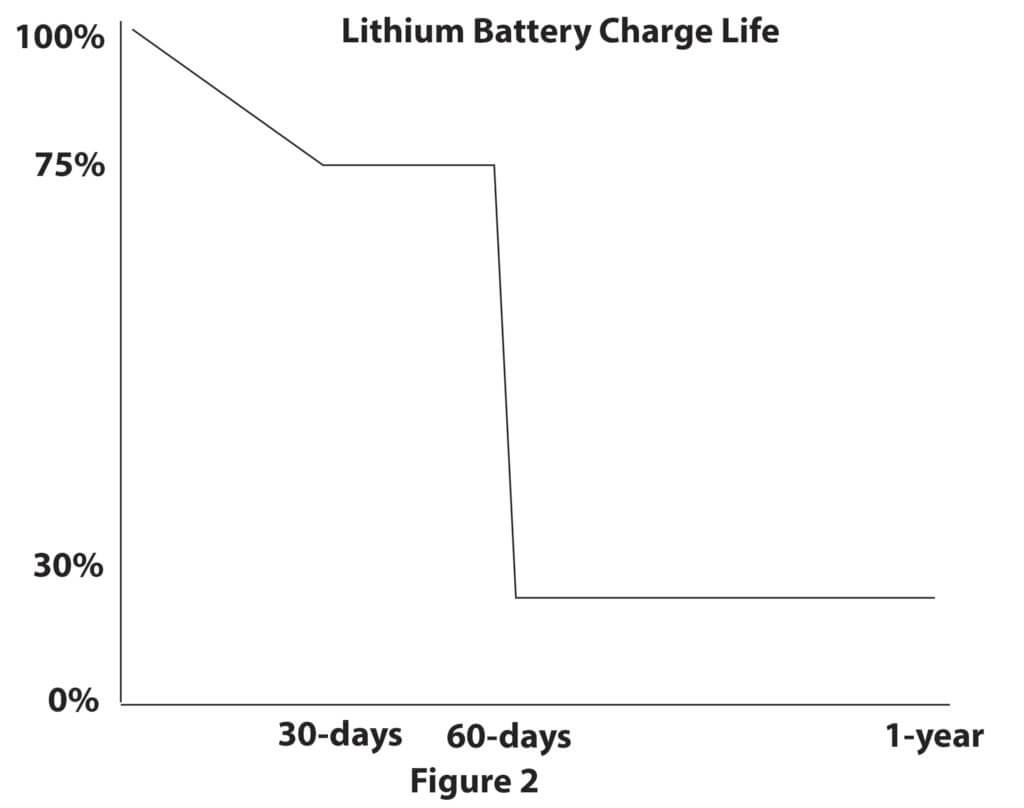
AGM batteries linearly lose their charge (see Figure 1), while lithium batteries tend to self-discharge in stages (see Figure 2). Leaving either battery type in a discharged state for long periods can cause permanent damage.

How often to charge your jump starter depends on use and storage conditions
• When using it to jump a vehicle — charge your jumper pack after each use.
WARNING: Leaving your jumper pack in a discharged state after use will cause permanent damage to the battery.
• When stored indoors — Charge it at least once every 3 months.
• When stored in a cold vehicle — Charge it at least once a month.
NOTE: Charging it more often than every 3 months will not harm it.
Storage: Storing your jump starter in moderate temperatures 50°F to 70°F will extend its charge and provide the most power when you need it.
©, 2021 Rick Muscoplat
Posted on by Rick Muscoplat