
P0410 Code: Causes, Symptoms, and Fixes
Why Your Car Has a P0410 Code and How to Fix It
Quick Summary
The P0410 code indicates a problem in the secondary air injection system, which is designed to reduce emissions during cold starts. In my experience diagnosing this code, the most common causes are a failed air pump, clogged passages, or a bad check valve. The fix depends on proper diagnosis—blindly replacing parts is a mistake I see all the time.
For more information on how the Secondary Air Injection System Works and the Components Involved, see this post
What Is a P0410 Code?
The P0410 code stands for “Secondary Air Injection System Malfunction.” This system injects fresh air into the exhaust stream during cold startup to help burn off unburned hydrocarbons. The powertrain control module (PCM) monitors this system and sets the P0410 code when it doesn’t see the expected change in oxygen sensor readings.
From a diagnostic standpoint, the PCM is looking for a lean condition when the air injection system activates. If that lean signal doesn’t occur, the computer assumes the system isn’t working.
How the Secondary Air Injection System Works
Before you can diagnose a P0410 code, you need to understand how the system operates:
An electric or belt-driven air pump forces fresh air into the exhaust
A check valve prevents exhaust gases from flowing backward
Switching valves or solenoids controls airflow direction
The PCM activates the system during cold starts
When everything works correctly, oxygen sensors detect the added oxygen, confirming system operation.
Most Common Causes of a P0410 Code
After diagnosing hundreds of emissions-related faults, I can tell you the P0410 code usually comes down to a handful of repeat offenders:
• Failed secondary air pump
• The pump either seizes or fills with water (very common on GM vehicles)
• Clogged air injection passages
• Carbon buildup blocks airflow, especially in cylinder heads
• Faulty check valve
• Allows hot exhaust gases to backflow and damage the pump
• Bad air control solenoid or vacuum switching valve
• Prevents proper routing of airflow
• Electrical issues
• Blown fuse, bad relay, or wiring faults
• Water intrusion in the system
• A huge issue in cold climates—freezing can destroy the pump
Symptoms of a P0410 Code
The P0410 code rarely causes drivability issues. But you may notice:
• Check engine light illuminated
• Loud whining noise from the air pump
• Failed emissions test
• Occasional rough cold start (rare)
How I Diagnose a P0410 Code (Step-by-Step)
This is where most DIYers—and even some shops—go wrong. You don’t guess. You test.
1. Check Pump Operation — Start the engine cold. The air pump should run immediately.
• No sound? Check fuse, relay, and power/ground
• Loud grinding? Pump is failing internally
2. Verify Airflow — Disconnect the outlet hose and confirm the pump is actually moving air.
• Weak or no airflow = bad pump
3. Inspect the Check Valve — Remove and inspect for carbon buildup or damage.
• If stuck open → exhaust damages pump
• If stuck closed → no airflow
4. Check for Blocked Passages — This is extremely common on certain engines.
• Remove injection ports and inspect for carbon clogging
• Use compressed air or cleaning tools to clear
5. Monitor O2 Sensor Response — Using a scan tool:
• Command the air system ON
• Look for a lean spike in upstream O2 sensors
• No response? The PCM will trigger a P0410 code
6. Inspect Electrical Circuits — Check:
• Relay operation
• Voltage supply to the pump
• Ground integrity
How to Fix a P0410 Code
Once you’ve confirmed the failure point, here’s how I typically fix a P0410 code:
• Replace the secondary air pump if it’s noisy, seized, or water-damaged
• Install a new check valve to prevent repeat failures
• Clean clogged air passages thoroughly
• Repair wiring or replace faulty relays
• Address water intrusion (reroute intake or install updated components if applicable)
One pro tip: if you replace the pump but don’t replace the check valve, you’re setting yourself up for a repeat failure.
Common Mistakes When Fixing a P0410 Code
I see these errors all the time:
• Replacing the pump without diagnosing airflow
• Ignoring clogged passages
• Skipping check valve inspection
• Not verifying O2 sensor response
The P0410 code is a system fault—not just a single component failure.
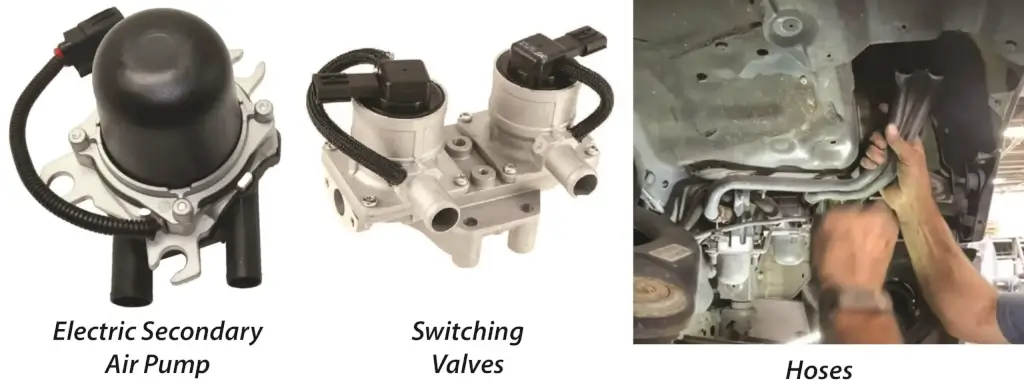
This image shows the 3 major components of a secondary air system. 1) The electric air pump, 2) Solenoid Check Valves, and 3) Air intake hoses. A failure of any of these components can cause a P0410 code.
Preventive Measures and Maintenance Tips
Water infiltration into the pump and solenoid check valves can damage the secondary air system. Periodically check the condition of the air pump, hoses, and check valve, especially if your vehicle is prone to SAI system issues.
Keep the Check Valves Clean— Carbon buildup in the exhaust system can cause the check valve to malfunction. Using high-quality fuel and performing regular maintenance can help reduce carbon deposits.
○, 2024 Rick Muscoplat
Posted on by Rick Muscoplat