
P0443 fix: Purge Control Valve Circuit Malfunction
How I Diagnose a P0443 Code and Test the Purge Valve with a Multimeter
As a technician who’s dealt with many evaporative emission (EVAP) system problems, I’ve seen my share of the P0443 code. If you’re staring down a check engine light and your scanner pulls up this code, don’t panic. It’s not typically a catastrophic issue—but it does require proper testing and logical diagnosis. In this article, I’m going to walk you through exactly what the P0443 code means and how I personally diagnose a P0443 code using a simple multimeter.
What the P0443 Code Means
The P0443 code stands for “EVAP Purge Control Valve Circuit Malfunction.” The key to diagnosing a P0443 is in its definition: Evaporative Emission Control System Purge Control Valve Circuit Malfunction. That means the computer has detected a circuit issue. That can be caused by no power to the purge valve from a blown fuse or bad power relay, an open in the purge valve solenoid windings, a short to ground in the valve’s windings, a bad or corroded electrical connector to the valve, or a wiring harness issue. In plain English, the engine control module (ECM) is trying to activate the purge valve by providing ground to the circuit. Once it provides ground, it checks the circuit by measuring voltage drop on the ground side. If it sees the expected voltage drop, it knows that the wiring and purge solenoid are good.
Step-by-Step: How I Diagnose P0443 Code with a Multimeter
I start my diagnostic process with some visual checks, but the multimeter is my go-to tool when I really want to get to the bottom of a P0443 code.
Step 1: Locate the Purge Valve— Most purge valves are located under the hood, near the intake manifold or firewall. I always check the service manual or a reliable database for the exact location. Once I find it, I test the purge valve by disconnecting the electrical connector.
Step 2: Inspect the Connector and Wiring— Before I touch the multimeter, I visually inspect the connector. Corrosion, pushed-back pins, or broken wires can all cause a P0443 code. If everything looks clean, I move on to electrical testing.
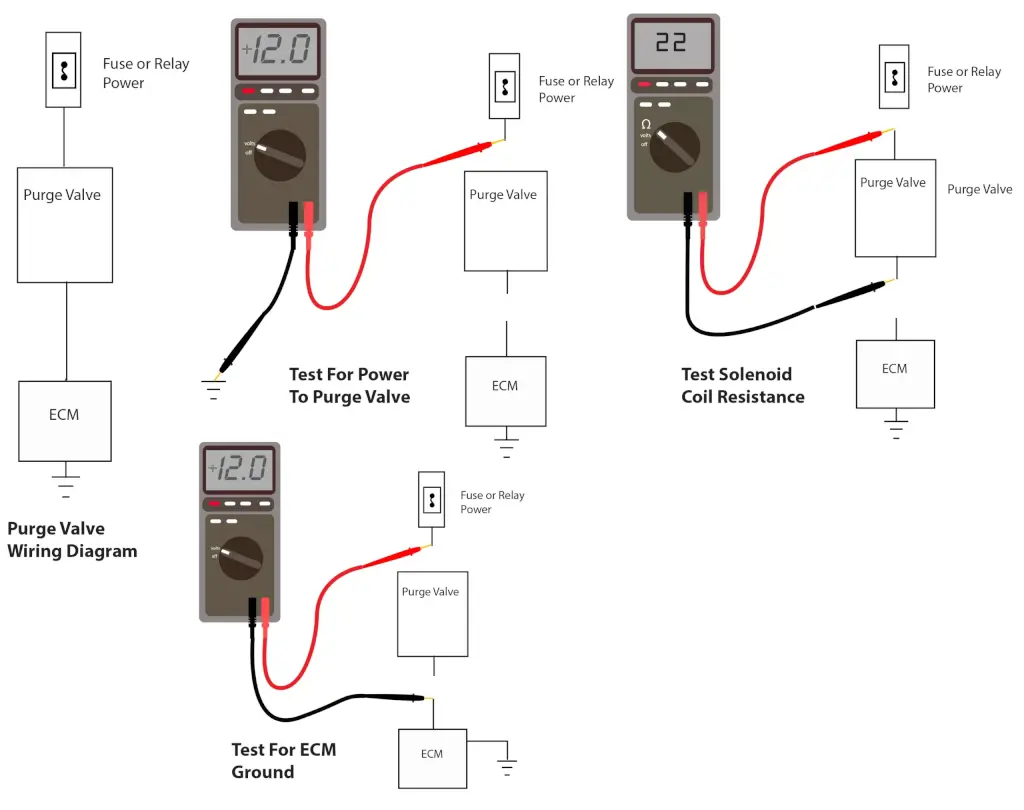
Step 3: Measure Coil Resistance— With the purge valve disconnected, I set my digital multimeter to the ohms (Ω) setting. Then I touch the probes to the two terminals on the purge valve solenoid.
A good solenoid typically has a resistance between 20 and 40 ohms. If I read infinite resistance, the coil is open, and the purge valve is bad. If I see near zero ohms, it’s shorted internally. Either way, I’ll replace the valve.
This is one of the key steps to properly test the purge valve and diagnose a P0443 code—you want to know if the solenoid itself is electrically sound.
Step 4: Check for Power and Ground— Next, I reconnect the multimeter, this time to the harness side of the connector. I turn the key to the “ON” position without starting the engine. One of the wires should have battery voltage (typically 12V). That’s the power side. If I don’t see voltage, I trace the wire back to the fuse and relay. A blown fuse or bad relay can definitely set a P0443 code.
The other wire is the ground control side, which the ECM pulses to complete the circuit. If I want to see this in action, I’ll use a scan tool to command the purge valve on and watch for a pulsed ground signal.
Step 5: Confirm ECM Control— If the wiring and purge valve check out, but I’m still getting a P0443 code, it’s time to consider the ECM. This is rare, but not impossible. I’ll backprobe the ground control wire with the valve commanded on and verify the ECM is switching ground properly. If it’s not, and everything else is good, the ECM may be faulty.
Purge Valve Testing
The valve is a high failure rate item, but I’ve also seen wiring harness issues cause this code
In many cases, it’s a bad purge valve. However, I’ve seen
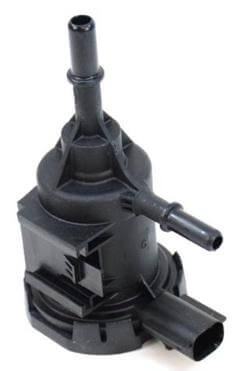
Purge valve
many instances where the problem is in the electrical connector or harness. In my experience, you should always check the condition of the electrical connector first before automatically replacing the purge valve.
How the purge valve works
After filling your tank with gas and starting the engine, the ECM starts an Evaporative Emissions test procedure. This test does double duty: 1) It purges the charcoal canister of the gas vapors it absorbed during the fill-up, and 2) It performs a system test to ensure there are no fuel vapor leaks.
The ECM opens the purge and the vent valves. Manifold vacuum sucks the fuel vapors from the canister, and the canister is purged of vapors by the fresh air coming in through the vent valve.
The ECM monitors engine RPM and detects an RPM from the additional fuel. Once the canister is empty and fresh air is coming into the engine from the purge valve, it knows the canister is fully purged. It then closes the vent valve but leaves the purge valve open. That puts the entire fuel system under a vacuum. The ECM monitors the vacuum. If the vacuum drops, that’s a sign of a leak.
If you have P0443 Evaporative Emission Control System Purge Control Valve Circuit Malfunction, read this article for a full explanation of how the evaporative emissions system works.
To learn more about EVAP system, read this article
© 2012 Rick Muscoplat
Posted on by Rick Muscoplat