
How to test for a head gasket leak
Six tests to positively identify a head gasket leak
Sometimes all it takes to conclude you have a head gasket leak is to look at the dipstick. If it looks like a chocolate milkshake, you’ve got coolant and oil mixing in the oil pan. But other head gasket leaks aren’t so easy to find. Here are the four best tests to check for head gasket leak: Visual inspection, cooling system pressure test, combustion gas test, and a cylinder leak down test.
1) Visually check on the dipstick and coolant reservoir
If the head gasket has failed between an oil passage and a coolant passage, oil can leak into the coolant or coolant can leak into the oil.
When coolant gets into the oil, the oil looks like a chocolate milk shake. That’s trouble with a capital “T”.
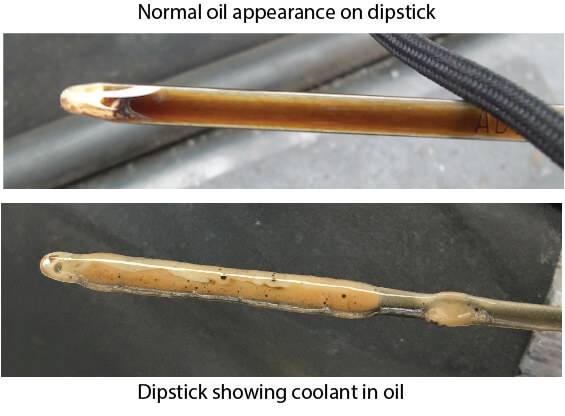
Normal oil on dipstick and dipstick with oil and coolant
Check for floating oil in the coolant reservoir
When oil gets into the coolant, it can float to the top of the coolant in the reservoir. However, if you see oil in the coolant, don’t automatically assume it’s a bad head gasket; it could also be a leaking transmission oil cooler inside the radiator. When that fails, transmission fluid gets into the coolant and coolant gets into the transmission. Check the transmission dipstick or pull the transmission fill plug to check for transmission fluid condition.
Check the oil filler cap for milky gel in the cap and inside the valve cover
If coolant gets into the oil, the milky mixture can splash all around the valves and valve cover and wind up in the oil fill cap. If you see the milkshake there, that COULD be a sign of a bad head gasket. But never condemn the head gasket based on the oil fill cap alone. It could be normal winter condensation
2) Perform a cooling system pressure test
Buy or rent a cooling system pressure test kit and pressurize the cooling system to 21-psi. If the system doesn’t hold the pressure, recheck the dipstick and look for external cooling system leaks.
3) Perform a compression test
A low compression reading between two adjoining cylinders is a sign of a gasket failure between the cylinders.
WARNING: If you’re low on coolant, it’s possible the head gasket is leaking coolant into the cylinder and burning it. In some cases where coolant is leaking into the cylinder, a compression test can provide a false negative result.
That occurs because coolant leaks into the cylinder, leaving a layer of coolant on top of the piston head. As you conduct your compression test, that liquid gets pushed back through the head gasket breach during the compression stroke, effectively sealing the combustion chamber and giving you a good compression reading.
4) Perform a combustion gas test kit
Use this test if you have rapid overheating and pressurized radiator hoses and suspect exhaust gasses in your coolant
If the head gasket fails between the cylinder and a cooling passage, the engine can pump very hot exhaust gasses into the coolant causing rapid overheating and over-pressurization. The over-pressurization can actually pop radiator hoses off the radiator. Each compression cycle pumps exhaust into the cooling system causing it to over-pressurize and overheat.
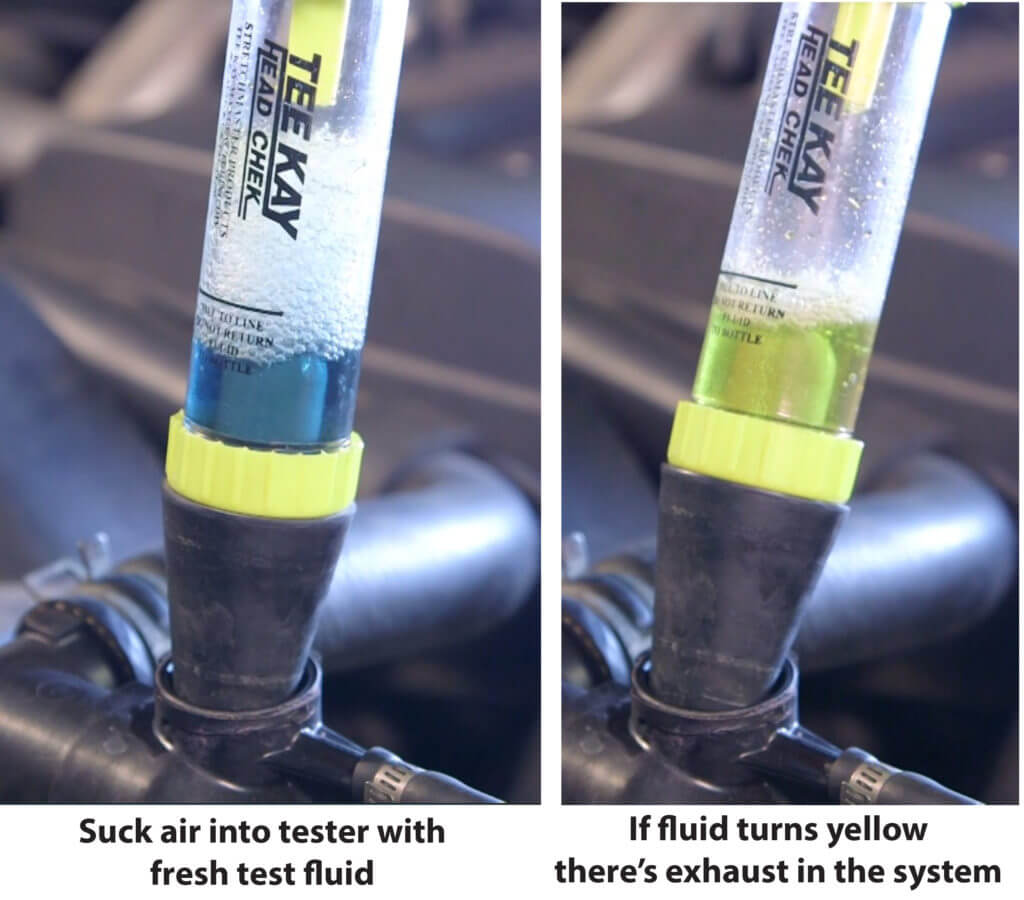
To test for this condition, perform a chemical test on the coolant reservoir.  Purchase a combustion gas test kit from any auto parts store. Start the engine and let it heat up. Fill the tester with the test fluid and apply the suction bulb to the tester. Place the tester in the coolant reservoir and suck air (not liquid coolant) into the tester. If the blue fluid turns yellow, combustion gasses are in the coolant.
To isolate the actual cylinder that’s leaking, disconnect either the spark plug or the fuel injector for a cylinder. Start the engine and run it for a few minutes to purge the disabled cylinder. Perform the combustion gas test again. If the fluid turns yellow, the disconnected cylinder is NOT the cause of the exhaust leak. Move on to each additional cylinder, making sure you run the engine between each test to purge the cylinders. If the fluid remains blue during one of the disabled cylinder tests, that confirms the disabled cylinder is the cause of the leak because it is not producing exhaust gas.
5) Check for coolant in the cylinders
As discussed above, a head gasket breach between the cylinder and coolant passage can cause exhaust gasses to enter the cooling system. But it can also work the other way around where coolant enters the combustion chamber and is burned with the air and fuel mixture.
How to check for coolant in the cylinder
Let the engine cool. Then, remove the spark plugs and keep them in order. Examine the removed spark plugs for signs of coolant staining or wetness. If you don’t see either, drape a clean white cloth over the spark plug holes and crank the engine. If coolant is in the cylinder, the cranking operation will spit the coolant onto the cloth and tell you which cylinder has the head gasket breach
6) Perform a cylinder leak-down test
This test is the most accurate but also the most time-consuming. Remove all the spark plugs. Connect a leak-down pressure tester to one cylinder and attach a compressed air hose. Watch the gauges to see how much air is leaking out of the cylinder. If a gauge indicates a leak, listen to the intake, exhaust, and radiator for sounds of rushing air. That will tell you which cylinder has the gasket failure and where it’s leaking.

cylinder leak down tester
©, 2023 Rick Muscoplat
Posted on by Rick Muscoplat