
Why Your Car’s AC Isn’t Working: The Complete Diagnosis Guide
The Most Common Reasons Your Car AC Isn’t Working
Quick Answer
If your car’s AC isn’t working, the most likely causes are:
1) Low refrigerant from a leak
2) A failed AC compressor
3) Clogged condenser
4) Malfunctioning expansion valve or orifice tube
5) Air in the system — An AC system can’t cool properly if there’s air in the system.
There are other causes, but these are the most common. Most of these are repairable, with costs ranging from a simple leak repair to an expensive full compressor replacement. Start with a professional diagnosis before spending money on parts.
Why Your Car’s AC Isn’t Working: The Complete Diagnosis Guide
Few things are more frustrating than climbing into your car on a sweltering afternoon and getting a blast of lukewarm air from the vents. When your car’s AC isn’t working, it rarely fixes itself — and the longer you wait, the worse the underlying problem typically gets. Understanding the most common causes gives you a significant advantage: you’ll know what questions to ask your mechanic, what repairs are reasonable, and which ones you can safely defer.
Low or Leaked Refrigerant: The #1 Cause of Car AC Failure
Refrigerant is the lifeblood of your AC system. It’s the pressurized chemical compound — R-134a in older vehicles, R-1234yf in newer ones — that absorbs heat from the cabin and releases it outside. When refrigerant leaks out, even partially, cooling performance drops fast.
Unlike engine oil, refrigerant doesn’t “burn off” or get consumed. If the level is low, there’s a leak somewhere. Common leak points include the compressor shaft seal, O-ring connections between components, the condenser, and the evaporator core (often hidden behind your dashboard).
How it’s repaired: A technician uses UV dye or an electronic leak detector to locate the source, repairs or replaces the leaking component, evacuates the system with a vacuum pump to remove air and moisture, and recharges the system with the correct refrigerant and PAG oil. Costs range from $250–$400 for a minor repair and recharge to $800–$1,200 if the evaporator is involved.
Compressor Problems: When the Heart of the AC System Fails
The AC compressor pressurizes the refrigerant and keeps it circulating. It’s the single most expensive component in the system and, unfortunately, one of the most prone to failure — especially in vehicles that sit unused for long periods or that have been run low on refrigerant.
Signs of compressor failure include:
• AC that blows cold intermittently but not consistently
• A loud grinding, rattling, or squealing noise when the AC is switched on
• The compressor clutch is not engaging when the system is activated
• Visible refrigerant oil staining around the compressor body
How it’s repaired: Compressor replacement is a significant job. The system must be recovered, the failed unit removed and replaced, the system flushed to remove metal debris, a new receiver-drier or accumulator installed (mandatory after compressor failure), and the system evacuated and recharged. Expect $1,500–$2,500 depending on vehicle and labor rates.
External or Internally Clogged or Physically Damaged Condenser
The condenser sits at the front of the vehicle, just ahead of the radiator, and releases the heat that the refrigerant has absorbed from the cabin. Road debris, bent fins, or a buildup of bugs and dirt can restrict airflow severely enough to make the system ineffective — or trigger a high-pressure cutout that shuts the AC off entirely.
In addition to external clogging, a condenser can clog internally, preventing full refrigerant flow. Internal clogging is caused by sludge formation, metal wear particles, and degraded rubber from the AC hoses and seals.
Lastly, the condenser can sustain physical damage from flying rocks/stones that puncture the small microchannel tubes.
How it’s repaired: External blockages can be cleared with a careful rinse from the front of the vehicle. Physically damaged condensers with punctured fins or cracks must be replaced. Condenser replacement typically runs $300–$700, including labor.
Faulty Expansion Device
There are two common types: Thermostatic expansion valve (TXV) and orifice tube. Each fails in its own way.
The TXV is a mechanically sensitive 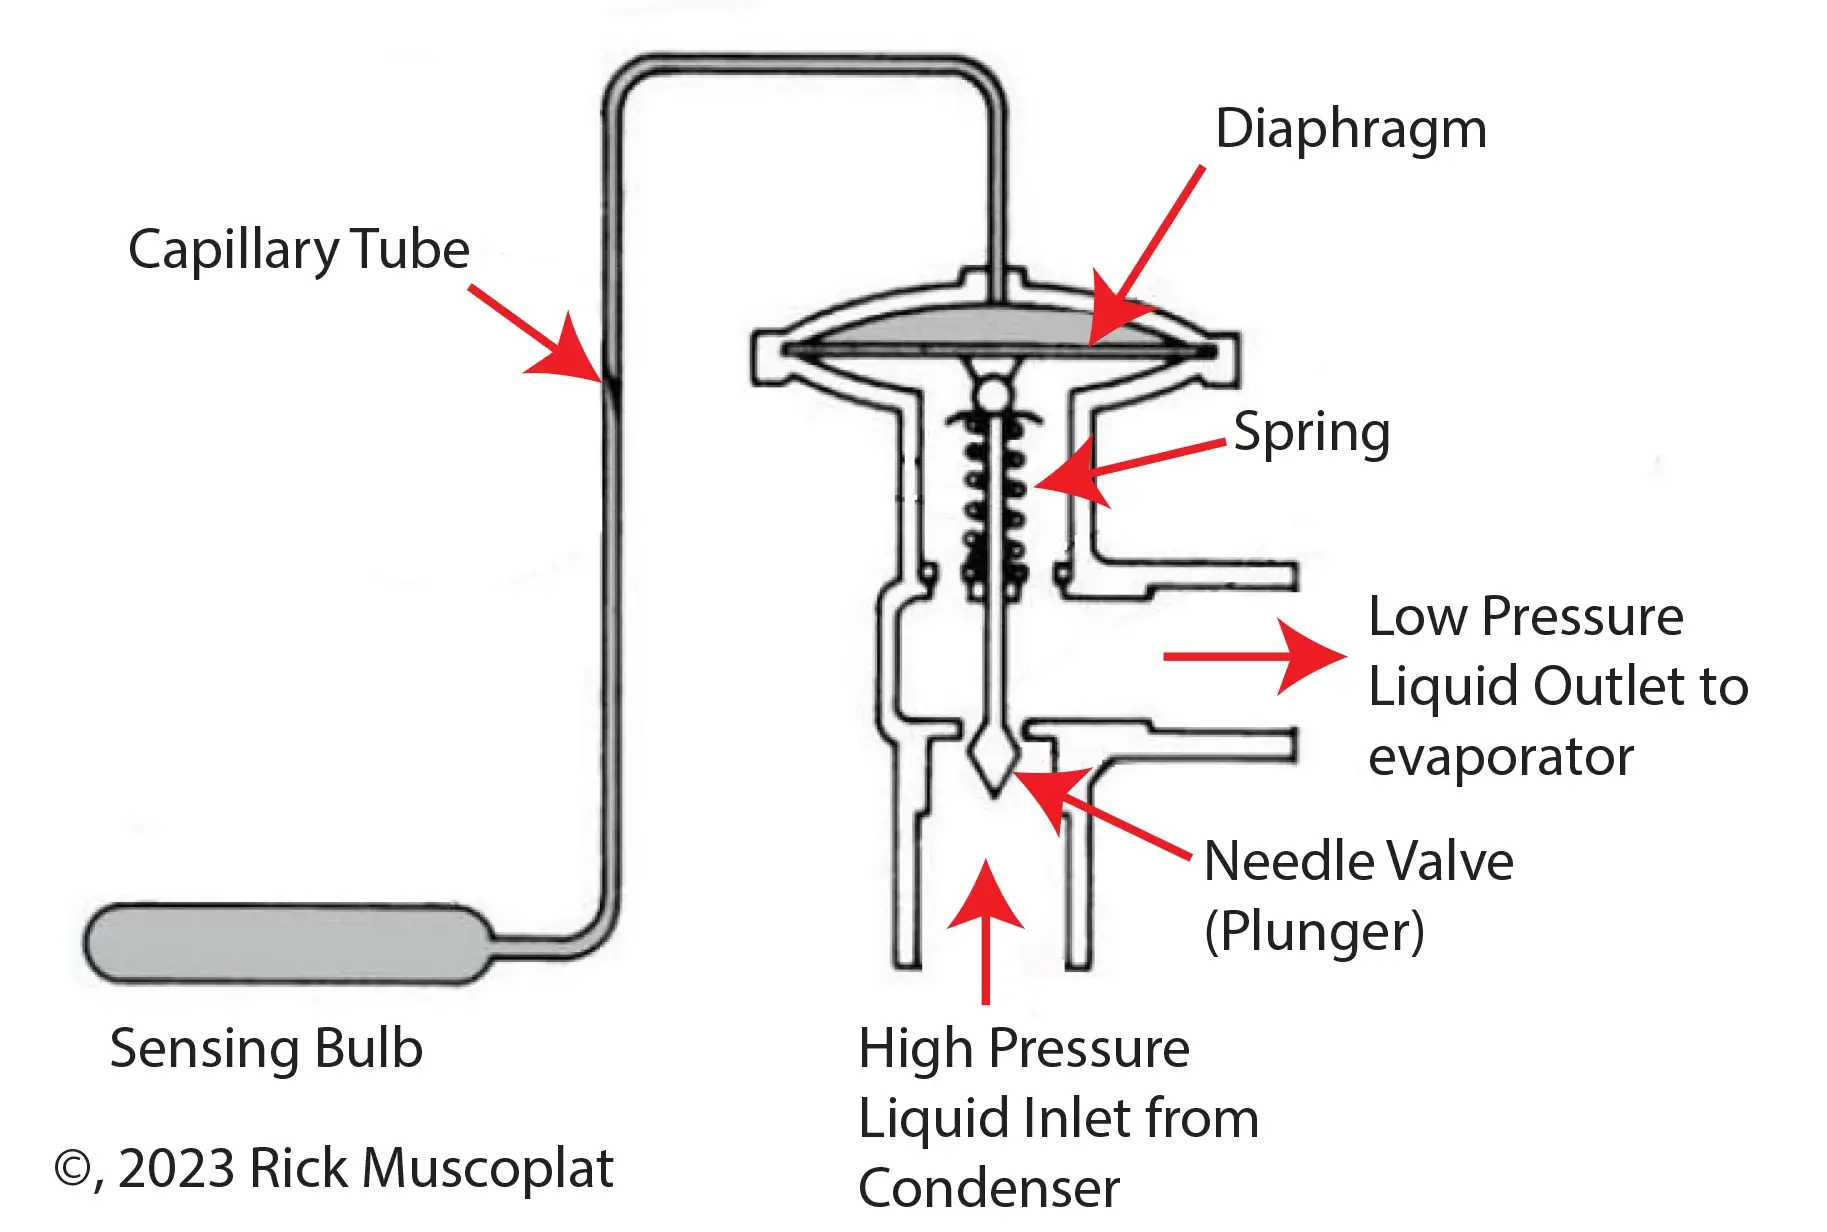 valve that opens and closes in response to evaporator temperature and pressure. Over time, it can stick open — flooding the evaporator with excess refrigerant and causing the compressor to ingest liquid, which it can’t compress, leading to catastrophic internal damage. More commonly, it sticks closed or becomes restricted, starving the evaporator of refrigerant and producing little to no cooling.
Moisture contamination is the leading cause of TXV failure: even trace amounts of water freeze at the valve orifice, blocking flow entirely, often causing symptoms that come and go as the ice melts and reforms.
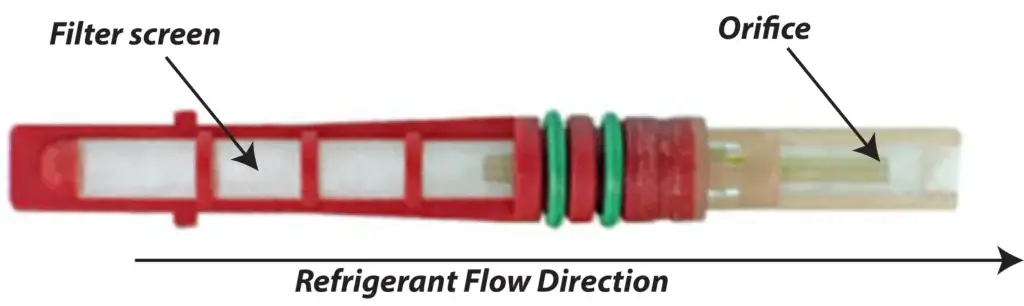
The orifice tube is simpler — a fixed metering device with no moving parts — but it fails due to clogging. Debris, degraded PAG oil, and compressor metal particles accumulate on its small inlet screen, restricting refrigerant flow progressively until cooling output drops to nearly nothing. A badly clogged orifice tube is often a warning sign that the compressor is also beginning to fail.;
Air in the System

Your car’s AC system is a sealed, pressurized loop. Under normal conditions, nothing gets in, and nothing gets out. But the moment that seal is compromised — even briefly — atmospheric air finds its way in, and the consequences for cooling performance are immediate and surprisingly severe.
How Air Enters Your Car’s AC System: The most common entry point is a refrigerant leak. As refrigerant escapes through a failed O-ring, a cracked hose, a porous condenser, or a leaking compressor shaft seal, it creates a localized low-pressure zone. On the low-pressure side of the system — particularly when the compressor cycles off — pressure can drop below atmospheric, effectively turning the leak point into an intake. The same gap that lets refrigerant out now pulls air in.
The second major entry route is improper service. When a technician or DIYer opens the system to replace a component and doesn’t pull an adequate vacuum before recharging, residual air remains trapped inside. A proper evacuation — typically 30 minutes or more with a quality vacuum pump — brings the system down to near-perfect vacuum, which boils off moisture and collapses any air pockets before refrigerant is introduced. Cut that step short, and air stays in the system permanently until it’s recovered and re-evacuated.
DIY recharge kits are a third culprit. Connecting a consumer recharge can to the low-side service port without first checking system pressure and without recovering and evacuating first almost always introduces atmospheric air along with the refrigerant. Many drivers have unknowingly contaminated their own systems this way.
Why Air Is So Destructive to Cooling
Air is what engineers call a non-condensable gas (NCG). That term is the key to understanding exactly why it ruins AC performance. The entire refrigeration cycle depends on refrigerant changing state — from gas to liquid and back again — at precise pressure and temperature points. Air can’t do this. It doesn’t condense, evaporate, or participate in heat transfer. It simply occupies the space and pressure that the refrigerant should have. Here’s what happens physically when air is present:
• High-side pressure spikes abnormally — Air accumulates in the condenser, the component responsible for releasing heat, so it takes up volume without contributing to cooling. This forces system pressure on the high side, well above normal operating range. A system that should read 200–225 psi on the high side might read 275–325 psi or higher, even though the refrigerant charge is correct.
• The condenser becomes partially blocked. Because air won’t condense into liquid as refrigerant does, it creates a dead zone inside the condenser. Refrigerant that should be condensing and releasing heat is competing for space with trapped air, reducing the condenser’s effective surface area and dramatically reducing its heat-rejection capacity.
• The evaporator is starved. With the condenser underperforming, less liquid refrigerant reaches the evaporator — the component responsible for absorbing heat from your cabin. Less refrigerant flow means less heat absorption, which means the air coming out of your vents stays warm.
• The compressor works harder for fewer results. Elevated high-side pressure puts the compressor under increased load. It’s working against higher resistance, running hotter, consuming more energy, and wearing faster — all while delivering reduced cooling output. Over time, this accelerates compressor wear and can considerably shorten its service life.
• Pressure readings become misleading. A technician checking system pressures on a contaminated system will see abnormally high high-side readings that don’t match the refrigerant charge level. This can lead to a misdiagnosis — an overcharge or condenser blockage suspected when the real culprit is trapped air. Experienced technicians recognize the pattern, but it complicates diagnosis.
The Moisture Problem That Comes With Air In The System
Air never travels alone. Atmospheric air carries humidity, and moisture inside an AC system is corrosive. It reacts with refrigerant — particularly R-134a and R-1234yf — to form hydrofluoric and hydrochloric acids that attack metal components from the inside. It saturates the desiccant in the receiver-drier or accumulator, rendering that component useless. It degrades PAG oil lubricity and can freeze at the expansion device, causing the intermittent cooling failures described earlier. Air contamination and moisture contamination are almost always a package deal.
How it’s repaired: The system must be fully evacuated, flushed if contamination is severe, the receiver-drier replaced (its desiccant is saturated), and a deep vacuum pulled — typically 30 minutes or more — to boil off residual moisture before recharging. This is why a proper AC repair always includes evacuation, not just a top-off.
Electrical Faults, Fuses, and Faulty Sensors
Modern AC systems are heavily computerized. Your car’s AC isn’t working in some cases, not because of a refrigerant or mechanical issue, but because a $5 fuse has blown, a relay has failed, or a pressure sensor is sending the wrong signal to the control module.
Common electrical culprits include:
• Blown AC fuse or faulty relay in the under-hood fuse box
• Defective pressure cycling switch or high/low pressure sensors
• Faulty AC control module or blend door actuator
• Damaged wiring harness or corroded connectors near AC components
How it’s repaired: A technician uses a scan tool to pull fault codes and checks circuit continuity with a multimeter. Fuse and relay replacements are inexpensive ($10–$50). Sensor and module replacements run $100–$400.
What a Proper AC Diagnosis Looks Like
A qualified shop will connect a manifold gauge set or a digital AC machine to read both high-side and low-side pressures. These readings, combined with ambient temperature and system performance data, tell a trained technician almost immediately where the problem originates. Be cautious of any shop that offers to “just recharge it” without checking for leaks first — you’ll be back in the same situation within weeks.
Most Searched Keywords for This Topic
car AC not working, car AC not blowing cold air, why is my car AC not cooling, car AC stopped working suddenly, car AC blowing warm air, car AC compressor not working, car AC refrigerant leak symptoms, how to fix car AC, car AC recharge cost, car AC repair near me, car AC pressure too high, car AC compressor replacement cost, low refrigerant symptoms car, car AC not working after recharge, AC clutch not engaging, car AC evaporator leak, R-134a recharge, R-1234yf refrigerant leak, car AC expansion valve symptoms, moisture in car AC system