
How to Tell If Your Alternator Is Bad
How to test an alternator using a multimeter
Quick Summary
You don’t need expensive diagnostic equipment to test your car’s alternator. A quality digital multimeter and a few minutes are all it takes to determine whether your alternator is charging properly. The key is following the correct testing procedure—checking battery voltage first, measuring charging voltage under load, and understanding how modern computer-controlled charging systems operate. Most importantly, never disconnect the battery while the engine is running. That outdated trick can destroy thousands of dollars’ worth of electronic modules.
How to Test an Alternator Without Damaging Your Vehicle
After diagnosing hundreds of charging system problems over the years, I’ve learned that alternators are often replaced when they’re perfectly good. More often than not, the real culprit is a weak battery, poor cable connections, a slipping serpentine belt, or corrosion in the charging circuit.
That’s why I always begin with a systematic test instead of guessing.
The safest and most accurate way to test an alternator with a multimeter is to first verify the battery condition, then check the charging voltage while the alternator is under electrical load.
Forget the Old Battery Cable Test
One piece of advice refuses to die: disconnect the battery cable while the engine is running. Don’t do it.
That method may have worked decades ago when vehicles had little more than a carburetor and ignition coil, but it has no place on a modern vehicle.
The battery acts as a giant electrical capacitor, absorbing voltage spikes created by the alternator. Remove that protection, and the alternator can produce voltage spikes exceeding 100 volts—sometimes approaching 150 volts.
Those spikes can instantly destroy:
• Engine Control Module (ECM)
• Powertrain Control Module (PCM)
• Body Control Module (BCM)
• Infotainment system
• Airbag controller
• ABS module
• Navigation system
• Audio amplifiers
Reconnecting the battery while the engine is still running can create another damaging voltage spike.
The repair bill from this outdated test can easily exceed the cost of several alternators.
Tools You’ll Need
Fortunately, you only need a few basic tools:
• Digital multimeter
• Safety glasses
• Clean battery terminals
• Vehicle owner’s manual (recommended)
A digital multimeter provides accurate readings without interfering with the charging system.
Step 1: Check Battery Voltage Before Testing the Alternator
This is the step most DIYers skip. An alternator cannot be accurately evaluated if the battery is discharged.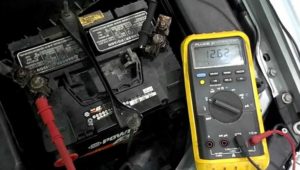
With the engine off and all accessories turned off, measure voltage directly across the battery posts.
A healthy battery should read approximately:
12.6 volts — fully charged
12.4 volts — about 75% charged
12.2 volts — minimum acceptable for testing
Below 12.2 volts — charge the battery before continuing
If the battery is weak, the alternator may appear to be malfunctioning when it’s actually working normally.
Step 2: Measure Charging Voltage
Start the engine and connect the multimeter leads directly to the battery posts. On most vehicles, normal alternator charging voltage will eventually stabilize between:
13.0 and 15.0 volts
Don’t panic if you don’t immediately see 14 volts.
Modern vehicles use smart charging systems that intentionally reduce alternator output to improve fuel economy and extend battery life.
The computer only commands charging when necessary.
Step 3: Force the Charging System to Work
Many late-model vehicles won’t charge continuously. If voltage remains near battery voltage after startup, increase electrical demand by turning on:
• Headlights
• High-beam headlights
• Rear window defroster
• Blower motor on high
• Heated seats
• Windshield wipers
Once sufficient electrical load is applied, the PCM should command the alternator to begin charging.
Watch for voltage to climb into the normal 13 to 15-volt range.
Step 4: Perform an Alternator Load Test
This is where many failing alternators reveal themselves. Increase engine speed to approximately 2,000 RPM while keeping all electrical accessories on.
A healthy alternator should maintain:
• Above 13 volts
• Stable voltage
• No large fluctuations
If voltage falls into the low 12-volt range or continues dropping as electrical demand increases, the alternator may have:
• Worn brushes
• Weak stator windings
• Failing rectifier diodes
• Internal voltage regulator problems
• Signs of a Bad Alternator
Even before testing, these symptoms often point toward charging system problems:
• Battery warning light illuminated
• Dim headlights
• Flickering interior lights
• Slow engine cranking
• Dead battery every morning
• Electrical accessories behaving erratically
• Burning electrical smell
• Whining or growling noises from the alternator
• Battery repeatedly goes dead
These symptoms don’t automatically condemn the alternator, but they do justify further testing.
Test the Entire Charging System
An alternator can pass a voltage test and still have problems elsewhere in the charging circuit. Whenever I diagnose charging complaints, I also inspect:
• Battery terminals for corrosion
• Ground cable connections
• Positive battery cable
• Alternator output cable
• Fusible links
• Serpentine belt condition
• Belt tensioner operation
A slipping belt or corroded cable can mimic a bad alternator.
What About AC Ripple?
A charging voltage test doesn’t always detect failing diodes. If your multimeter can measure AC voltage, check for alternator AC ripple. Excessive AC voltage usually indicates failed rectifier diodes.
Common symptoms include:
• Flickering headlights
• Radio interference
• Battery that won’t stay charged
• Intermittent charging problems
Many professional technicians consider an AC ripple test one of the best ways to diagnose internal alternator failures before complete failure occurs.
Smart Charging Systems Can Fool You
One of the biggest changes in today’s vehicles is intelligent charging. Instead of charging continuously, the engine computer monitors:
• Battery temperature
• Battery state of charge
• Engine load
• Ambient temperature
• Electrical demand
The computer then decides when charging is needed.
That’s why simply revving the engine and watching the voltmeter often leads people to replace perfectly good alternators.
Understanding how to test an alternator on a modern vehicle means recognizing that charging is no longer constant.
Final Thoughts
After decades of diagnosing charging system failures, I’ve found that the most reliable way to test an alternator hasn’t really changed—a digital multimeter, a fully charged battery, and a proper load test remain the gold standard.
What has changed is the technology controlling today’s charging systems. Modern alternators are smarter than ever, and understanding how they operate will keep you from replacing expensive parts unnecessarily.
Whenever you suspect an alternator problem, take a few extra minutes to perform the complete test. You’ll save money, avoid misdiagnosis, and gain confidence that you’re repairing the real problem instead of chasing symptoms.
To read an in-depth story on testing an alternator, click on this article.
Here are additional articles on alternators and batteries:
Symptoms of a dead or dying battery
© 2012 Rick Muscoplat
Posted on by Rick Muscoplat