
How to Replace a Fluidmaster Toilet Fill Valve
Fluidmaster Toilet Fill Valve Replacement: Step-by-Step DIY Guide
Quick Summary
The Fluidmaster 400 series toilet fill valve is the most commonly used fill valve in the plumbing industry. When it fails, you’ll have symptoms like a constantly running toilet, a tank that doesn’t refill or refills very slowly, or makes hissing noises. Replacing a Fluidmaster 400 series fill valve with another 400 series valve is one of the easiest plumbing repairs you can make. The entire job takes less than five minutes.
I’ve replaced hundreds of toilet fill valves over the years, and if there’s one brand I consistently recommend to homeowners, it’s Fluidmaster. Their universal fill valves are reliable, easy to install, inexpensive, and come as factory standard on most toilets sold in North America.
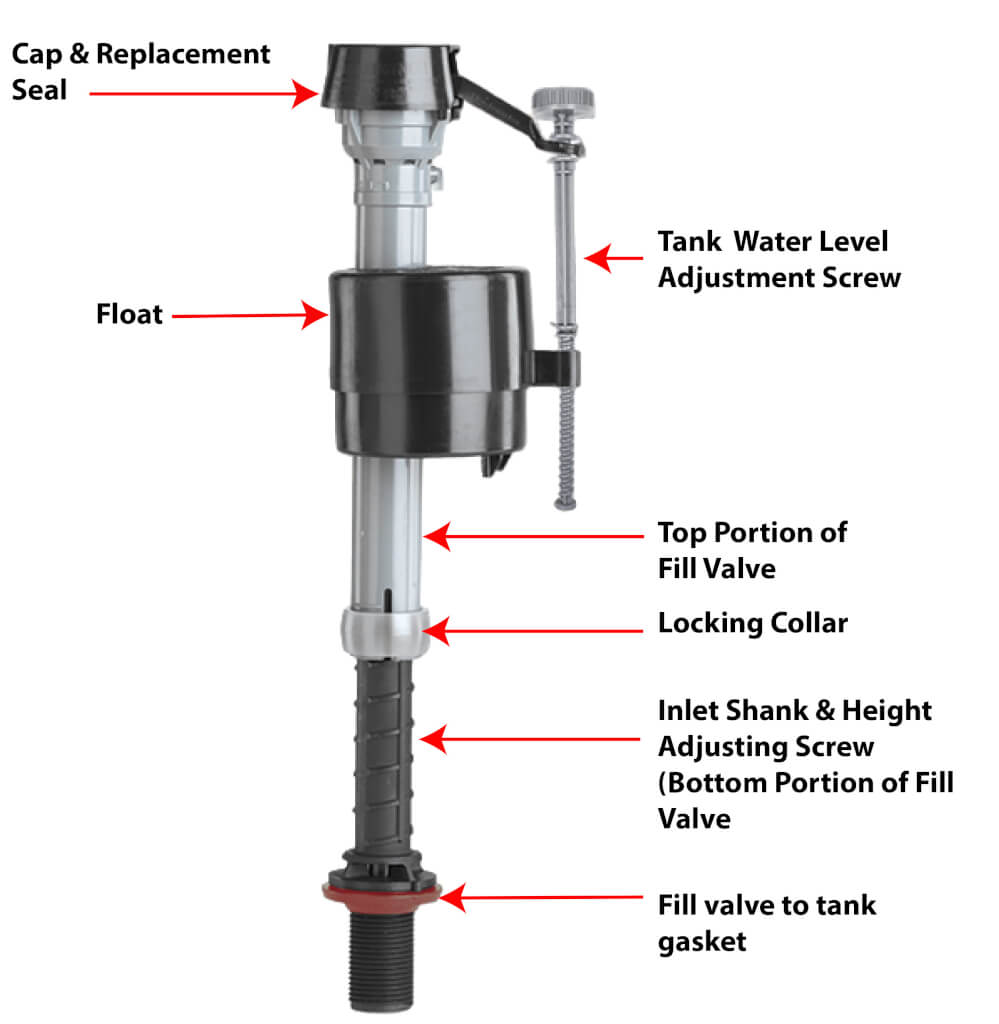
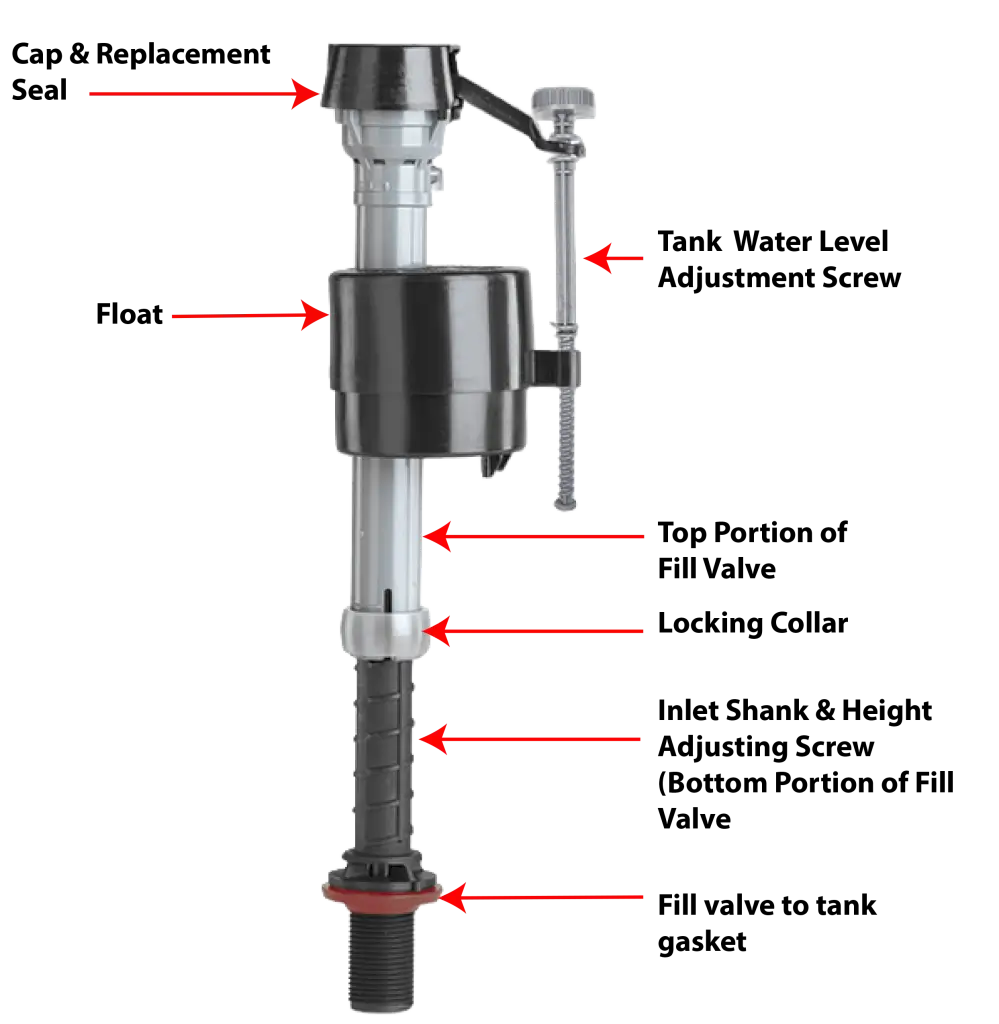
Parts of a Fluidmaster Fill Valve
Fluidmaster Fill Valve Parts and Their Functions
• Cap – The removable top of the valve that houses the internal diaphragm seal and controls the flow of water into the toilet tank.
• Seal – A flexible rubber seal inside the cap that opens and closes to regulate water flow as the float moves up and down.
• Float – The sliding plastic float that rises and falls with the water level in the tank, signaling the fill valve when to start and stop filling.
• Water level adjustment screw– The vertical rod that guides the float as it moves up and down the fill valve body and raises or lowers the float to adjust the tank’s final water level.
• Valve Body/Top Portion– The main plastic housing that contains the internal water passages and supports all of the fill valve components.
• Locking Collar – The locking collar that allows the valve body to be extended or shortened to fit different toilet tank heights.
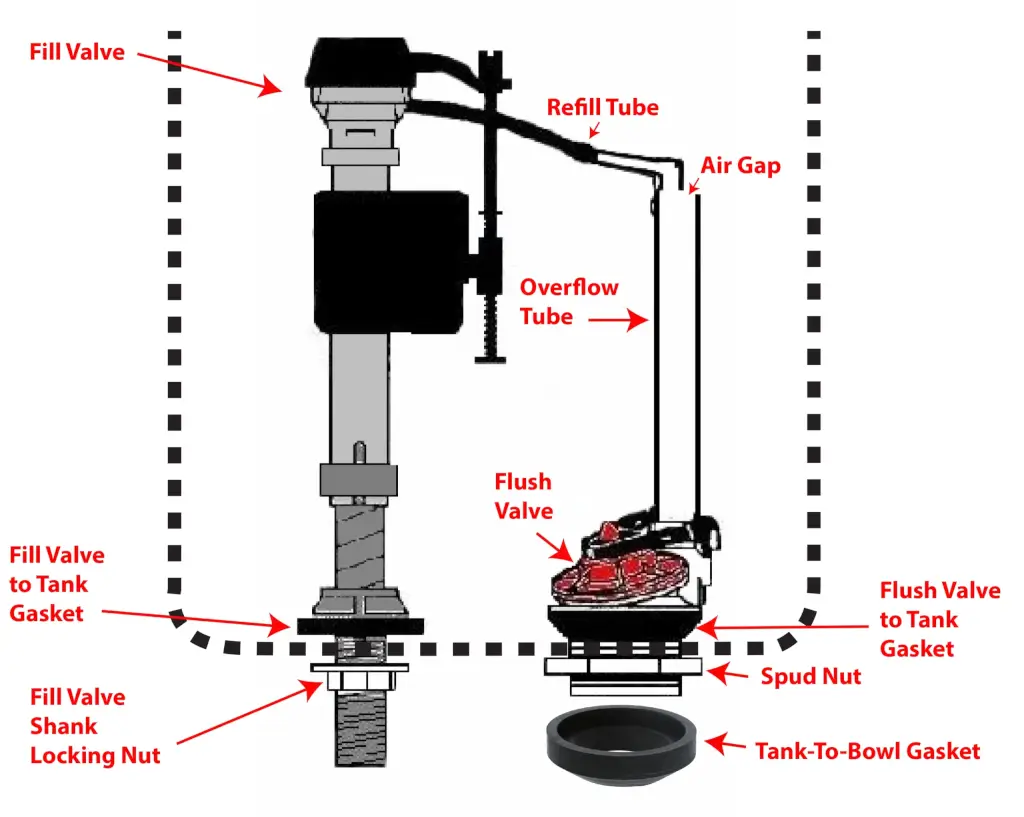
• Refill Tube – A flexible tube that carries a small stream of water from the fill valve to the overflow tube to restore the correct water level in the bowl.
• Inlet Shank – The threaded lower portion of the fill valve that passes through the hole in the bottom of the toilet tank.
• Fill valve to tank sealing washer – A thick rubber washer installed inside the tank around the threaded shank that creates a watertight seal.
How the Fill Valve Works in Your Toilet
The toilet’s flush and fill valves work together to complete each flush cycle. When you press the flush handle, the flush valve opens, allowing water stored in the tank to rush into the bowl. This surge of water creates the force needed to flush waste through the trap and into the drain.
As the water level in the tank drops, the float on the fill valve also drops, causing the fill valve to open automatically. Fresh water flows into the tank while a small amount is directed through the refill tube connected to the top of the overflow tube. This water restores the proper water level in the toilet bowl. As the tank refills, the float rises with the water level. When the water reaches the preset height, the float closes the fill valve, stopping the flow of water until the next flush.
Together, the flush valve empties the tank, and the fill valve refills it, ensuring the toilet is ready for the next flush while maintaining the correct water levels in both the tank and the bowl.
What Goes Wrong with a Fluidmaster Fill Valve
1) Bad seal — The seal inside the cap 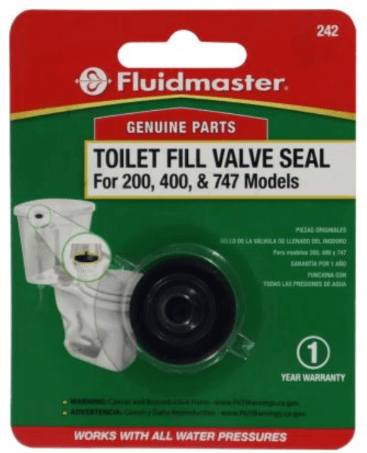 deteriorates from the chlorine in city water. The chlorine causes the rubber to swell, preventing the fill valve from filling the tank or causing it to not shut off when the float reaches the proper level.
Fix for a bad seal: Replace the seal or replace the fill valve. Find a replacement seal at any home center or hardware store. The seal costs about $4. However, a complete Fluidmaster fill valve only costs about $10.
To replace a bad seal:
• Turn off the water to the toilet
• Lift the float arm and turn the cap 1/4 turn counterclockwise.
• Swap in the new seal
• Place the cap back on the valve and turn 1/4 turn clockwise
2) Debris inside the valve — Debris in the valve
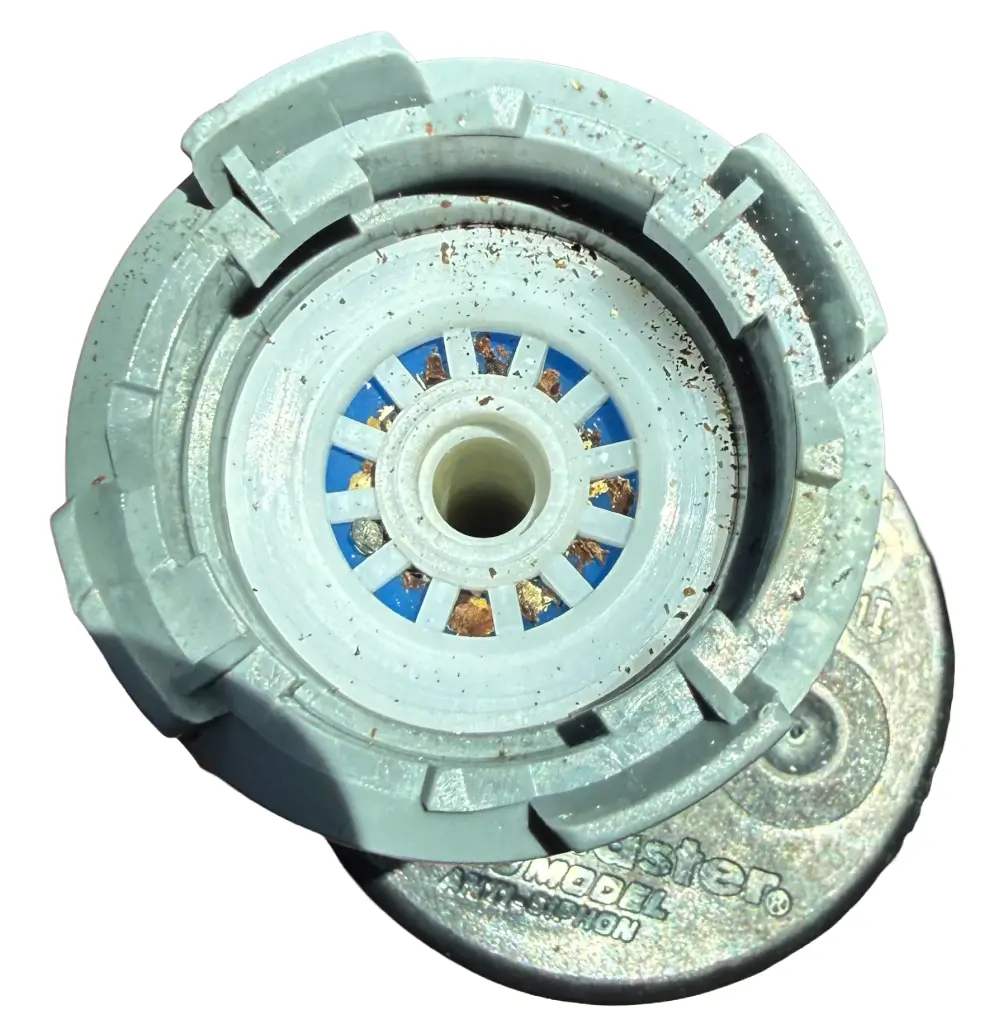
Sediment accumulates inside the cap of the fill valve, preventing the seal from shutting off properly
can cause the same symptoms as a bad seal: failure to fill and failure to stop filling
Fix for Debris: Flush the valve. Turn off the water supply to the toilet. Remove the cap and seal (see above). Hold a cup upside down over the fill valve while you slowly open the shutoff valve until you have a vigorous flow. If the valve still malfunctions after a flush, replace it.
3) Intermittent operation — This is commonly caused by accidentally rotating the valve, causing the float to rub against the backside of the tank or the trip lever mechanism.
Fix: Lift the float arm manually and check for binding. If the float binds, rotate the valve to avoid contact with other parts.
How to Replace a Fluidmaster Toilet Fill Valve
The Fluidmaster fill valve is constructed in two pieces. As long as your fill valve isn’t leaking from the shank gasket, you don’t need to replace the bottom half of the valve. You simply unlock and replace the top half. That means you never have to disconnect the supply tube/hose or unscrew the shank locking nut. Here’s how to replace your Fluidmaster fill valve.
Step 1: Turn Off the Water Supply — Locate the shutoff valve beneath the toilet and turn it clockwise until it stops.
Step 2: Flush the toilet and hold the handle down until most of the water drains from the tank.
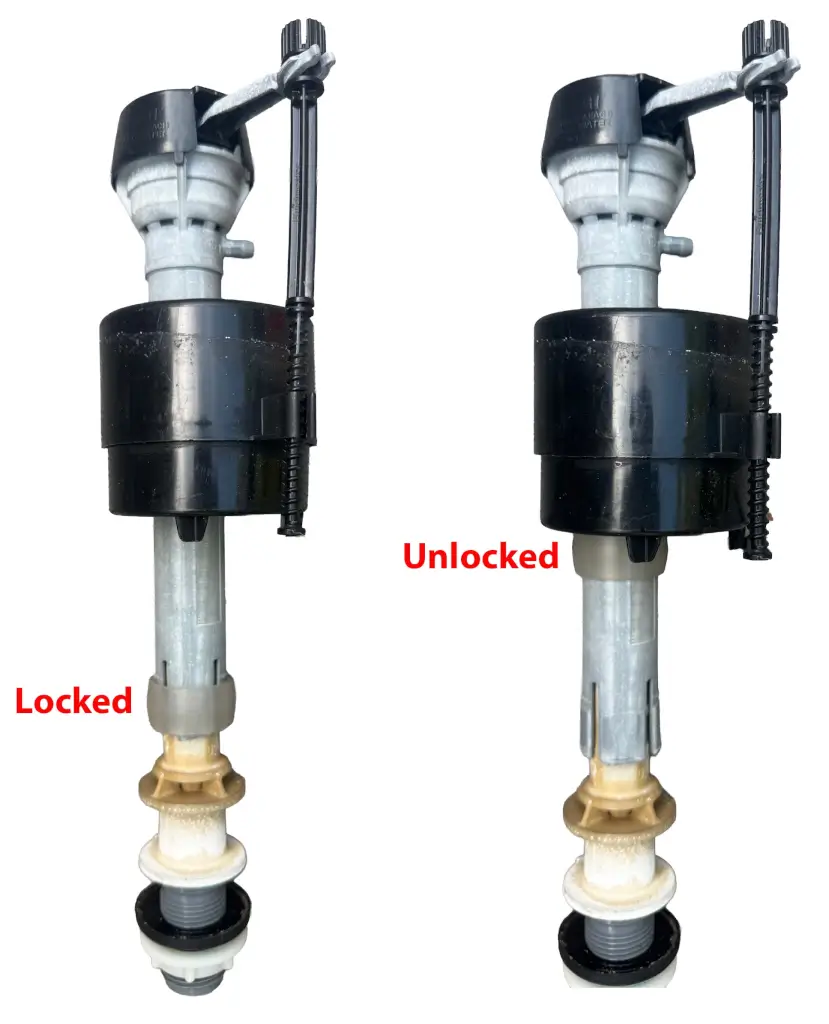
Step 3: Reach into the tank and unlock the locking ring — locate it on the bottom of the top portion of the valve (see the image below). Pull straight up on the ring.
Notice the translucent ring at the bottom of the grey plastic shaft. That’s the locking ring
on the bottom of the top portion of the valve (see the image below). Pull straight up on the ring.
Step 3: Disconnect the refill tube from the old valve and the air gap connector from the overflow tube. Toss those and use the new parts included in the box.
Step 4: Pull straight up on the upper portion of the fill valve to remove it. Toss the old valve.
Step 5: Separate the top and bottom portions of the new Fluidmaster fill valve by raising the locking ring and pulling the two halves apart.
Step 5: Swap O-rings — Remove the O-rings from the old and new shanks. Move the new O-ring to the old shank and apply plumber’s grease.
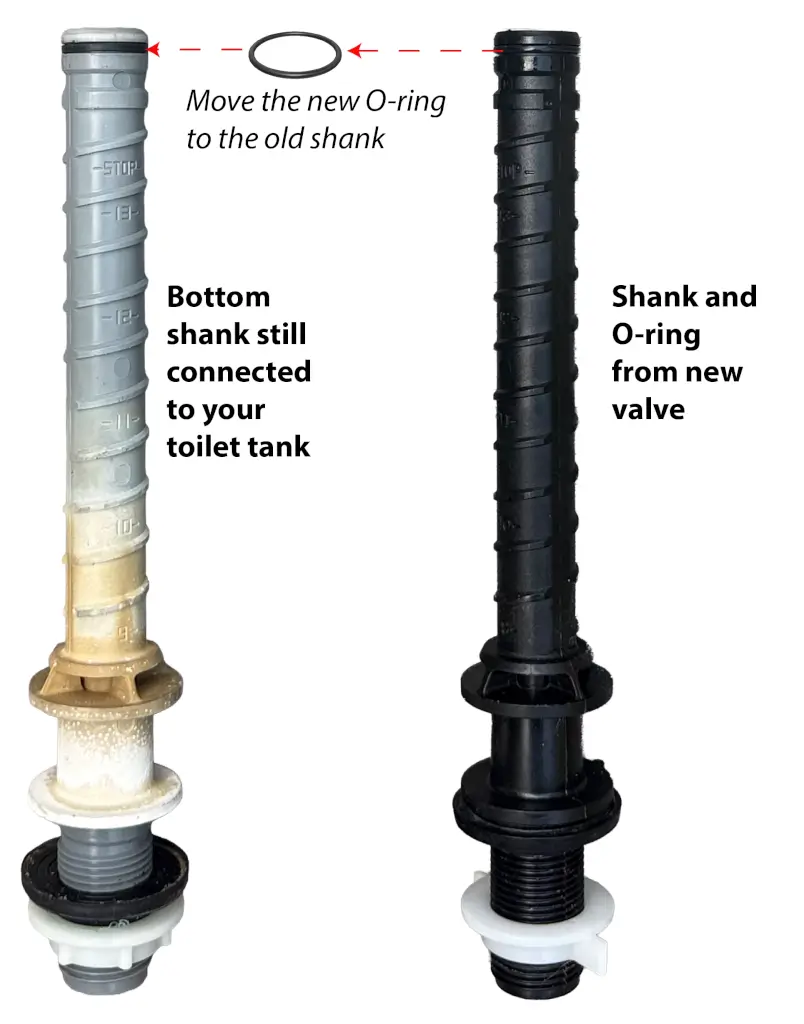
Move the O-ring from the new shank to the old shank
Step 6: Swap the new valve onto the old shank — Connect the new refill tube to the valve. Then push the valve down onto the old shank so the top of the cap is level with the top of your toilet tank.
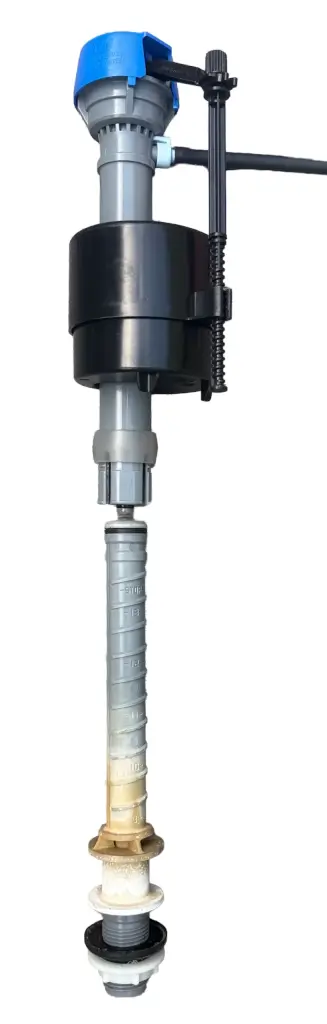
Step 7: Slide the locking ring down until it clicks into place.
Step 8: Arrange the refill tube so it will reach the overflow tube with the new air gap. Cut off any excess. Then connect the air gap to the refill tube and the air gap to the overflow tube.
Step 9: Turn on the water and adjust the tank fill level. Allow the tank to fill. Turn the adjustment screw counterclockwise to lower the water level and clockwise to raise it.
Common Mistakes When Changing a Toilet Fill Valve
Even experienced DIYers occasionally make mistakes.
Avoid these common problems:
• Installing the valve at the wrong height
• Forgetting to connect the refill tube
• Setting the water level too high
Signs You Need to Replace a Toilet Fill Valve
Common symptoms include:
• Toilet keeps running after flushing
• Tank refills very slowly
• Constant hissing or whistling sound
• Water level is too high or too low
• Fill valve leaks around the top or bottom
• Float sticks or won’t move freely
• Toilet won’t stop filling
If the flapper seals properly but the tank continues to refill, the fill valve is usually the component that needs replacement.
Final Thoughts
Learning how to replace a toilet fill valve is one of the most valuable plumbing repairs a homeowner can master. The repair requires very few tools, takes less than half an hour, and can eliminate running toilets, noisy refills, and excessive water consumption. By carefully replacing the fill valve in the toilet tank, setting the correct height, and properly adjusting the water level, you’ll restore dependable flushing performance while reducing water waste for years to come.
©, 2026 Rick Muscoplat
Posted on by Rick Muscoplat