
Harmonic Balancer Replacement Step-by-Step Guide
How to Replace a Harmonic Balancer Without Damaging the Engine
Quick Summary
When I perform a harmonic balancer replacement, I always inspect the crankshaft seal, crank angle sensor, and keyway before reinstalling anything. A failed harmonic balancer can cause engine vibration, belt noise, timing issues, and even crankshaft damage. Knowing how to properly replace or remove a harmonic balancer prevents damage to the crankshaft snout and avoids sensor calibration problems later. At the same time, correctly installing and calibrating a crank angle sensor is critical because modern engines rely on precise crankshaft position data for ignition and fuel injection timing, as well as misfire detection.
Over the years, I’ve replaced hundreds of harmonic balancers and crank sensors, and I can tell you this: most failures are due to improper installation, not defective parts.
Why Harmonic Balancer Replacement Matters
The harmonic balancer, also called the crankshaft damper, absorbs torsional vibration from the crankshaft. Without it, the crankshaft twists slightly every time a cylinder fires. Over time, those vibrations can destroy bearings, crack the crankshaft, or damage timing components.
When I diagnose a failing balancer, I commonly see:
• Wobbling crank pulley
• Squealing serpentine belts
• Engine vibration at idle
• Rubber separating from the balancer hub
• Timing irregularities
• Oil leaks near the front crank seal
Ignoring those symptoms can become extremely expensive.
How to Remove an Harmonic Balancer Safely
One of the biggest mistakes DIYers make when learning how to remove a harmonic balancer is trying to pry it off with screwdrivers or hammer on it directly. That can ruin the crankshaft thrust bearing or damage the balancer.
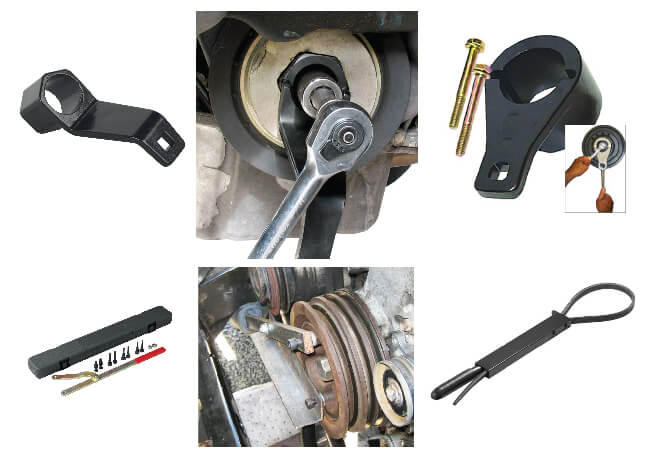
I always use a proper harmonic balancer puller.
Basic Removal Steps
1. Disconnect the Battery — Modern vehicles can accidentally crank while you’re working near the crank pulley.
2. Remove the Serpentine Belt — Use a belt tensioner tool or breaker bar to unload the tensioner.
3. Remove Obstructing Components — Depending on the engine, you may need to remove:
• Cooling fans
• Splash shields
• Radiator shroud
• Accessory brackets
4. Remove the Crankshaft Bolt — This is often the hardest step. Many crank bolts are torque-to-yield and extremely tight.
I usually use:
• High-torque impact gun
• Flywheel holding tool
• Crank holding fixture
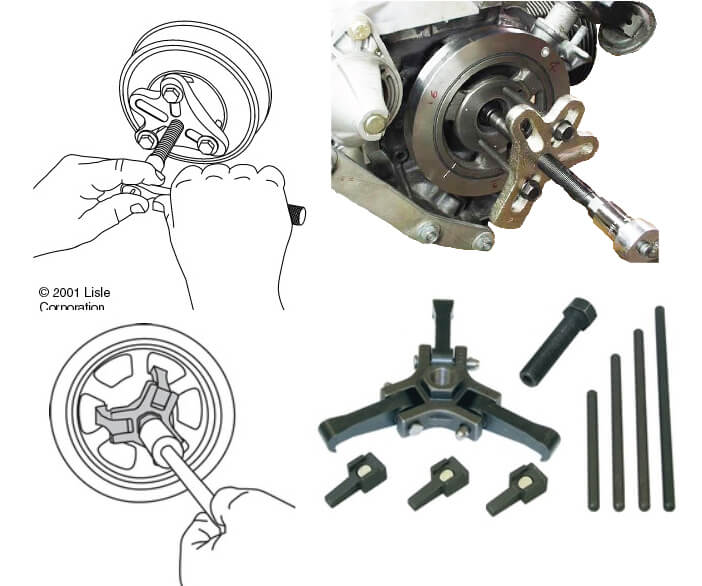
5. Use a Harmonic Balancer Puller — Thread the puller bolts evenly into the balancer and slowly draw the balancer off the crankshaft snout. Never pry against the timing cover.
NOTE: If you’re re-using the old harmonic balancer and simply replacing the crankshaft oil seal, check for a wear groove on the harmonic balancer. If you see this type of wear groove, you have two options: replace the harmonic balancer with a new part or install a harmonic balancer sleeve.
Install a harmonic balancer sleeve
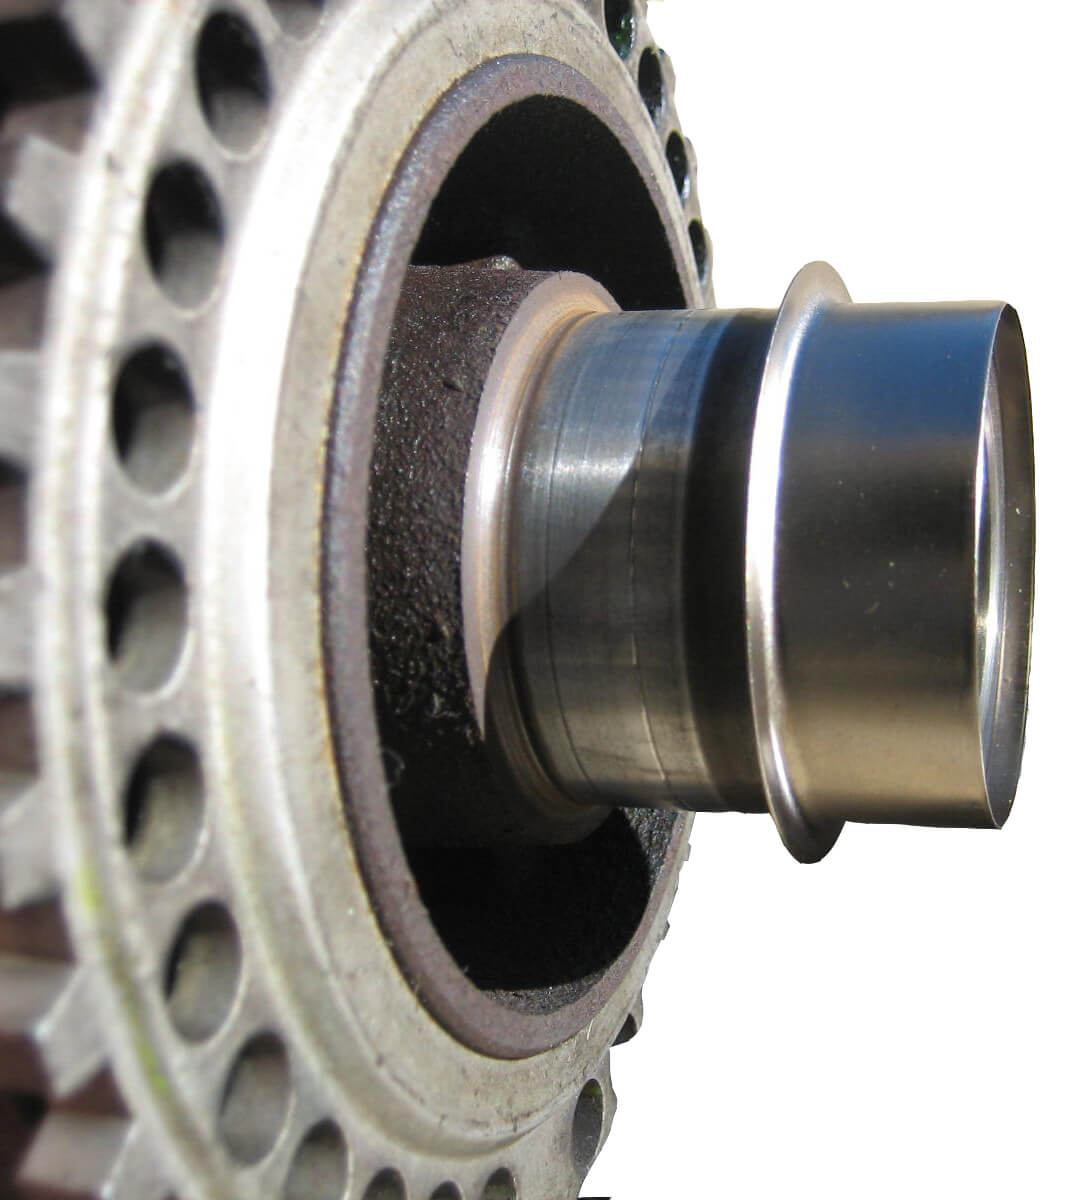
Buy a harmonic balancer sleeve repair kit and a new 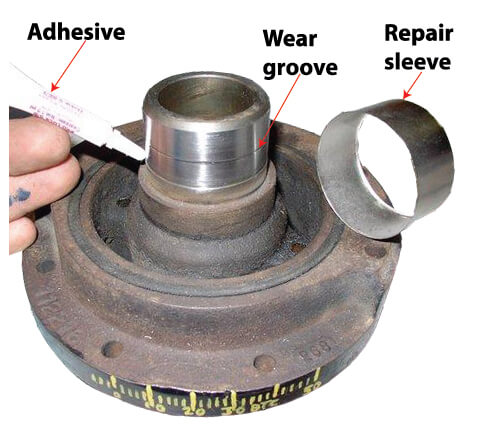 crankshaft oil seal from any auto parts store. You’ll get the repair sleeve, adhesive and an installation tool. Clean the wear groove and shaft with brake cleaner to remove all oil and dirt. Next, apply the adhesive to the shaft of the harmonic balancer. Then use the installation tool to drive the repair sleeve onto the shaft. Remove and replace the crankshaft oil seal. Lubricate the new seal and the outside of the repair sleeve with a light coating of clean engine oil. Re-install the harmonic balancer and torque the crankshaft bolt to spec.
 ©, 2017 Rick Muscoplat
Harmonic Balancer Replacement Tips I Always Follow
A successful harmonic balancer replacement involves more than swapping parts.
Before installation, I always inspect:
• Crankshaft keyway
• Woodruff key
• Front crank seal
• Timing cover wear
• Crankshaft snout scoring
If the old balancer failed catastrophically, metal damage can prevent the new balancer from seating properly.
How to Install a Harmonic Balancer Correctly
One thing I never do is hammer a balancer onto the crankshaft.
That can damage:
• Thrust bearings
• Crankshaft threads
• Internal engine components
Instead, I use a harmonic balancer installer tool.
• Proper Installation Process
• Lubricate the Crank Snout
• I apply a light coat of clean engine oil.
• Align the Keyway
• Carefully line up the balancer with the crankshaft key.
• Use an Installer Tool
The installer slowly presses the balancer into position without shock-loading the crankshaft.
• Torque the Crank Bolt Properly
Many engines require:
• Torque-to-yield procedures
• Angle torque specifications
• New crankshaft bolts
Always verify manufacturer specs.
Many modern engines will not even start if the crank angle sensor signal is incorrect.
Common Crank Angle Sensor Symptoms
• Intermittent stalling
• No-start conditions
• Random misfires
• Extended cranking
• Tachometer dropouts
• Check engine lights
Common codes include:
• P0335
• P0336
• P0016
How I Install and Calibrate a Crank Angle Sensor
On many engines, replacing the sensor alone is simple. Calibration is what causes trouble.
Installation Steps
• Disconnect the Battery — Prevents PCM damage.
• Remove the Old Sensor — Usually held by one small bolt.
• Inspect the Reluctor Wheel — A damaged reluctor ring creates false sensor readings.
• Install the New Sensor
I always check:
• Air gap clearance
• Connector condition
• Harness routing
Even slight misalignment can create intermittent failures.
Crankshaft Position Relearn Procedure
Many vehicles require a crankshaft position relearn after replacing:
• Crank angle sensor
• Harmonic balancer
• Crankshaft
• PCM
Without calibration, the PCM may misinterpret crankshaft speed fluctuations as misfires.
Depending on the manufacturer, I use:
• Factory scan tools
• Bidirectional scan tools
• Relearn procedures involving throttle snaps
This step is critical on many GM, Chrysler, Nissan, and Honda vehicles.
Final Thoughts
Knowing how to replace a harmonic balancer and properly install a crank angle sensor can prevent major drivability problems. I’ve seen engines ruined by improper balancer installation and countless false misfire codes caused by skipped crank relearn procedures.
The key is patience, proper tools, and following the correct torque and calibration procedures.
Do it correctly once, and the repair can last the life of the engine
©, 2017 Rick Muscoplat
Posted on by Rick Muscoplat