
Headlights Not Working: Step-By-Step Troubleshooting Guide
What To Check If Your Headlights Aren’t Working
If you find yourself in a situation where your headlights aren’t working, it’s crucial to diagnose and fix the problem as soon as possible. This article provides a comprehensive guide on what to check if your headlights aren’t working, helping you identify the issue and get back on the road safely.
Headlights Aren’t Working: The Four Most Common Causes
• Burned-out bulb
• Blown fuse
• Damaged headlight connector or wiring harness issue
• Inoperative headlight relay (if equipped) or faulty junction box
• Faulty headlight switch
• Body control module issue
Step 1: Check the headlight filament for signs of breakage
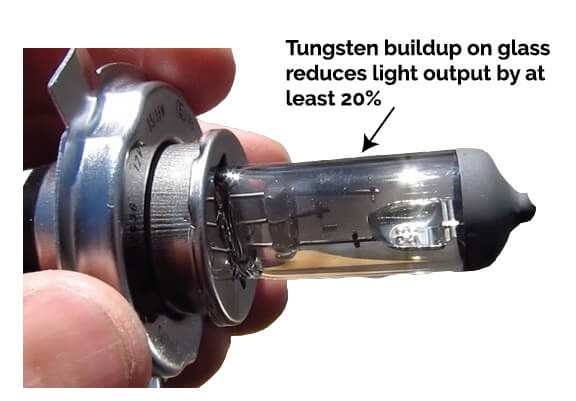
Check for a broken filament and tungsten buildup on the glass. Some headlight bulbs have two filaments; one for the low beam and the other for the high beam.
Visual Inspection: Turn off the vehicle and pop the hood to access the headlight assembly. Look at the bulb through the lens to see if the filament is broken or if there is any discoloration inside the bulb, such as blackening, which indicates a blown bulb.
Swap Bulbs: If only one headlight is out, swap the working bulb with the non-working one. If the previously working bulb doesn’t light up in the other socket, the issue may be with the bulb socket or wiring rather than the bulb itself.
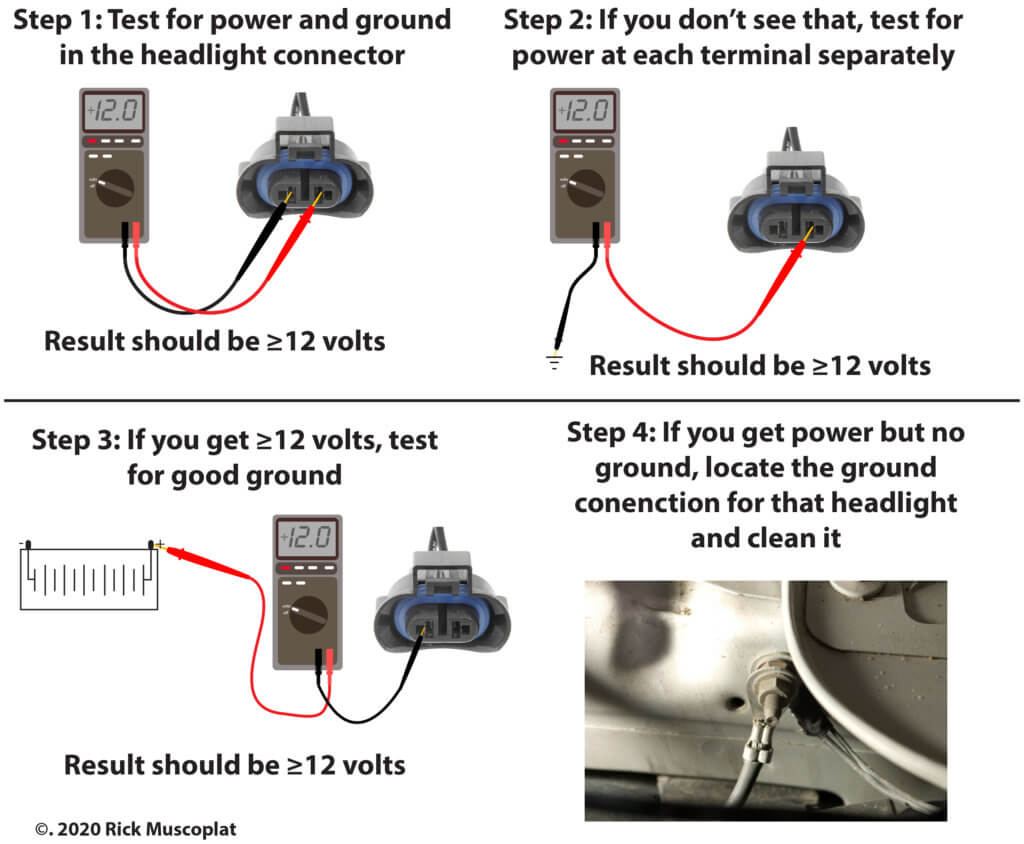
Step 2: Check for power and ground in the headlight connector
Set your meter to DC volts. Turn on the low beams. Connect the probes to the two terminals on a 2-terminal connector. If power and ground are present, your meter will read +12 or -12 volts (indicating the polarity is reversed). Reversed polarity doesn’t really matter here; the fact that it’s reading +12 or -12 volts confirms that the socket is getting power and ground.
Step 3: If you don’t get power at the headlight connector
• Check the headlight fuse. There may be one or several headlight fuses, depending on the year, make and model
• Check the headlight connector condition
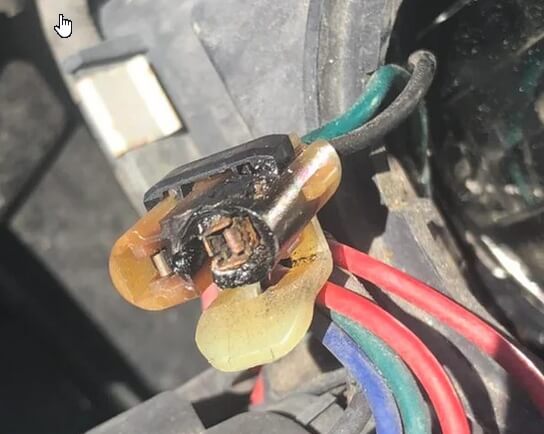 • Check the headlight connector for:
Melting, corrosion, or terminals pushed out the back of the connector. If you find any of those conditions, you’ll probably have to splice in a new headlight pigtail connector. Find a headlight pigtail at any auto parts store.
Melted headlight connectors are fairly common. They can be caused by excessive heat from the headlight bulb or undersized wiring from the factory. To prevent melting from reoccurring, splice in a new pigtail and then add a ceramic jumper. The ceramic jumper will handle the heat of the headlight bulb without melting. See this post for ceramic jumpers.
Step 4: Find out why you’re not getting power at the headlight connector
This is where it gets tricky. Here’s why.
1) The headlight power might be switched by a relay
In older vehicles, the headlight switch switched power to the headlights. However, in late-model vehicles, the headlight switch only provides power or ground to the headlight relay. It’s the relay that switches power to the headlights.
2) The headlight power might be switched by the Body Control Module
In other variations on late-model vehicles, the headlight switch is only an input to the body control module. The headlight switch acts as a “headlight request,” asking the BCM to turn on the headlights. The BCM then provides either power or ground to the headlight relay(s).
On the latest models, the headlight switch communicates with the BCM. The BCM communicates DIGITALLY with a smart junction box or an integrated power module (IPM). The SJB or IPM contains removable or permanently connected relays that switch either power or ground to the headlights.

You’ll need a wiring diagram to diagnose the headlight circuits on these models.
Here are some headlight troubleshooting tips:
• If your vehicle has an AUTO setting on the headlight switch, don’t use that setting for testing. Turn the headlight switch to LOW BEAMS. That will force the system to bypass the light sensor.
• If the vehicle has an AUTO setting, you’ll find a light sensor in the system. The light sensor is what the BCM relies on to know when to turn on the headlights. You MUST check out the signal from the light sensor to make sure the BCM is receiving the signal. If the BCM thinks it’s daylight, it won’t turn on the headlights automatically.
• If your vehicle has daytime running lights, the system often uses a DRL module to reduce voltage to the high beams. That extends their life. The DRL module often uses the light sensor, the shifter range selector, and the parking brake switch to determine when to turn on the DRL.
• In vehicles with a BCM or IPM, the control module deciphers whether the driver is requesting parking lights, low beams or high beams based on the voltage drop. The BCM or IPM provides a reference voltage to the headlight switch and the headlight switches contain series wired resistors that drop the reference voltage by a set amount depending on the position. Based on the return voltage, the BCM or IPM determines what the request is and then turns on the requested lights.
• To test the headlight switch in these models, you’ll need a shop manual and wiring diagram showing the expected voltages. If you have a bi-directional scan tool, you can switch to live data and read whether the BCM is receiving the correct input from the headlight switch. If it’s not getting the right signal, you’ll have to manually test the headlight switch and wiring harness.
• Test for the reference voltage to the headlight switch. Then, check for the return voltage. If it’s the expected voltage, then the problem is in the BCM or the relays.
• If the BCM IS receiving the proper signal from the headlight switch, then you’ll have to check the associated relays and wiring harness.
©, 2020 Rick Muscoplat
Posted on by Rick Muscoplat