
How to Replace a Trailer Wheel Bearing the Right Way
Common Mistakes When To Avoid When You Replace Trailer Wheel Bearings
Quick Summary
In this article, I’ll list the three most common mistakes DIYers make when replacing trailer wheel bearings.
1) Replacing the bearing but not the matching race
2) Not cleaning all the old grease from the hub
3) Applying grease to the edge of the lip seal on the new grease seal
4) Not packing bearings thoroughly enough
5) Packing the hub cavity with grease
6) Using the wrong type of grease
7) Damaging the new seal during installation by not using a seal driver or a properly-sized socket
8) Reusing old seals, cotter pins, or castle nuts instead of replacing them
9) Over-tightening the axle nut and not following the proper tighten-loosen-retighten procedure for proper bearing preload
10) Under-tightening the axle nut
Article
How to Replace a Trailer Wheel Bearing the Right Way (Step-By-Step Expert Guide)
I’ve worked on enough trailers to know this: wheel bearings don’t give second chances. When they fail, they fail hard. I’ve seen hubs welded to spindles, wheels come loose, and vacations ruined because someone rushed a trailer wheel bearing service job. So let me walk you through the right way to replace trailer wheel bearing components.
Why Proper Trailer Wheel Bearing Service Matters More Than You Think
Trailer service companies tell me that failure to properly grease or replace trailer bearings is the #1 cause of highway trailer failures. When arriving at the emergency, trailer service companies often find the wheel bearings overheated and seized to the axle, many times due to neglected or improper service.
In other words, if you’re going to replace trailer wheel bearing assemblies, do it completely—bearings, races, and seals. Installing new bearings on old races is one of the most common mistakes I see.
Step 1: Safe Lifting and Wheel Removal
Start the job by loosening the lug nuts on both sides while the tires are on the ground. Then, locate a floor jack under one side of the axle and raise the trailer. Next, secure the trailer using jack stands. Then you can remove the lug nuts and the wheel.
Step 2: Removing the Dust Cap and Hub the Smart Way
The hub dust cap comes off easier if you tap around the edge using a stiff putty knife and a hammer. That moves the dust cap out slightly so you can rock it off with Channelock pliers.
Next, remove the cotter key, axle nut, and washer. Pull the hub out slightly to dislodge the outer bearing. Put the bearing aside and spin the axle nut back on. Then pull the hub toward you until you feel the axle nut catch the inboard grease seal. Using a quick pull motion, pull the hub off the axle. The quick pull will remove the inboard grease seal and the bearing — no need for a grease seal puller!
Step 3: Remove and Replace the Races (Don’t Skip This)
This is where many DIYers cut corners. If you’re doing a proper trailer wheel bearing service, you remove the races. Period.
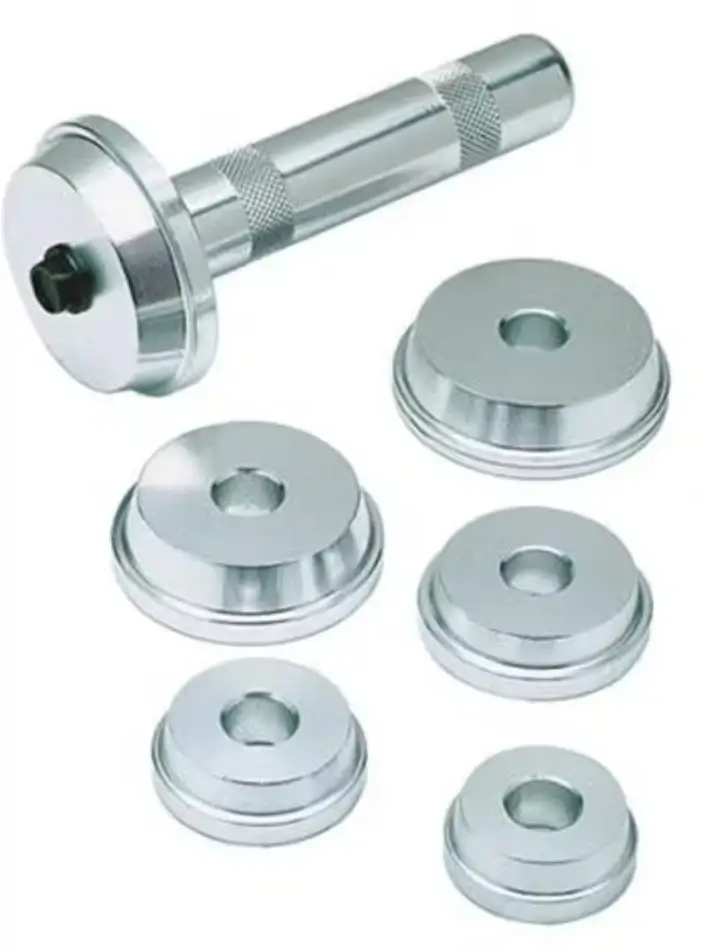
Bearing race and seal driver tool
Many DIYers think the races are pressed into the hub.
They’re not. They’re tapped into place, and you can remove them using a flat punch and a hammer. Place the flat punch in the hub cutouts and work evenly around the race until it walks out of the hub. Once both races are out, clean the hub thoroughly with brake cleaner and inspect for burrs. Also, clean all the grease from the hub cavity.
Lightly grease the bore prior to installing the new races. Then tap the race into place using a race driver tool or a properly sized socket. Make sure the race is fully seated against the hub shoulder.
Step 4: Packing Bearings Correctly
Many companies make bearing packing devices. But you can do the same job without any tools. Scoop out a generous dollop of grease and place it in the palm of your hand. Next, slap the bearing into the grease, forcing it into the bearings and cage. Rotate and repeat until the entire bearing is filled with grease. Place the greased bearing on a fresh paper towel until you’re ready to install it.
How well you pack the bearing determines trailer wheel bearing job will last.
Step 5: Installing the Inner Bearing and Seal
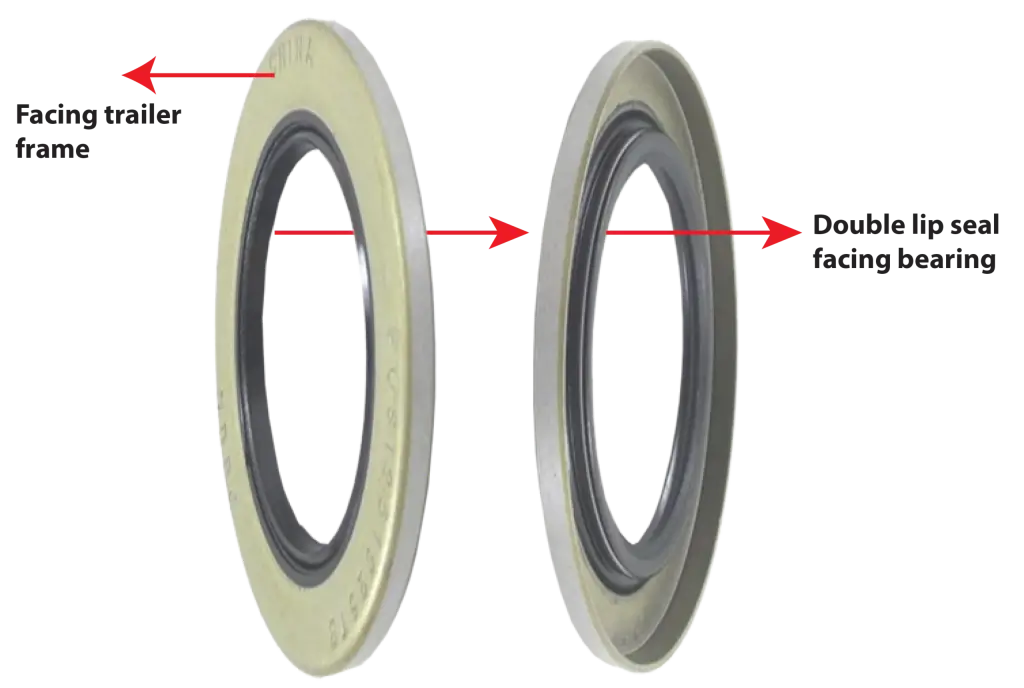
Place the greased bearing into the hub, seating it against the new race. Then orient the new double-lip grease seal with the cupped side facing the bearing. DON’T apply grease to the lip of the grease seal. Some grease seal manufacturers recommend applying a light coat of fresh motor oil to the lip, but never grease. That can cause an immediate grease leak.
Then, using a seal installer, drive it into place until the edge is fully seated in the hub.
Step 6: Inspect and Prepare the Spindle
Clean the spindle completely before sliding the hub back on. Inspect the seal journal carefully for any grooves that could cause a grease seal leak. If you find any, polish them with fine emery cloth. Keep in mind that a damaged spindle can ruin even the best wheel bearing installation.
Step 7: Installing the Hub and Setting the Bearing Preload
This is the most misunderstood part of any trailer wheel bearing service. Proper bearing service requires two tightening sequences; otherwise, the preload will be too loose. To assemble correctly, install the outer bearing, washer, and spindle nut. Then, tighten the nut and spin the wheel to move some of the grease around the bearing. Next, tighten the axle nut to 25 ft/lbs. Finally, back the nut off roughly 1/8 turn. That will provide roughly 0.001″ to 0.005″ end play, the amount needed to prevent overheating. If you crank the nut too tight, you’ll destroy your new bearings.
Step 8: Cotter Pin and Dust Cap or Bearing Buddy
Install a new cotter pin and bend it securely. Then clean the old grease from the dust cap and reinstall it.
Step 9: Reinstall the Wheel and Torque the Lug Nuts to Spec
After reinstalling the wheel, snug the lug nuts, lower the trailer so the tire just touches the ground, and torque them in a crisscross pattern to spec.
Final Thoughts from Experience
Your trailer bearings carry the full weight of your load. If you don’t want to launch your boat into the next county, treat bearing replacement as if it’s critical engine work, because those bearings are critical to the operation of your trailer.
Posted on by Rick Muscoplat